How Far from Edge to Screw Drywall: Essential Pro Placement
Table of Contents
- Introduction
- The Foundation of Fastening: Understanding Drywall Screw Edge Distance
- The Anatomy of a Drywall Screw: Types and Applications
- Best Practices for Drywall Screw Placement and Installation
- The Professional Edge: Advanced Considerations for Procurement Managers
- Common Drywall Installation Mistakes and How to Avoid Them
- Conclusion
- FAQ
Every seasoned procurement manager, MRO buyer, and design engineer understands that success in construction and manufacturing hinges on precision—even down to the seemingly minute details. Overlooking fundamental best practices can lead to costly rework, project delays, and compromised structural integrity. Consider, for instance, the foundational task of installing drywall. While it may appear straightforward, the precise placement of each screw is critical. A misplaced drywall screw isn't just an aesthetic flaw; it’s a structural vulnerability, a potential source of future callbacks, and a drain on resources. This issue extends beyond just residential projects, impacting commercial builds, industrial facility upgrades, and even specialized architectural designs where optimal performance and durability are paramount.
The purpose of this comprehensive guide is to demystify the exact science behind drywall screw placement, particularly focusing on the crucial "how far from edge to screw drywall" question. We will delve into the technical specifications, the 'why' behind the industry standards, and the practical implications for project longevity and cost efficiency. Furthermore, we will explore how strategic sourcing, prioritizing verified American-made components, and leveraging innovative procurement platforms like Maden.co can enhance your supply chain resilience and overall project success. Our aim is to equip you with the knowledge to not only avoid common pitfalls but also to procure the highest quality fasteners, ensuring every project stands the test of time.
Introduction
In the intricate world of construction and facility management, where deadlines are tight and quality is non-negotiable, the reliability of every component matters. One often underestimated detail, yet critical for the structural integrity and finish quality of any interior space, is the proper fastening of drywall. Incorrect screw placement can lead to cracked boards, visible imperfections, and a compromised finish, necessitating expensive repairs and delaying project completion. For professionals responsible for large-scale procurement or MRO, understanding these nuances is not just about avoiding immediate problems; it's about safeguarding long-term investments and ensuring operational efficiency.
This article will guide you through the precise guidelines for determining how far from the edge to screw drywall, explaining the technical reasons behind these recommendations. We'll explore the various types of drywall screws, their applications, and the best practices for installation that prevent common issues like screw pops and damaged sheets. Beyond the installation techniques, we will connect these foundational principles to the broader strategic implications for procurement, emphasizing the value of sourcing high-quality, American-made materials. We believe that by understanding and adhering to these standards, and by partnering with reliable suppliers, you can significantly enhance the durability, safety, and overall success of your projects. Our commitment at Maden.co, as America's premier B2B marketplace for U.S.-manufactured products, is to empower industrial buyers with access to the highest quality components that underscore American Manufacturing Pride, ensuring industrial excellence in every build.
The Foundation of Fastening: Understanding Drywall Screw Edge Distance
The question of "how far from edge to screw drywall" is not arbitrary; it's a critical dimension dictated by the material properties of gypsum board and the mechanics of fastener engagement. Gypsum, while a robust core for paneling, is inherently brittle, especially at its edges. Proper screw placement is essential to prevent the material from crumbling, ensuring a secure hold that contributes to the overall structural integrity of the wall or ceiling system.
Why Edge Distance Matters: Preventing Cracks and Compromises
Imagine a piece of gypsum board being fastened to a stud. If a screw is driven too close to the factory-tapered edge or a field-cut edge, the pressure exerted by the screw head and the rotation of the threads can easily fracture the gypsum core. This is particularly true when the screw attempts to penetrate both the paper facing and the gypsum core simultaneously near the unsupported edge. The result is often a "blown out" edge, where the gypsum crumbles, leaving the screw without proper purchase and the drywall panel insecurely attached. This instability not only leads to unsightly cracks and screw pops in the finished surface but also weakens the entire assembly, potentially leading to panels detaching or sagging over time.
Conversely, placing a screw too far from the edge can also be problematic. While it mitigates the risk of edge blow-out, it can leave the very edge of the drywall panel unsupported. This lack of support can allow the edge to flex or warp, leading to joint compound cracks or visible seams in the finished wall. The ideal placement strikes a balance, providing maximum holding power without damaging the board.
The Standard Recommendation: 3/8" to 1/2"
Industry best practices, supported by building codes and manufacturer guidelines, consistently recommend an edge distance of 3/8 inch to 1/2 inch (approximately 9.5 mm to 12.7 mm) from the edge of the drywall sheet to the center of the screw head. This measurement applies to both the factory-tapered edges and any field-cut edges.
- 3/8 inch (minimum): This is generally considered the absolute minimum to ensure sufficient gypsum material surrounds the screw for optimal grip and to prevent the board from crumbling under the pressure of the screw head.
- 1/2 inch (ideal): Many professionals aim for 1/2 inch as it provides a slightly larger margin of safety, especially when dealing with slightly inconsistent framing or less-than-perfect board edges. It offers robust support without risking edge damage.
Adhering to this precise range is a hallmark of industrial excellence and a testament to rigorous quality control on any project. Neglecting this seemingly small detail can cascade into significant material waste, increased labor costs for rework, and ultimately, a diminished reputation for quality. For design engineers specifying materials or procurement managers sourcing for large-scale projects, understanding these fundamental principles is key to ensuring that the supplied components meet the practical demands of installation and long-term performance.
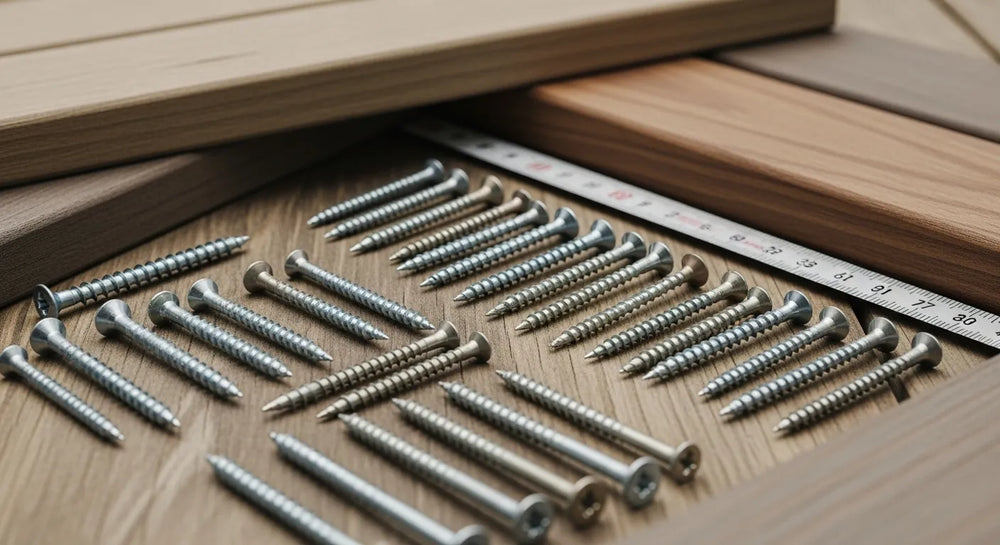
The Anatomy of a Drywall Screw: Types and Applications
Understanding screw placement is only half the battle; selecting the correct type of drywall screw is equally crucial. Not all screws are created equal, and choosing the right fastener for the specific application ensures maximum holding power, prevents damage, and contributes to the overall durability of the installation.
Coarse Thread vs. Fine Thread: A Key Distinction
The primary distinction among drywall screws lies in their thread pattern:
- Coarse Thread Drywall Screws: These screws feature widely spaced, aggressive threads designed to grip effectively into the softer fibers of wood framing members (studs and joists). The coarse threads create strong engagement with wood, resisting pull-out and providing a secure hold. They are the most common type used in residential and light commercial construction where wood framing is prevalent. When your project demands reliable fastening into wood, you might consider options such as these 6 x 1-1/4 Coarse Thread Drywall Screws, designed to deliver superior grip and stability for standard drywall applications.
- Fine Thread Drywall Screws: In contrast, fine thread screws have tighter, more numerous threads. These are specifically engineered for fastening drywall to light-gauge metal studs, typically found in commercial buildings and some modern residential constructions. The fine threads bite cleanly into the thinner metal, creating a strong, secure connection without stripping the pilot hole. For scenarios involving metal studs, precision is paramount, and a product like the 6 x 1 Fine Thread Drywall Screw ensures a secure, lasting hold without compromising the integrity of the metal framing.
Length Considerations for Different Applications
Drywall screws come in various lengths, typically ranging from 1 inch to 4 inches, with 1-1/4 inches and 1-5/8 inches being the most common for single-layer drywall applications. The appropriate length depends on the thickness of the drywall and the type of framing material.
- 1-1/4 inch screws: Ideal for fastening 1/2-inch thick drywall to wood studs. This length provides adequate penetration into the stud (typically about 7/8 inch to 1 inch), ensuring a strong grip.
- 1-5/8 inch screws: Commonly used for 5/8-inch thick drywall (often specified for fire-rated assemblies or enhanced sound insulation) to wood studs, or for fastening 1/2-inch drywall to metal studs.
- Longer screws (2 inches, 3 inches, 4 inches): Reserved for specialized applications such as fastening multiple layers of drywall, attaching furring strips, or securing specialized panels to deeper framing. For heavier duty applications, or when fastening multiple layers of gypsum board, a robust fastener like the 8 x 4 Drywall Screw offers the necessary length and strength to ensure a deep and secure anchor.
Material and Coating: Durability and Corrosion Resistance
Most drywall screws are made from hardened steel, making them strong enough to penetrate framing without bending or breaking. They typically feature a black phosphate coating, which provides a degree of corrosion resistance and helps the screw blend in with the drywall surface before finishing. For applications in moisture-prone areas (like bathrooms or basements), specialized corrosion-resistant screws (often galvanized or coated with advanced polymers) may be required to prevent rust and staining, which would otherwise compromise the aesthetic and structural integrity of the installation.
Sourcing these specific types of fasteners from a reliable marketplace like Maden.co not only ensures you receive products engineered to precise specifications but also supports our commitment to American Manufacturing Pride. Our extensive network of over 800 verified U.S. manufacturers offers access to more than 2.5 million American-made products, ensuring that industrial buyers can find the exact components they need, precisely when they need them.
Best Practices for Drywall Screw Placement and Installation
Beyond the critical edge distance, several other best practices contribute to a flawless and durable drywall installation. Adhering to these guidelines minimizes rework, enhances efficiency, and ensures a superior finish, which translates directly into cost savings and client satisfaction for procurement managers and project leads.
Consistent Screw Spacing
Consistent spacing is vital for evenly distributing the load and preventing sagging or bowing of the drywall panels.
- Wall Studs: Screws should be spaced approximately 16 inches (40.6 cm) apart along the studs in the field of the board.
- Ceiling Joists: For ceilings, which bear more weight and are subject to greater deflection, screws should be spaced closer, typically 12 inches (30.5 cm) apart along the joists.
- Edges and Joints: Along the edges and at joints where two panels meet, screws should be spaced every 8 inches (20.3 cm). This increased density provides additional reinforcement where the board is most vulnerable and where joint compound will be applied. It is crucial to ensure that screws at tapered edges and butt joints penetrate into the center of the framing member to provide solid backing for finishing materials.
Double-Screwing at Edges and Joints
For enhanced stability and to prevent "ridging" at seams, some professionals advocate for a "double-screwing" technique at drywall edges and joints. This involves placing two screws about 1 to 1.5 inches apart, following the standard 8-inch spacing pattern along the edge. The second screw provides extra compression and helps to flatten the board more effectively against the framing, creating a more stable surface for finishing. While this adds a slight amount of material and labor, it can be a worthwhile investment for high-traffic areas or where a superior finish is absolutely critical.
The Dimpling Technique: Recessing Screw Heads
Properly recessing the screw head, also known as "dimpling," is fundamental. The screw head should be driven just below the surface of the paper, creating a slight indentation (a "dimple") without breaking the paper facing. This dimple provides a small cavity for joint compound, allowing for a smooth, flush finish that conceals the screw head entirely.
- Over-driving: Driving the screw too deep will break the paper facing, reducing the screw's holding power significantly. This creates a weak point and can lead to screw pops. A broken paper facing means the screw is essentially useless for holding the board.
- Under-driving: Leaving the screw head proud of the surface makes it impossible to achieve a smooth finish, as the head will protrude through the joint compound and paint.
Using a drywall screw gun or a drill with a dedicated drywall screw setter bit is highly recommended. These tools are designed with an adjustable clutch or depth stop that automatically sets the screw to the perfect depth, preventing both over-driving and under-driving and ensuring consistent dimpling across the entire project.
Avoiding Screw Pops
Screw pops occur when the drywall moves relative to the framing, causing the screw head to push through the finishing compound and paint, becoming visible as a small bump. This is often a symptom of several underlying issues:
- Improper screw depth: As discussed, over-driving compromises holding power.
- Framing movement: Lumber can shrink or warp as it dries, causing the drywall to shift. Using properly seasoned lumber or metal studs can mitigate this.
- Inadequate fastener length: Screws that are too short won't get sufficient purchase in the framing, allowing movement.
- Drywall not fully seated: If the drywall isn't pressed firmly against the framing when the screw is driven, a gap can form, leading to future movement.
Careful adherence to all placement guidelines, using the correct screw types and lengths, and ensuring the drywall is tight against the framing during installation are the best defenses against screw pops.
Strategic Procurement for Quality and Efficiency
For procurement managers overseeing industrial or commercial projects, the choice of fasteners extends beyond immediate cost. The hidden costs of callbacks, rework, and structural deficiencies far outweigh any upfront savings from inferior materials. This is where strategic sourcing through a platform like Maden.co becomes invaluable. We focus on connecting you with verified U.S. manufacturers, ensuring that every drywall screw, every bolt, and every component meets rigorous American standards for quality and performance. Our mission is to democratize access to American manufacturing, making it as accessible and convenient as any global alternative, thereby driving America's manufacturing revival. You can learn more about our commitment to these values and our vision to become the definitive platform for American-made products on our About Us page.
The Professional Edge: Advanced Considerations for Procurement Managers
Beyond the technicalities of installation, procurement managers, MRO buyers, and business owners face broader strategic decisions that impact project success. The choice of suppliers and the quality of materials have direct implications for Total Cost of Ownership (TCO), supply chain resilience, and compliance.
Enhancing Total Cost of Ownership (TCO)
The upfront cost of a box of drywall screws is negligible in the grand scheme of a multi-million-dollar construction project. However, the long-term impact of choosing substandard fasteners can be substantial. Poor quality screws or improper installation leading to failures can result in:
- Rework Costs: Labor and material expenses for fixing screw pops, cracked drywall, or loose panels.
- Schedule Delays: Rework pushes project timelines, incurring penalties and delaying revenue.
- Reputational Damage: A compromised finish or structural issues can harm a company's reputation, impacting future bids and client relationships.
- Warranty Claims: Manufacturers and contractors often bear the cost of failures post-completion.
By investing in high-quality, U.S.-made drywall screws and ensuring adherence to best practices, procurement teams actively reduce TCO. These are not merely expenses but investments in durability, reliability, and ultimately, profitability. Maden.co's commitment to Industrial Excellence means that the products you source through our platform contribute to minimizing these hidden costs.
Building Supply Chain Resilience with American Manufacturing
In an increasingly unpredictable global economy, supply chain resilience is paramount. Relying on distant, complex supply chains for critical components can lead to:
- Volatile Lead Times: Geopolitical events, natural disasters, or international shipping disruptions can cause unpredictable delays.
- Quality Control Issues: Less oversight in offshore manufacturing can lead to inconsistent product quality, resulting in higher defect rates.
- Increased Logistics Costs: Fluctuating shipping rates and tariffs can erode profit margins.
Sourcing U.S.-made products significantly mitigates these risks. At Maden.co, we champion American Manufacturing Pride and Supply Chain Transparency. By connecting industrial buyers directly with over 800 verified U.S. manufacturers, we ensure shorter lead times, consistent quality, and reduced logistical complexities. This local sourcing strategy strengthens domestic industries, provides greater visibility into the manufacturing process, and ultimately creates a more reliable and responsive supply chain for your organization. For procurement managers under pressure to source a specific DIN 931 compliant hex cap screw, a design engineer needing specific material certifications for a new prototype, or an MRO buyer facing an unexpected equipment breakdown, the ability to quickly find and finance a verified, U.S.-made part on Maden.co is a game-changer. We empower you to build a supply chain that is robust, ethical, and strategically sound. If you are a U.S. manufacturer, we invite you to join our network and contribute to this vital initiative; you can register as a vendor and join the American manufacturing revival today.
Ensuring Compliance with Industry Standards
From ASTM International standards for gypsum board and fasteners to local building codes, compliance is non-negotiable. Procurement managers must ensure that all sourced materials meet or exceed these required specifications. U.S. manufacturers typically operate under stringent regulatory frameworks, making it easier to verify compliance and obtain necessary certifications. Our platform ensures that the American-made products you procure meet these exacting benchmarks, providing peace of mind and reducing regulatory risks.
Leveraging Digital Innovation for Efficient Procurement
Maden.co embodies Digital Innovation by transforming the traditional B2B procurement process. Our platform offers a seamless experience for finding and purchasing industrial components. Instead of sifting through countless catalogs or waiting for quotes, buyers can access a vast catalog of over 2.5 million American-made products with clear specifications and availability. This drastically reduces procurement friction and saves invaluable time for busy professionals.
A key differentiator that further streamlines the capital-intensive projects of our clients is our "Instant Financing" option. This isn't just a payment method; it's a strategic financial tool designed to empower procurement managers and business owners. It allows you to manage cash flow effectively, make larger-volume purchases without immediate capital strain, and keep projects moving forward without financial bottlenecks. You can apply for Instant Financing at checkout to streamline your capital-intensive projects, ensuring that vital procurements are never delayed by financing hurdles. If you have specific sourcing questions or need assistance navigating our platform, our team is ready to help; you can easily contact us for support.
Common Drywall Installation Mistakes and How to Avoid Them
Even with the best intentions and quality materials, mistakes can happen. Recognizing common errors related to drywall screw placement and installation is the first step toward preventing them, ensuring a professional and durable finish.
Over-driving or Under-driving Screws
- The Mistake: As discussed, over-driving damages the paper facing and compromises holding power; under-driving leaves screw heads protruding.
- The Fix: Always use a drywall screw gun or a drill with a dedicated clutch/depth setter. These tools are specifically designed to stop the screw at the perfect depth, creating a consistent dimple without breaking the paper. Regular inspection during installation ensures proper depth.
Improper Edge Distance
- The Mistake: Placing screws too close to the edge (less than 3/8 inch) leads to crumbling gypsum, loose panels, and visible cracks.
- The Fix: Consistently measure and mark screw placement, especially along cut edges. Train installers on the critical 3/8-inch to 1/2-inch guideline and provide clear visual aids if necessary. Emphasize that quality over speed is essential for edge integrity.
Inconsistent Screw Spacing
- The Mistake: Random or widely spaced screws can lead to unsupported sections of drywall, causing bowing, sagging, or cracks, particularly on ceilings.
- The Fix: Establish clear spacing guidelines (16 inches for walls, 12 inches for ceilings, 8 inches at edges/joints) and use a measuring tape or marking tools to ensure consistency. Spot checks during installation can catch and correct this issue early.
Using the Wrong Screw Type
- The Mistake: Using coarse-thread screws on metal studs can lead to stripped holes and poor grip. Using fine-thread screws on wood can result in less effective bite and weaker hold.
- The Fix: Clearly identify the framing material (wood or metal) before starting. Stock both coarse-thread and fine-thread screws, ensuring the correct type is used for each specific application. For example, relying on our selection of 6 x 1 Fine Thread Drywall Screws for metal applications and 6 x 1-1/4 Coarse Thread Drywall Screws for wood framing ensures optimal performance.
Not Fully Seating the Drywall Against the Framing
- The Mistake: If there's a gap between the drywall and the framing when the screw is driven, the screw may not pull the board tight, leaving a void that can lead to movement and screw pops later.
- The Fix: Ensure the drywall panel is held firmly against the studs or joists during fastening. Applying slight pressure to the board while driving the screw helps to seat it properly. Using extra hands or a drywall lift can aid in this process, especially for ceiling installations.
Skipping Studs or Joists
- The Mistake: Accidentally missing a framing member means the screw is driven into empty space, providing no structural support for the drywall.
- The Fix: Use a stud finder to accurately locate and mark all framing members. Draw light pencil lines or use a chalk line across the drywall panel to indicate the center of each stud or joist, providing a clear target for screw placement.
Addressing these common mistakes through proper training, material selection, and rigorous quality control during installation will significantly improve the outcome of any drywall project, leading to more durable surfaces and fewer costly repairs. Maden.co’s commitment to Customer Empowerment extends to providing resources and access to quality materials that help avoid these pitfalls, ensuring your teams have the best American-made products for the job.
Conclusion
The seemingly small detail of "how far from edge to screw drywall" exemplifies a broader truth in industrial procurement and project management: precision and quality in foundational components yield disproportionately large returns in structural integrity, longevity, and overall cost efficiency. Adhering to the 3/8-inch to 1/2-inch edge distance, coupled with proper screw selection and installation techniques, is not just a best practice; it is a fundamental requirement for achieving durable, blemish-free finishes that stand the test of time.
For procurement managers, MRO buyers, and business owners, the implications of these principles extend far beyond the immediate task of drywall installation. They underscore the critical importance of a strategic procurement approach that prioritizes high-quality, reliable, and compliant materials. By choosing American-made components, you not only ensure adherence to stringent quality standards but also build a more resilient and transparent supply chain, minimizing risks and enhancing your Total Cost of Ownership.
At Maden.co, we are dedicated to being your strategic partner in this endeavor. Our platform provides unparalleled access to over 2.5 million American-made products from 800+ verified U.S. manufacturers. We champion Digital Innovation, Supply Chain Transparency, and Industrial Excellence to simplify your procurement process and empower your projects. America's manufacturing revival is here, and we invite you to be a part of it.
Don't let overlooked details compromise your next project. Explore our extensive catalog today to discover the vast array of high-quality, U.S.-manufactured components available, from essential fasteners like 6 x 1-1/4 Coarse Thread Drywall Screws and 6 x 1 Fine Thread Drywall Screws to specialized 8 x 4 Drywall Screws for more demanding applications. Leverage the power of our platform, and remember, you can apply for Instant Financing at checkout to streamline your capital-intensive projects, ensuring that your procurement challenges are not just met, but overcome with confidence and efficiency.
FAQ
Q1: What is the ideal distance from the edge of the drywall to place a screw?
A1: The industry standard and recommended distance is between 3/8 inch and 1/2 inch (approximately 9.5 mm to 12.7 mm) from the edge of the drywall sheet to the center of the screw head. This applies to both factory-tapered edges and field-cut edges, ensuring maximum holding power without causing the gypsum to crumble.
Q2: Why is it important not to place drywall screws too close to the edge?
A2: Placing screws too close to the edge of the drywall can cause the brittle gypsum core to crack or crumble, weakening the board's attachment to the framing. This leads to insecure panels, potential screw pops, and costly repairs, compromising the structural integrity and aesthetic finish of the wall or ceiling.
Q3: What's the difference between coarse-thread and fine-thread drywall screws, and when should each be used?
A3: Coarse-thread drywall screws have widely spaced threads designed for strong grip in wood framing (studs and joists). Fine-thread drywall screws have tighter threads and are specifically engineered for fastening drywall to light-gauge metal studs. Using the correct thread type for your framing material is crucial for optimal holding power and preventing damage.
Q4: How can I prevent "screw pops" in drywall?
A4: Preventing screw pops involves several best practices: ensure screws are driven to the correct depth (dimpled, not over-driven or under-driven), use the appropriate screw length and type for the application, make sure the drywall is pressed firmly against the framing during installation, and consider using properly seasoned wood or metal studs to minimize framing movement.


