How to Fix Holes from Drywall Anchors: Pro Guide
Table of Contents
- Introduction
- Understanding the Root Cause: Why Drywall Anchors Fail
- A Step-by-Step Guide to Professional Drywall Repair
- Prevention is the Best Policy: Sourcing the Right Anchors for Future Success
- Strategic Procurement: Managing Costs and Cash Flow for MRO Supplies
- Building the Future: Strengthening America's Industrial Base
- Conclusion
- Frequently Asked Questions (FAQ)
Introduction
A hole left by a failed drywall anchor seems like a minor nuisance. For a maintenance, repair, and operations (MRO) manager, a facilities director, or a project contractor, however, that small crater in the wall represents much more. It’s a visible symptom of a potential breakdown in process—a sign of an installation failure, a substandard component, or a mismatch between hardware and application. The direct cost of patching the wall is trivial. The true cost is measured in labor hours for the repair, the disruption to a professional environment, potential safety liabilities, and the recurring expense of addressing the same problem again and again. It's a small issue that telegraphs a larger operational challenge.
This article moves beyond simple DIY patching tutorials. We will provide a comprehensive, professional-grade framework for addressing the aftermath of failed drywall anchors. We will detail the technical steps for achieving a flawless, durable repair suitable for any commercial or industrial setting. More critically, we will explore the root causes of these failures and outline a strategic approach to procurement that prevents them from happening in the first place.
Our focus is on transforming this common maintenance task from a reactive chore into a proactive strategy. By understanding the principles of proper repair and, more importantly, by committing to sourcing high-quality, American-made components, you can enhance the safety, integrity, and long-term value of your facilities. This is about elevating a simple maintenance task into a standard of industrial excellence.
Understanding the Root Cause: Why Drywall Anchors Fail
Before any spackle is applied, a proper diagnosis is essential. A recurring issue with anchors pulling out of drywall is rarely a fluke; it points to a specific failure point in material selection, component quality, or installation technique. Addressing the symptom—the hole—without understanding the cause ensures the problem will return. In a professional context, this means repeated labor costs, potential damage to mounted equipment, and a compromised environment.
Material Mismatch: The Wrong Anchor for the Job
The single most common cause of anchor failure is using a component that is not rated for the load it is expected to bear. This goes beyond a simple weight rating; it involves understanding the forces at play and the specifications of the hardware.
- Load Dynamics: Anchors are rated for two primary types of force. Tensile strength refers to the anchor's resistance to being pulled straight out of the wall. Shear strength is its ability to resist a downward or sideways force parallel to the wall surface. A heavy, shallow object like a large whiteboard exerts mostly shear force, while a deep shelf with items placed at its edge exerts significant tensile force. Using an anchor with a high shear rating for a high-tensile-load application is a recipe for failure.
- Application Context: The demands within a commercial space are vastly different from those in a residential one. Mounting a fire extinguisher cabinet, securing heavy-duty shelving in a storage room, or installing large-format digital signage requires anchors with verified load capacities. A procurement manager must ensure that the sourced components have clear, accessible specification sheets that detail these capacities, a level of transparency often missing from generic, bulk-imported hardware.
The Quality Variable: The True Cost of Inferior Hardware
In the world of fasteners and MRO components, not all parts are created equal. The pressure to reduce upfront costs can lead procurement teams to source seemingly identical anchors from the lowest bidder. This approach, however, often ignores the Total Cost of Ownership (TCO) by inviting premature failure.
Inferior anchors, typically sourced through opaque global supply chains, suffer from several common defects:
- Material Degradation: Low-grade plastic can become brittle over time, especially when exposed to fluctuations in temperature and humidity common in commercial buildings. A once-secure anchor can crack and fail without warning.
- Inconsistent Manufacturing: Poor molding processes can result in anchors with weak points, thin walls, or incomplete threads. Similarly, metal anchors made from soft, low-quality alloys can deform under load or strip easily during installation.
- Lack of Traceability: When an anchor fails, is there a clear path to determine its origin, material composition, or manufacturing lot? With most bulk-imported hardware, the answer is no.
This is precisely the challenge our mission at Maden.co is designed to solve. We believe in democratizing access to superior, American-made products by creating a transparent link between industrial buyers and a network of over 800+ verified U.S. manufacturers. Our commitment to American Manufacturing Pride means that when you source a component through our platform, you are investing in quality, consistency, and a traceable supply chain. You can learn more about our mission to champion American manufacturing and build a more resilient industrial base here.
Installation Errors: Technique Matters
Even the highest-quality anchor will fail if installed improperly. For maintenance teams and contractors, standardizing installation procedures is critical for ensuring consistency and safety.
- Incorrect Pilot Hole: Drilling a pilot hole that is too large will prevent the anchor from expanding properly and gripping the drywall. A hole that is too small can damage the anchor during insertion or cause the drywall to crack and weaken around the installation point.
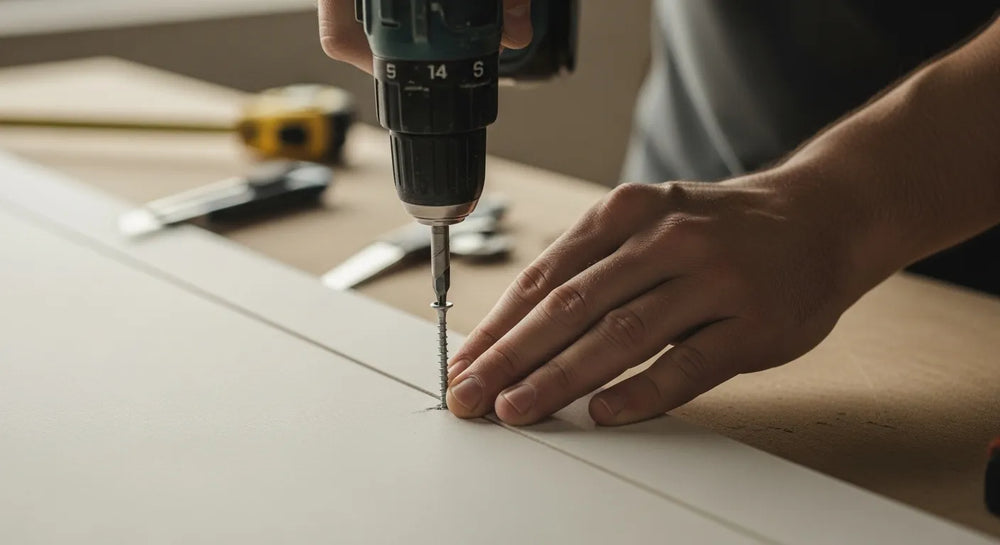
- Over-Torquing: The temptation to drive a screw until it feels "tight" can be destructive. Over-tightening can strip the anchor's internal threads or apply excessive expansion force, compromising the surrounding drywall's integrity. Using a drill with a clutch set to a low torque setting can prevent this common error.
- Ignoring Drywall Type and Thickness: Standard drywall is 1/2-inch thick, but 5/8-inch (Type X) is common in commercial construction for fire resistance. The length of the anchor and screw must be appropriate for the wall's thickness to ensure a secure fit.
A Step-by-Step Guide to Professional Drywall Repair
Once the cause of failure is understood, the repair can begin. A professional repair is not about a quick patch; it's about restoring the wall to its original strength and finish, making it structurally sound for future use.
Step 1: Assessment and Preparation
First, evaluate the extent of the damage to determine the appropriate repair method.
- Small Holes (under 1/2-inch): These are typically left by screws or small plastic anchors where the anchor itself has been removed cleanly.
- Medium Holes (1/2-inch to 1.5 inches): This is the most common scenario, where the anchor has pulled out a chunk of the drywall paper and gypsum core.
- Large Holes (over 1.5 inches): This indicates significant damage, often where a toggle bolt has ripped out or a heavy object has fallen, creating a large, structurally weak area.
Before starting, gather the right tools and materials. A professional kit should include:
- Utility knife with fresh blades
- Putty knives (a 2-inch and a 6-inch flexible blade)
- Drywall or jab saw
- Sanding block or sponge (120 and 220-grit)
- Shop vacuum
- High-quality spackling compound for small holes, and a setting-type joint compound (hot mud) for larger repairs for its strength and low shrinkage.
- Fiberglass mesh tape or self-adhesive patches
- A scrap piece of drywall for larger patches
- Stain-blocking primer
Step 2: Repairing Small to Medium Holes (Up to 1.5 inches)
For the most common anchor blowouts, the spackling and mesh tape method provides a strong, durable repair.
- Debride the Area: Use a utility knife to carefully cut away any loose drywall paper, frayed edges, and crumbled gypsum from around the hole. Create a clean, concave divot with beveled edges. This allows the compound to fill the hole properly and form a stronger bond. Vacuum out any dust.
- Apply Mesh Tape (for medium holes): For holes larger than 1/2-inch, cut a small piece of self-adhesive fiberglass mesh tape to cover the hole completely. This tape acts as a reinforcement, preventing the compound from cracking as it dries and adding structural integrity.
- First Coat of Compound: Using a 2-inch putty knife, press the compound firmly into the hole and over the mesh tape. The goal is to fill the void completely. Make the initial fill slightly concave, just below the level of the wall surface.
- Second Coat and Feathering: Once the first coat is dry, apply a second, thinner coat with the 6-inch putty knife. This time, extend the compound about 2-3 inches beyond the edges of the repair area. Use long, smooth strokes to "feather" the edges, creating a seamless transition between the patch and the surrounding wall.
- Sanding: After the second coat is fully cured, lightly sand the area with a 120-grit sanding block. Your goal is a perfectly smooth surface that is flush with the wall. Run your hand over it; you should not be able to feel the edges of the patch. If needed, apply a very thin third skim coat to fill any imperfections, let it dry, and then perform a final sanding with 220-grit paper.
Step 3: Tackling Large Holes and Damaged Areas
When a large section of drywall is compromised, a simple patch is not enough. You need to restore the structural integrity of the wall surface. The most professional method is to install a drywall patch, often called a "California patch" or "butterfly patch."
- Square the Hole: Use a drywall saw to cut the damaged area into a clean square or rectangle.
- Create the Patch: Cut a piece of new drywall that is about 4 inches wider and taller than the hole. On the back side of this patch, use your utility knife to score a line 2 inches in from all four edges, cutting only through the paper and slightly into the gypsum core.
- Snap and Peel: Carefully snap the drywall along the scored lines away from the cut. The gypsum will break, but the front paper will remain intact. Peel the broken gypsum away from the back, leaving you with a central square of drywall surrounded by a 2-inch flange of paper on the front face.
- Test Fit and Apply Compound: Test fit the patch to ensure the central gypsum piece fits snugly into the hole. Apply a layer of joint compound to the wall around the edges of the hole.
- Embed the Patch: Press the patch into place. The paper flanges will embed into the wet compound, acting like built-in tape. Use your 6-inch putty knife to smooth the paper flanges flat against the wall, squeezing out any excess compound from underneath.
- Finish the Seams: Apply a thin coat of compound over the paper flanges, feathering the edges as you would with a medium-sized repair. Allow it to dry, then apply a second and possibly third coat, sanding between each, until the patch is invisible.
Step 4: Finishing for a Flawless Surface
The final steps are what separate an amateur job from a professional one.
- Priming is Mandatory: Never paint directly over joint compound. The compound is more porous than the surrounding painted wall, and it will absorb the paint differently, resulting in a dull, blotchy spot known as "flashing." Apply a coat of high-quality, stain-blocking primer over the entire repair area. This seals the patch and creates a uniform surface for painting.
- Texture Matching: If the wall has a texture (like orange peel or knockdown), you will need to replicate it. Aerosol texture products are available that can be adjusted to match most common patterns. Practice on a piece of cardboard first to get the technique right.
- Painting: Once the primer and any texture are dry, apply two coats of the matching wall paint for a truly invisible repair.
Prevention is the Best Policy: Sourcing the Right Anchors for Future Success
A perfect repair is good. A procurement strategy that prevents the failure from ever happening is better. This involves a strategic shift from sourcing the cheapest available fastener to investing in the correct fastener for the application, sourced from a reliable and transparent supply chain. This is where MRO managers and design engineers can create significant long-term value.
Choosing the Correct Anchor Type for Commercial Applications
Our catalog features millions of American-made products, including a vast array of specialized fasteners designed for professional use. Selecting the right one is the first step in ensuring a secure, long-lasting installation.
- Light-Duty Applications: For hanging lightweight signage, small pictures, or cable management clips in an office or retail space, a classic design offers proven reliability. The U.S.-Made Ribbed Plastic Anchor is a cost-effective and dependable choice. Its ribbed design expands to provide a secure grip in drywall without requiring an oversized pilot hole, reducing the risk of installation error.
- Medium-Duty Reliability: When securing shelving, wall-mounted dispensers, or heavier display units, you need an anchor with more substantial holding power. The Medium-Duty Nylon Wall Anchor is an excellent solution. Made from high-quality nylon, it is more durable and less prone to becoming brittle than cheap plastic alternatives. Its design ensures consistent, reliable expansion for critical applications.
- Efficiency and Speed for Large Projects: For contractors and facilities teams working on large-scale installations or renovations, labor time is a significant cost driver. Self-drilling anchors can dramatically increase efficiency. The Medium-Duty Self-Drilling Drywall Zip-It® Anchor combines the drill bit and the anchor into one component. It can be driven directly into drywall with a screwdriver, saving time and eliminating the need for pre-drilling on many projects.
The Maden.co Advantage: Building a Resilient MRO Supply Chain
Choosing the right type of anchor is only half the battle. Ensuring that the anchor you receive meets its stated specifications requires a transparent and trustworthy supply chain.
- Access and Verification: Our platform is a direct conduit to the heart of American industry. We connect you to over 800+ verified U.S. manufacturers, giving you confidence that the components you order are genuine and manufactured to high standards. This drastically reduces the risk of receiving counterfeit or substandard parts that can lead to failure and liability.
- Reducing Procurement Friction: Time spent searching for obscure parts or vetting unknown suppliers is time wasted. Our marketplace streamlines the entire procurement process, allowing MRO managers to quickly search, compare specs, and order millions of industrial components from one centralized platform. If you have specific sourcing questions about bulk orders or material certifications, our expert team is ready to help; you can Contact Us at any time.
- Compliance and Specifications: For design engineers and managers in regulated industries, access to detailed technical data is not a luxury—it's a requirement. We make it easy to find parts that meet specific standards (e.g., DIN, NPT) and to access the material data sheets and specifications needed to ensure compliance and performance.
Strategic Procurement: Managing Costs and Cash Flow for MRO Supplies
Effective procurement in an industrial setting looks beyond the per-unit price and considers the entire lifecycle cost of a component. It also requires the financial flexibility to make strategic purchases that improve operational efficiency.
Beyond Unit Price: Calculating the Total Cost of Ownership (TCO)
A U.S.-made, high-grade nylon anchor might cost a few cents more than a generic plastic alternative. However, its TCO is almost always lower. Consider the costs associated with the failure of that cheaper anchor:
- Labor cost for the MRO technician to remove the failed anchor and repair the wall.
- Material cost for joint compound, primer, and paint.
- Potential cost of damage to the equipment that was mounted.
- The intangible cost of a disrupted professional environment.
By investing in a quality component upfront, you eliminate these downstream costs, resulting in significant long-term savings. This is the essence of smart, value-based procurement.
Empowering Your Purchasing Power with Instant Financing
We understand that managing cash flow is a primary concern for every business, from small contractors to large corporations. That’s why we built a powerful tool directly into our platform to support your procurement needs. For a facilities manager planning a large-scale renovation or an MRO buyer needing to stock a new maintenance department, making a large-volume purchase of necessary hardware can be a capital-intensive challenge. Our "Instant Financing" option, available at checkout, addresses this directly. It allows your business to acquire all the necessary components for a project—from fasteners to fittings to raw materials—in a single, efficient transaction, while managing the payment over time.
This isn't just a payment method; it's a strategic tool for project management and financial planning. You can apply for Instant Financing at checkout to streamline your capital-intensive projects and get the materials you need, when you need them, without compromising your cash position.
Building the Future: Strengthening America's Industrial Base
Every component sourced from a domestic manufacturer contributes to a stronger, more resilient national supply chain. The ability to procure critical MRO parts like high-quality fasteners from within the U.S. insulates businesses from the volatility of global shipping and geopolitical disruptions. It ensures that the backbone of our commercial and industrial infrastructure is supported by reliable, accessible, and high-quality materials.
This ecosystem of excellence is why we're always looking for new partners to join us in this mission. The American manufacturing revival is here, and it's being built by innovators and craftsmen across the country. Are you a U.S. manufacturer? Register as a vendor and join the American manufacturing revival.
Conclusion
A simple hole in the drywall is a data point. It tells a story about component selection, installation quality, and procurement strategy. By mastering the professional techniques for repair, you can efficiently address the immediate problem. But by elevating your approach to sourcing and embracing a TCO mindset, you can eliminate the problem at its root.
The solution is a two-pronged strategy: pair expert maintenance practices with a commitment to sourcing high-quality, verified American-made components. This approach doesn't just fix walls; it builds a foundation of reliability, safety, and long-term value for your entire operation.
We invite you to explore the extensive catalog at Maden.co. Discover the difference that U.S.-made quality can make for your next project, and ensure it's done right the first time. From specialized fasteners to industrial-grade hardware, find the exact parts you need and leverage the power of Instant Financing at checkout to empower your procurement and drive your business forward.
Frequently Asked Questions (FAQ)
Q1: What's the fastest way to fix a small anchor hole if I need to reuse it? For a quick fix where you need to reuse the same spot, the best method is to drill out the hole slightly larger, insert a new, more robust anchor (like a threaded, self-drilling anchor), and then mount your item. Simply filling a stripped hole with spackle will not provide any structural support for a new screw. For a stronger, more permanent solution, you can also fill the hole with a product like a dowel and wood glue, sand it flush, and then drill a new pilot hole for your screw.
Q2: Can I use wood glue or other adhesives to fix a loose drywall anchor? While squirting wood glue or construction adhesive into a stripped hole might seem like a clever hack, it is not a reliable or professional repair method. These adhesives are not designed to bond with gypsum and paper in a way that provides predictable tensile or shear strength. The anchor will almost certainly fail again under load. The proper method is always to remove the failed anchor and repair the drywall substrate correctly before attempting a new installation.
Q3: How do I know the weight limit of a drywall anchor I source online? This is a critical question that highlights the importance of sourcing from a transparent marketplace. On Maden.co, product pages for fasteners and anchors include detailed specification sheets and technical data directly from the verified U.S. manufacturer. This data provides clear information on rated load capacities, material composition, and recommended installation procedures. Avoid sourcing critical fasteners from platforms where this information is unavailable or unverified, as you cannot be certain of their performance or safety.
Q4: Why is sourcing U.S.-made fasteners important for a commercial project? Sourcing U.S.-made fasteners provides several key advantages in a commercial or industrial context. First, you benefit from superior quality control and material consistency, reducing the rate of component failure and the associated rework costs. Second, it ensures a transparent and resilient supply chain, protecting your projects from the delays and uncertainties of overseas shipping. Finally, it provides clear traceability and access to verified technical specifications, which is essential for meeting project compliance standards, ensuring safety, and mitigating liability.


