How to Install Butterfly Drywall Anchors
Table of Contents
- Introduction
- What is a Butterfly Anchor?
- Choosing the Right Anchor: Butterfly vs. Other Solutions
- Essential Tools and Materials
- Step-by-Step Installation Guide
- Common Mistakes to Avoid
- Procurement Reimagined: The Maden.co Advantage
- Conclusion
- Frequently Asked Questions (FAQ)
Introduction
We've all experienced it. That sinking feeling when a newly hung shelf, a heavy mirror, or a critical piece of equipment begins to pull away from the wall. The initial confidence in your installation gives way to the realization that the small plastic anchor you used was simply not up to the task. This common failure point isn't just an inconvenience; in an industrial or commercial setting, it can be a significant safety hazard and a costly repair. The culprit is almost always a mismatch between the weight of the object and the holding power of the fastener. When you need to mount heavy items securely to a hollow surface like drywall, standard anchors won't do. You need an engineering solution designed for the challenge: the butterfly anchor.
This article is your definitive guide to understanding, selecting, and correctly installing butterfly drywall anchors, also known as toggle bolts. We will move beyond a simple set of instructions to provide a comprehensive look at the mechanics, applications, and best practices that procurement managers, MRO buyers, and professional installers need to know. We'll explore why these fasteners are a cornerstone of secure mounting, compare them to other common anchor types, and walk through a detailed, step-by-step installation process designed to prevent failure. Ultimately, this guide will empower you to execute installations with the precision and confidence that ensures long-term stability and safety, reflecting the standard of industrial excellence we champion.
What is a Butterfly Anchor?
A butterfly anchor, or toggle bolt, is a heavy-duty fastener specifically designed for anchoring objects to hollow walls such as drywall, plaster, or hollow-core doors. Its design is both simple and remarkably effective. The component consists of two main parts:
- A Machine Screw: This is the threaded bolt that passes through your fixture and into the wall.
- A Spring-Loaded Toggle: This is the "butterfly" component. It's a metal bar with two hinged wings that are held together by a spring mechanism.
The name "butterfly anchor" comes from the action of these wings. When you pinch them together, they can be inserted through a pre-drilled hole in the drywall. Once through the hole and into the hollow cavity behind the wall, the spring forces the wings to open up, resembling a butterfly's wings.
The Mechanics of Superior Holding Power
The genius of the butterfly anchor lies in how it distributes weight. Unlike conventional anchors that rely on friction within the drilled hole, a butterfly anchor creates a solid bracing point against the back of the drywall.
When you tighten the screw, it pulls the opened toggle wings flush against the interior surface of the wallboard. This action clamps the drywall between the toggle on the inside and the fixture you're mounting on the outside. The load of the hanging object is spread across the wide surface area of the toggle wings, drastically reducing the pressure on any single point of the fragile drywall.
This mechanism allows butterfly anchors to support significantly more weight than almost any other type of hollow-wall anchor, making them the default choice for applications where safety and stability are non-negotiable. At Maden.co, our mission is to connect industrial buyers with the highest quality American-made components, and understanding the robust engineering behind products like the butterfly anchor is core to our value of promoting Industrial Excellence.
Choosing the Right Anchor: Butterfly vs. Other Solutions
Selecting the correct fastener is a critical decision that impacts the safety, longevity, and Total Cost of Ownership (TCO) of any installation. A procurement manager who chooses an under-specified anchor to save a few cents can cost the company thousands in damages, repairs, and potential liability. Butterfly anchors are the premium solution for heavy loads, but they are not the only option. Here's how they compare to other common drywall anchors.
Light-Duty Applications: Ribbed Plastic Anchors
For very light-duty tasks like hanging small picture frames, smoke detectors, or lightweight decor (typically under 10-15 pounds), a simple expansion anchor is often sufficient. These anchors, like a standard Ribbed Plastic Anchor, are inserted into a pilot hole. As you drive a screw into the anchor, its sides expand, creating friction against the inside of the drywall hole.
- Pros: Inexpensive, quick to install, suitable for very light loads.
- Cons: Very low weight capacity, prone to pulling out under moderate strain, not suitable for dynamic loads.
Medium-Duty Applications: Self-Drilling Anchors
A step up in both convenience and holding power is the self-drilling anchor. These are often made from strong nylon or a zinc alloy and feature an aggressive, auger-like tip that drills its own hole into the drywall, eliminating the need for a separate pilot hole. The Medium Duty Nylon Wall Anchor #6 Self-Drilling Drywall Zip-It® is a prime example of this efficient design. They offer better holding power than plastic expansion anchors and are ideal for hanging items like curtain rods, medium-sized mirrors, and small shelves.
- Pros: Fast installation (no pre-drilling), better holding power than expansion anchors, good for mid-range weights (20-50 pounds).
- Cons: Still relies on the integrity of the drywall itself, not recommended for ceiling applications or very heavy objects.
Heavy-Duty Applications: Butterfly Anchors (Toggle Bolts)
When the load exceeds 50 pounds or when safety is paramount (e.g., installing grab bars, wall-mounted shelving units, heavy AV equipment), the butterfly anchor is the only acceptable choice for a hollow-wall application. Their ability to brace against the back of the wall makes them fundamentally more secure.
- Pros: Highest weight capacity of any hollow-wall anchor, provides the most secure and reliable mounting, distributes load over a wide area.
- Cons: Requires a larger hole, installation is more involved, cannot be easily removed or reused.
Your professional toolkit should be versatile enough to handle any situation. While our focus here is on heavy-duty butterfly anchors, a well-stocked MRO supply closet includes solutions for every load requirement. Having reliable options like the American-made Medium Duty Nylon Wall Anchor #8 for Drywall on hand ensures you are prepared for comprehensive project readiness, from light-duty fixes to major installations.
Essential Tools and Materials
Proper preparation is the key to a successful and efficient installation. Before you begin, gather the following tools and materials to ensure a smooth process:
- The Butterfly Anchor: Select an anchor rated for the weight of the object you are hanging. The packaging will specify the screw diameter, length, and maximum holding weight.
- Power Drill: A standard cordless or corded drill will work perfectly.
- Drill Bits: You will need a drill bit that is the exact diameter required to pass the folded toggle through the wall. This size is almost always listed on the anchor's packaging. Do not guess.
- Stud Finder: This is arguably the most important tool. Butterfly anchors are for hollow walls only. A stud finder will help you locate and, more importantly, avoid drilling into wall studs, plumbing, or electrical wiring.
- Screwdriver: A Phillips or flat-head screwdriver that matches the head of the screw on your anchor.
- Tape Measure: For accurate placement.
- Pencil or Marker: To mark the drilling location.
- Safety Glasses: Always protect your eyes from drywall dust and debris when drilling.
Step-by-Step Installation Guide
Follow these steps carefully for a secure, professional-grade installation. Rushing through this process, especially during the drilling and tightening phases, is the primary cause of anchor failure.
Step 1: Locate and Mark the Installation Point
Begin by deciding where you want to hang your object. Use your tape measure to find the precise spot and mark it lightly with a pencil.
Now, use your electronic stud finder. Scan the area horizontally and vertically around your mark. The goal is to confirm that your chosen location is indeed a hollow cavity between two wall studs. If the stud finder indicates a stud, you must move your location to one side or the other. Attempting to install a butterfly anchor into a wood stud will not work and will damage the wall.
Step 2: Select the Correct Anchor Size
The size of the butterfly anchor you need is determined by two factors: the weight of the object and the thickness of the drywall (typically 1/2-inch or 5/8-inch). Always check the manufacturer's specifications on the anchor packaging. It is always better to over-specify than to under-specify. If your object weighs 60 pounds, choose an anchor rated for 75 or 100 pounds to build in a margin of safety. Our commitment to Supply Chain Transparency at Maden.co means providing clear, accessible specifications for the millions of products on our platform, empowering you to make the right choice every time.
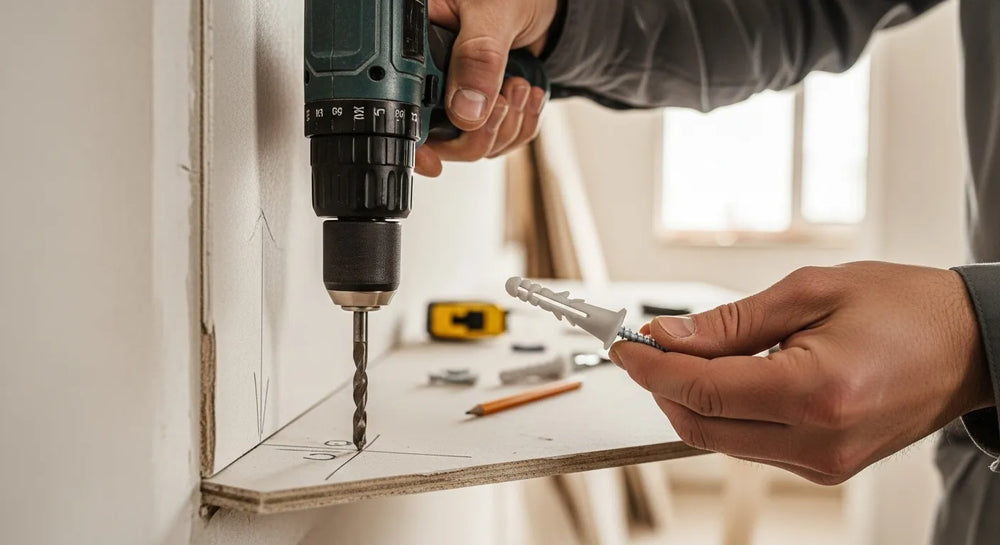
Step 3: Drill the Pilot Hole
This step is critical. Using your power drill, select the drill bit size specified by the anchor manufacturer. The hole needs to be just large enough for the folded toggle to pass through.
- Pro Tip: Hold the drill perfectly perpendicular (at a 90-degree angle) to the wall. Drilling at an angle can create an oblong hole, which can compromise the anchor's grip. Apply steady, even pressure and let the drill do the work.
Once the hole is drilled, gently clear away any excess drywall dust from the edges.
Step 4: Prepare the Butterfly Anchor
This is a small but crucial step that often trips up first-time users. Unlike other anchors, you must prepare the butterfly anchor with your fixture.
- Unscrew the toggle wings completely from the screw.
- Take the screw and insert it through the mounting hole on the object or bracket you intend to hang.
- Thread the toggle wings back onto the end of the screw, turning them just a few times so they are secure but still near the tip of the screw.
If you insert the toggle into the wall first, you will have no way to attach your object to it.
Step 5: Insert the Anchor into the Wall
With the screw passed through your fixture and the toggle attached, you are ready to insert it. Pinch the two toggle wings together so they are parallel with the screw. They should be held flat by the spring's tension.
Carefully push the folded toggle wings through the hole you drilled in the drywall. You may need to wiggle it slightly to get it through. Push it in until you hear or feel a distinct "snap" or "pop."
Step 6: Deploy the Wings
That "snap" is the sound of the spring forcing the wings to open inside the wall cavity. You have successfully deployed the anchor. Give the screw a gentle tug outward to ensure the wings have opened and are resting against the back of the drywall. You should feel it catch firmly.
Step 7: Tighten the Screw
This is the final and most delicate step. To prevent the toggle from spinning freely inside the wall while you tighten, you must create tension.
- While holding your fixture against the wall, pull the screw and fixture slightly outward, away from the wall. This will pull the open toggle wings firmly against the inside surface of the drywall.
- While maintaining this outward pressure, use your screwdriver to begin tightening the screw. The tension will keep the toggle from spinning.
- Continue tightening until the fixture is snug against the wall. Be careful not to overtighten. Excessive force can crush the drywall, compromising the integrity of the entire installation. The goal is "snug," not "cranked."
Once the fixture is flush and firm against the wall, the installation is complete.
Common Mistakes to Avoid
A successful installation depends as much on avoiding errors as it does on following the steps. Here are the most common mistakes that lead to a failed butterfly anchor:
- Drilling into a Stud: This is the most common error, which is why using a stud finder is not optional. It is mandatory.
- Drilling the Wrong Size Hole: A hole that is too small won't allow the toggle to pass through. A hole that is too large will not provide enough surface area for the toggle to brace against, leading to a drastically weaker hold or complete failure.
- Forgetting the Fixture: Inserting the toggle into the wall before putting the screw through your mounting bracket is a frustrating mistake that requires you to abandon the anchor inside the wall and start over.
- Overtightening the Screw: Drywall is a relatively soft material. Overtightening can crush the gypsum core, creating a weak point that will eventually fail.
- Not Applying Outward Pressure: If you try to tighten the screw without pulling it outward, the entire toggle mechanism will likely just spin inside the wall cavity, never tightening at all.
Procurement Reimagined: The Maden.co Advantage
For a facilities manager installing new safety equipment, a design engineer prototyping a wall-mounted chassis, or an MRO buyer sourcing components for a plant-wide upgrade, the process of finding and procuring the right fasteners can be a major source of friction. Delays, quality issues, and lack of traceability in the supply chain can bring critical projects to a halt. This is precisely the problem we built Maden.co to solve.
Our mission is to democratize access to American manufacturing, making it as easy to source a U.S.-made component as any global alternative. We provide a direct digital connection to over 2.5 million products from a network of more than 800 verified U.S. manufacturers. This approach builds a more resilient and transparent supply chain, ensuring you get the high-quality, traceable components you need, when you need them. It's how we're proving that America's manufacturing revival is here.
For large-scale projects or capital-intensive equipment upgrades that require significant quantities of hardware, managing cash flow is paramount. That's why we empower our customers with a powerful financial tool. You can apply for Instant Financing at checkout to streamline your procurement process, allowing you to acquire the materials you need to move forward without disrupting your operational budget.
This robust ecosystem of quality and innovation is built on the strength of our manufacturing partners. We are constantly expanding our network to better serve American industry. Are you a U.S. manufacturer? Register as a vendor and join us in rebuilding America's industrial backbone.
Conclusion
The butterfly drywall anchor is more than just a piece of hardware; it is an essential component for ensuring safety, stability, and professional quality in any heavy-duty mounting application. By understanding the mechanics, carefully selecting the right size, and meticulously following the installation steps—locate, drill, prepare, insert, and tighten—you can confidently mount heavy objects to hollow walls. Avoiding common pitfalls like drilling the wrong size hole or overtightening the screw is just as crucial as the installation itself.
In the world of industrial procurement, having a reliable source for these critical components is a strategic advantage. We invite you to explore the vast catalog on Maden.co, where you can find American-made fasteners and millions of other industrial products to meet your project's exact specifications. Streamline your next major purchase by taking advantage of instant financing at checkout, and build with the confidence that comes from using quality, U.S.-made components. If you have specific sourcing requirements or questions, our expert team is ready to assist. Please do not hesitate to contact us for support.
Frequently Asked Questions (FAQ)
1. What is the main difference between a butterfly anchor and a regular plastic anchor? The primary difference is the mechanism and resulting weight capacity. A plastic anchor relies on friction created by expanding within the drilled hole, making it suitable only for light loads. A butterfly anchor works by bracing against the back of the drywall with wide, metal wings, distributing the load over a large surface area and allowing it to support much heavier objects securely.
2. Can I reuse a butterfly anchor? Generally, no. Once the toggle wings have been deployed inside the wall cavity, they cannot be collapsed again to be removed through the small installation hole. Attempting to remove it usually involves pushing the toggle completely into the wall and patching the hole, or creating a larger hole to retrieve it, which causes significant wall damage.
3. What happens if I drill the hole too big for the butterfly anchor? Drilling a hole that is too large is a critical installation error. The opened toggle wings need to rest on the solid surface of the drywall's back. If the hole is too large, the wings may not have enough surface area to grip, or they may pull back through the hole under load. This will severely compromise the anchor's holding power and likely lead to failure.
4. Why is it important to source U.S.-made fasteners for industrial applications? Sourcing U.S.-made fasteners provides several key advantages for industrial buyers. These include superior quality control and material traceability that meet rigorous industry standards (like DIN or NPT), enhanced supply chain reliability that reduces the risk of project delays, and the ability to partner directly with verified manufacturers. It also supports the domestic economy and contributes to a more resilient national industrial base.


