How to Take Out Plastic Screw Anchors: A Guide
Table of Contents
- Introduction
- Understanding the Anatomy of a Plastic Screw Anchor
- Essential Tools and Safety Preparations
- Step-by-Step Anchor Removal Techniques
- Handling Difficult Situations and Common Problems
- Post-Removal Wall Repair: Restoring a Professional Finish
- Sourcing for Success: Choosing the Right Anchor for the Next Installation
- Conclusion: From Removal to Resilient Sourcing
- Frequently Asked Questions (FAQ)
Introduction
Imagine this scenario: a facility manager is overseeing a major office reconfiguration. Walls are being repainted, old shelving is coming down, and new equipment is going up. The project is on a tight schedule, but progress grinds to a halt. The maintenance team is struggling, spending hours trying to remove hundreds of old plastic screw anchors left behind from previous installations, damaging the drywall in the process. Each damaged spot means more time spent on patching, sanding, and priming—delaying the entire project and driving up labor costs. This seemingly minor task has suddenly become a significant bottleneck, a friction point that impacts budgets and timelines. It’s a challenge familiar to anyone in MRO, construction, or industrial maintenance.
Removing plastic screw anchors, or wall plugs, is a common task, but doing it efficiently and without causing collateral damage requires the right knowledge and techniques. This is more than just a simple DIY tip; for professionals, it's about operational efficiency and maintaining asset integrity. This guide provides a detailed, step-by-step process for removing various types of plastic screw anchors. We will cover the necessary tools, multiple removal methods tailored to different situations, and best practices for repairing the wall surface afterward.
Ultimately, this article aims to empower procurement managers, MRO buyers, and engineers with the practical knowledge to handle this task effectively, ensuring that both removal and future installations are performed to the highest standard. It's about understanding that even the smallest components, like a wall anchor, play a role in the bigger picture of operational excellence and the total cost of ownership—a principle that lies at the heart of sourcing reliable, high-quality industrial products from American manufacturers through platforms like Maden.co.
Understanding the Anatomy of a Plastic Screw Anchor
Before you can effectively remove an anchor, it’s crucial to understand its design and function. A plastic screw anchor is a type of fastener designed to allow screws to be secured into materials that are brittle or low-density, such as drywall, plaster, or masonry. When a screw is driven into the anchor, it expands, pressing its fins or ribs against the inside of the drilled hole. This expansion creates a secure, load-bearing point. While there are countless variations, most plastic anchors fall into a few primary categories.
Common Types of Plastic Anchors
Understanding the type of anchor you're dealing with can inform the best removal strategy. Each design has unique features that affect how it grips the wall material.
- Ribbed Anchors: These are perhaps the most common type found in drywall. They feature prominent ribs along the body that bite into the surrounding material to prevent the anchor from spinning during screw installation. The fins provide significant holding power, which can also make them more challenging to remove cleanly. A high-quality Ribbed Plastic Anchor is designed for superior grip in materials like drywall and plaster.
- Conical Anchors: These anchors have a smooth, tapered shape, often with a split body that expands as the screw is inserted. They are typically used for light-duty applications. While their smooth surface might suggest an easier removal, they can sometimes be more prone to breaking if improper force is applied. The classic Conical Bantam Plastic Anchor is a versatile option known for its ease of installation in a variety of base materials.
- Tapered and Ribbed Anchors: Combining features of the two types above, these anchors offer a balance of easy insertion and strong holding power. The tapered tip helps guide it into the pilot hole, while the ribs provide anti-rotation resistance. Sourcing a dependable Tapered and Ribbed White Plastic Anchor is essential for general-purpose tasks where reliability is key.
Knowing these distinctions is the first step. The presence of aggressive ribs might mean you need to apply more pulling force, while a conical anchor might be more susceptible to being pushed deeper into the wall cavity if you're not careful.
Essential Tools and Safety Preparations
Having the right tools on hand is half the battle. Attempting to remove an anchor with inadequate equipment is a recipe for frustration and wall damage. Gather the following items before you begin.
Recommended Tool Kit:
- Needle-Nose Pliers: The most essential tool for gripping and pulling the anchor.
- Screwdriver Set (Phillips and Flathead): Used to partially re-insert a screw for grip and to pry or clean around the anchor.
- Utility Knife or Putty Knife: For scoring paint or drywall paper around the anchor’s flange to prevent tearing.
- Drill with Various Bit Sizes: Necessary for the drill-out method if the anchor is stubborn or broken.
- Claw Hammer: Can be used for gentle prying or tapping.
- Corkscrew or Drywall Screw: An alternative tool for gaining leverage inside the anchor.
- Safety Glasses: Always wear eye protection, especially when drilling or applying force that could cause fragments to fly.
Preparation Steps:
- Clear the Area: Remove any nearby fixtures, furniture, or decorations to give yourself ample working space.
- Assess the Anchor: Identify the type of anchor if possible. Is it painted over? Is the flange flush with the wall or slightly raised? Is the surrounding wall material drywall, plaster, or concrete?
- Score the Perimeter: If the anchor has been painted over, use a utility knife to carefully cut around the flange. This breaks the paint seal and prevents you from peeling off a large chunk of paint or paper when you pull the anchor out.
Step-by-Step Anchor Removal Techniques
There isn't a single "best" way to remove a plastic anchor; the right method depends on the anchor's condition, its type, and the wall material. Here are four effective techniques, starting with the simplest.
Method 1: The Screw and Pliers Technique (For Most Common Scenarios)
This is the go-to method and is successful in the majority of cases. It uses the screw itself as a handle to pull the anchor straight out.
- Select the Right Screw: Find the original screw that was in the anchor or one that is slightly smaller in diameter. You want it to grip the inside of the anchor without expanding it further.
- Partially Insert the Screw: Thread the screw into the anchor by hand or with a screwdriver. Turn it just two or three times—enough to get a firm grip but not enough to cause the anchor to expand again.
- Grip and Pull: Use needle-nose pliers to grip the head of the screw. Wiggle it gently back and forth while pulling straight out. This motion helps break the friction between the anchor's ribs and the wall material.
- Apply Steady Force: Avoid yanking. A firm, steady pulling motion is more effective and less likely to damage the wall. The anchor should slide out, leaving a clean hole.
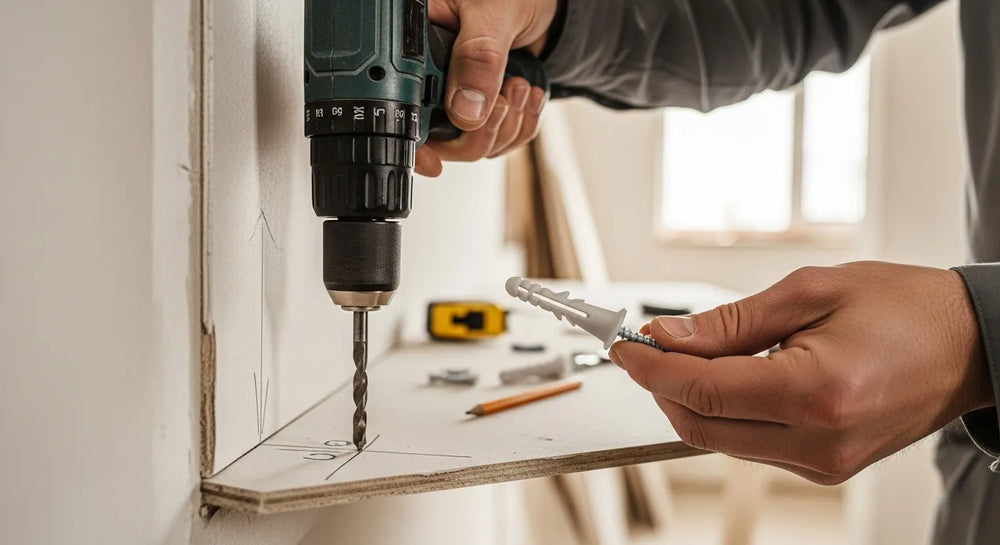
Method 2: The Drill-Out Technique (For Stubborn or Broken Anchors)
If the anchor's flange breaks off or it refuses to budge with pliers, drilling it out is the next logical step. This method destroys the anchor but preserves the wall.
- Choose a Drill Bit: Select a drill bit that is the same diameter as the inside of the anchor, or slightly smaller than the pilot hole. You want to drill out the plastic anchor itself, not enlarge the hole in the wall.
- Drill Slowly: Set your drill to a low speed. Insert the bit into the center of the anchor and begin drilling. The goal is to chew away the plastic material from the inside.
- Remove the Debris: The plastic will break apart. You can use the drill bit or a small screwdriver to clear out the remaining fragments. A vacuum cleaner with a nozzle attachment is also effective for cleaning the hole.
- Inspect the Hole: Once cleared, the hole should be clean and ready for patching. Be careful not to apply too much pressure and punch through the drywall.
Method 3: The Corkscrew Technique (A Clever Alternative)
This method works on a similar principle to the pliers method but can sometimes provide better leverage, especially if you don't have the original screw.
- Select Your Tool: A simple wine corkscrew or a coarse-threaded drywall screw can work well. The wide, sharp threads are excellent for biting into the plastic.
- Thread it In: Twist the corkscrew or drywall screw into the anchor until it feels securely lodged.
- Pull Straight Out: Just as with the pliers method, grip the handle of the corkscrew or the head of the drywall screw and pull firmly and steadily. The leverage provided by a corkscrew handle can be particularly effective.
Method 4: The Push-Through Technique (For Hollow Walls)
This is a last-resort method and is only suitable for hollow walls like drywall. It doesn't remove the anchor but instead hides it within the wall cavity. This is useful if the anchor is completely stuck or broken flush with the wall surface.
- Clear the Opening: Use a small flathead screwdriver or the tip of a utility knife to ensure there are no plastic fragments obstructing the hole.
- Push it In: Use the screwdriver or a punch to carefully tap the anchor until it falls through the drywall and into the space behind it. Use gentle taps with a hammer if needed.
- Prepare for Patching: The hole is now empty and ready for repair. While this is a quick fix, it does leave debris inside your wall. For most professional applications, complete removal is preferred.
Handling Difficult Situations and Common Problems
In a perfect world, every anchor would come out cleanly with the first tug. In reality, MRO teams face numerous challenges.
- The Painted-Over Anchor: As mentioned, always score the paint around the flange first. Failure to do so is the number one cause of significant paint and drywall paper tearing.
- The Broken Flange: If the head or flange of the anchor snaps off, leaving the body recessed in the wall, the pliers method is no longer an option. This is the prime scenario for using the drill-out technique.
- The Spinning Anchor: If the anchor spins in its hole when you try to insert a screw, it means its ribs have lost their grip. Try using a flathead screwdriver to apply slight pressure to the flange to hold it still while you thread the screw in. If that fails, the drill-out method is your best bet.
Post-Removal Wall Repair: Restoring a Professional Finish
Proper removal is only part of the job. Leaving a clean, professionally repaired surface is what separates a quick fix from quality work.
- Clean the Hole: Use a small brush or compressed air to remove any dust or debris from the hole.
- Apply Spackling Compound: Use a flexible putty knife to apply a small amount of lightweight spackling compound over the hole. Apply enough to slightly overfill it, as the spackle will shrink as it dries.
- Scrape it Smooth: In a single, smooth motion, scrape the putty knife over the repair to leave a flat surface.
- Sand When Dry: Once the spackle is completely dry (check the manufacturer's instructions), lightly sand it with fine-grit sandpaper (220-grit is ideal) until it is perfectly flush with the wall.
- Prime and Paint: Wipe away any sanding dust with a damp cloth. Apply a coat of primer over the patch to seal it, followed by a coat of matching wall paint.
Sourcing for Success: Choosing the Right Anchor for the Next Installation
Once the old hardware is removed and the surface is repaired, the focus shifts to the new installation. This is where procurement and engineering decisions have a lasting impact. Choosing a cheap, low-quality anchor can lead to premature failure, creating the very problem you just solved. This is why focusing on the Total Cost of Ownership (TCO) is paramount. A slightly higher upfront cost for a quality, verified component is a small price to pay to avoid future labor costs, downtime, and material waste.
This philosophy is the driving force behind our mission at Maden.co. We are dedicated to democratizing access to American manufacturing, connecting industrial buyers with a vast catalog of over 2.5 million products from a network of more than 800 verified U.S. manufacturers. Our vision is to prove that American-made components are not only superior in quality but also just as accessible and convenient as any global alternative. We believe in strengthening domestic supply chains and championing the industrial excellence that defines American ingenuity. You can learn more about our commitment to this mission here.
For a procurement manager under pressure to source a specific DIN-compliant fastener, a design engineer needing material certifications for a new prototype, or an MRO buyer facing an unexpected equipment breakdown, the ability to quickly find a verified, U.S.-made part is a game-changer. Our platform is built on values of:
American Manufacturing Pride: We celebrate the craftsmanship and quality of domestic production. Digital Innovation: We leverage technology to make sourcing simple, fast, and transparent. Supply Chain Transparency: We provide clear information on where your components are coming from, enhancing resilience and compliance.
When selecting your next batch of anchors, consider the specific application. A heavy-duty shelving unit requires a more robust anchor than one for a lightweight picture frame. By sourcing through our platform, you gain access to detailed specifications and high-quality options like the versatile Ribbed Plastic Anchor or the reliable Tapered and Ribbed White Plastic Anchor, ensuring you get the right part for the job. If you are a U.S. manufacturer who shares these values of quality and innovation, we invite you to register as a vendor and join the American manufacturing revival. If you have specific sourcing questions about finding the right fastener, our team is ready to help.
Conclusion: From Removal to Resilient Sourcing
Mastering how to take out plastic screw anchors is a valuable skill that saves time, prevents damage, and upholds a standard of professionalism in any maintenance or installation project. By following the systematic approaches outlined—from the simple screw-and-pliers method to drilling out stubborn remnants—you can tackle this common task with confidence and efficiency. Remember that the job isn't finished until the wall is impeccably repaired, ready for its next purpose.
This process highlights a broader principle in the industrial world: the importance of looking beyond the immediate task to consider the entire lifecycle of a component. The effort spent removing a failed anchor is a direct cost incurred from a past decision. By choosing high-quality, reliable, U.S.-made components for your future projects, you invest in durability and reduce the likelihood of future repairs and replacements.
We encourage you to explore the extensive catalog on Maden.co to find the right fasteners and components for your needs. Streamline your procurement process, reduce supply chain risk, and equip your teams with the best that American manufacturing has to offer. And for larger-volume orders or capital-intensive projects, you can apply for Instant Financing at checkout to manage your cash flow strategically and keep your operations moving forward.
Frequently Asked Questions (FAQ)
1. What is the easiest and most common way to remove a plastic wall anchor? The most common and often easiest method is the "Screw and Pliers Technique." You partially thread a screw into the anchor to get a good grip, then use needle-nose pliers to grab the screw head and pull the entire anchor straight out of the wall. This method works best for anchors that are intact and not painted over too heavily.
2. Can I reuse a plastic screw anchor after I've removed it? It is strongly advised not to reuse a plastic anchor. The removal process, particularly the pulling and wiggling, can stress the plastic and compromise the integrity of its ribs and fins. A reused anchor will not provide the same holding power as a new one, increasing the risk of failure. Given their low cost, it is always best practice to use a new anchor for any new installation.
3. What should I do if the head of the plastic anchor breaks off while I'm trying to pull it out? If the flange or head of the anchor breaks, leaving the body flush with or recessed into the wall, your best option is the "Drill-Out Technique." Select a drill bit slightly smaller than the anchor's hole diameter and carefully drill into the center of the anchor to break up the remaining plastic. Alternatively, if it's a hollow drywall, you can use the "Push-Through Technique" as a last resort.
4. Why is it important to choose high-quality, U.S.-made anchors for my next project? Choosing U.S.-made anchors from a trusted source ensures higher quality control, material consistency, and reliability. This reduces the likelihood of fastener failure, which can prevent costly rework, equipment damage, and project delays. Sourcing domestically also strengthens your supply chain, reduces lead times, and supports the national manufacturing economy, aligning with a strategy focused on long-term value and lower Total Cost of Ownership (TCO).


