How to Use Plastic Anchors for Secure Fastening
Table of Contents
- Introduction
- The Unseen Importance of a Simple Component
- Decoding Plastic Anchors: Types and Applications
- The Step-by-Step Installation Process: A Guide to Industrial Excellence
- Avoiding Common Pitfalls: Best Practices for Procurement and Installation
- The Strategic Advantage of Sourcing U.S.-Made Fasteners
- Streamlining Procurement: Beyond the Component
- Conclusion
- Frequently Asked Questions (FAQ)
Introduction
An MRO manager is tasked with a seemingly simple job: mounting new safety signage and equipment dispensers throughout a recently updated production facility. The walls are a mix of drywall and concrete block. The first attempt into the drywall results in a crumbling, oversized hole and a loose, useless fastener. This small setback delays the task, requires patching and repainting, and underscores a critical point in industrial operations: even the smallest components can have a significant impact on project timelines, safety, and overall professionalism. The integrity of a simple plastic anchor is often the difference between a secure, reliable installation and a costly, hazardous failure.
This article serves as a definitive resource for procurement professionals, engineers, and maintenance teams on the proper selection, use, and sourcing of plastic anchors. We will move beyond basic household tips to provide an in-depth, professional-grade understanding of these essential fasteners. We will explore the different types of plastic anchors and their specific applications, detail a precise step-by-step installation process, and identify the common mistakes that can compromise an anchor's holding power. Most importantly, we will discuss the strategic advantages of sourcing high-quality, American-made components to ensure reliability and strengthen your supply chain. Mastering the correct use of plastic anchors is more than a trivial skill; it is a fundamental practice that reflects a commitment to industrial excellence and operational integrity.
The Unseen Importance of a Simple Component
In the world of industrial supply, multi-ton machinery and complex electronic systems often capture the spotlight. Yet, the operational efficiency and safety of a facility frequently depend on the performance of the most unassuming components. A plastic anchor, costing mere cents, can be responsible for securing critical items like fire extinguishers, control panels, conduit, or safety barriers. The true cost of a fastener is not its purchase price but the potential cost of its failure.
A failed anchor can lead to a cascade of negative consequences:
- Safety Hazards: Falling objects can cause serious injury to personnel. A loosely mounted electrical box or piece of conduit can create an immediate electrical or tripping hazard.
- Equipment Damage: A control panel that detaches from a wall can be damaged beyond repair, leading to expensive replacement costs and operational downtime.
- Rework and Labor Costs: The time spent removing a failed anchor, patching the surface, and correctly reinstalling the fixture is wasted labor that directly impacts productivity and budget.
- Reputational Damage: In commercial or client-facing environments, shoddy workmanship reflected by a loose fixture can damage a company's reputation for quality and attention to detail.
This is where the concept of Total Cost of Ownership (TCO) becomes paramount. A fraction-of-a-cent saving on an unverified, low-quality import anchor can translate into hundreds or thousands of dollars in downstream costs. This is why building a resilient and reliable supply chain for even the smallest parts is a strategic imperative. By partnering with a dedicated B2B marketplace like Maden.co, you gain access to a vast catalog of components from verified U.S. manufacturers, ensuring that the parts you procure meet stringent quality standards. This commitment to domestic sourcing isn't just about patriotism; it's a sound business strategy that mitigates risk, ensures component availability, and enhances project outcomes.
Decoding Plastic Anchors: Types and Applications
The basic principle behind a plastic anchor is simple yet effective. When a screw is driven into it, the anchor expands, exerting outward pressure against the inside of the drilled hole. This creates a powerful friction-based grip in base materials like drywall, plaster, or masonry, which would otherwise be too brittle or soft to hold the threads of a screw directly. However, not all plastic anchors are created equal. Choosing the right type for the specific base material and load requirement is the first and most critical step toward a secure installation.
Ribbed Anchors
Ribbed anchors are one of the most common types used for light to medium-duty applications in hollow walls. Their design features external fins or "ribs" running along the length of the anchor body. These ribs are designed to collapse slightly upon insertion and then bite into the surrounding material as the screw expands the anchor, preventing it from spinning in the hole during installation and increasing its overall pull-out strength.
- Best For: Drywall (gypsum board), plaster, and paneling.
- Common Applications: Mounting signage, smoke detectors, thermostats, lightweight shelving, and wall plates.
- Professional Scenario: An MRO buyer for a large corporate campus needs to outfit new office spaces with hundreds of nameplates, small whiteboards, and cable management clips. The walls are exclusively drywall. For a task of this scale, reliability and ease of installation are key. The Ribbed Plastic Anchor is the perfect component for this application, offering a dependable hold for these light-duty items. Sourcing these in bulk from a verified American manufacturer ensures consistency across all installations, preventing the frustrating inconsistencies often found in lower-quality alternatives.
Conical and Tapered Anchors
Conical anchors are typically used for light-duty fastening into solid, brittle materials. As their name suggests, they have a cone-like shape that tapers to a point, often with a ribbed texture for added grip. The anchor is designed to split at the deep end as the screw is driven in, wedging it tightly against the walls of the pilot hole in the hard material.
- Best For: Concrete, brick, mortar joints, and masonry block.
- Common Applications: Fastening electrical junction boxes, conduit clamps, and light fixtures to concrete or brick walls.
- Professional Scenario: A design engineer is finalizing the specifications for a new data center build. Part of the design involves running thousands of feet of low-voltage data cabling along concrete block walls, secured by small clamps. The fastening solution must be reliable, easy for contractors to install correctly, and must not compromise the integrity of the masonry. The engineer specifies a U.S.-made Conical Bantam Plastic Anchor for its proven performance in solid materials, ensuring a secure installation that will last for the life of the facility.
Tapered and Ribbed Combo Anchors
Combining the features of the previous two types, the tapered and ribbed anchor offers excellent versatility, making it a staple in any professional maintenance toolkit. The tapered body allows for easy insertion into a variety of materials, while the aggressive ribbing provides superior holding power and anti-rotation characteristics. Many designs also feature a split body to ensure consistent and powerful expansion.
- Best For: A wide range of base materials, including drywall, plaster, brick, block, and concrete.
- Common Applications: General maintenance, repairs, and installations where the base material may vary from one location to another.
- Professional Scenario: A procurement manager for a multi-site property management company is looking to standardize the maintenance kits for their technicians. They need a "go-to" anchor that can handle the majority of light-duty repair calls, from re-securing a loose towel bar in a drywall bathroom to mounting a security camera on a brick exterior. The Tapered and Ribbed White Plastic Anchor is an ideal choice, providing the flexibility needed to tackle diverse tasks without requiring technicians to carry dozens of specialized fastener types. Stocking these U.S.-made anchors provides peace of mind that their teams are equipped with a quality, all-purpose solution.
The Step-by-Step Installation Process: A Guide to Industrial Excellence
A high-quality anchor can only perform as intended if it is installed with precision. Rushing the process or using the wrong tools will lead to failure, regardless of the component's quality. Adhering to a methodical installation process is a hallmark of professional work and aligns with our core value of Industrial Excellence.
Step 1: Pre-Installation Assessment and Tool Gathering
Before you drill, you must plan. This initial assessment is crucial.
- Identify the Base Material: Is it drywall, plaster over lath, concrete block, or poured concrete? Tap on the surface. A hollow sound indicates drywall or plaster, while a solid thud signifies masonry. The material will dictate the type of anchor you need.
- Determine the Load: What are you mounting, and how much does it weigh? Always err on the side of caution. Plastic anchors are designed for light-to-medium loads. For heavy items like large cabinets, industrial shelving, or machinery, you must use a heavy-duty metal anchor (e.g., sleeve anchor, wedge anchor, or toggle bolt).
-
Gather the Correct Tools:
- Power drill
- Drill bit set (ensure you have the exact size needed)
- Screwdriver or screw gun
- Hammer or rubber mallet
- Tape measure
- Pencil
- Level
- Safety glasses
Step 2: Selecting the Right Anchor, Screw, and Drill Bit
This is where most installation errors occur. The relationship between the anchor, screw, and drill bit is a precise trilogy.
- The Golden Rule: The anchor's manufacturer will specify the exact drill bit diameter required for a proper fit. This information is non-negotiable and is usually printed on the anchor's packaging or included in its technical data sheet. When you source products through our marketplace, these detailed specifications are clearly listed on the product page, eliminating guesswork.
- Screw Compatibility: The anchor will also specify a compatible range of screw diameters and a minimum length. The screw must be long enough to pass through the item you are mounting and then fully penetrate the entire length of the anchor to ensure maximum expansion.
Step 3: Drilling the Pilot Hole
With the correct drill bit selected and chucked into your drill, you can proceed.
- Mark Your Spot: Use a pencil to precisely mark the location for the hole. If mounting an item with multiple holes, use a level to ensure your marks are aligned correctly.
- Set the Depth: The pilot hole needs to be slightly deeper than the length of the anchor itself. This provides a small cavity for any dust or debris to settle and ensures the anchor can be inserted fully. A common technique is to hold the anchor against the drill bit and wrap a piece of masking tape around the bit to mark the required depth.
- Drill with Precision: Hold the drill perfectly perpendicular (90 degrees) to the wall surface. Apply steady, even pressure. If drilling into masonry, use a drill with a hammer function and a masonry bit. After drilling, reverse the drill to pull it out, which helps clear some of the debris. For masonry, use a vacuum or compressed air to completely clean out the hole.
Step 4: Inserting the Anchor
A correctly drilled hole will provide a snug fit for the anchor.
- Press It In: Push the anchor into the hole with your thumb. It should go in most of the way but require some light force.
- Tap It Flush: Use a hammer or rubber mallet to gently tap the anchor until the head is perfectly flush with the wall surface. If the anchor bends or deforms, the hole is too small. If it pushes in with no resistance or feels loose, the hole is too large. In this case, you must not proceed. You will need to drill a larger hole for a bigger anchor or patch the wall and start over.
Step 5: Setting the Screw and Mounting the Object
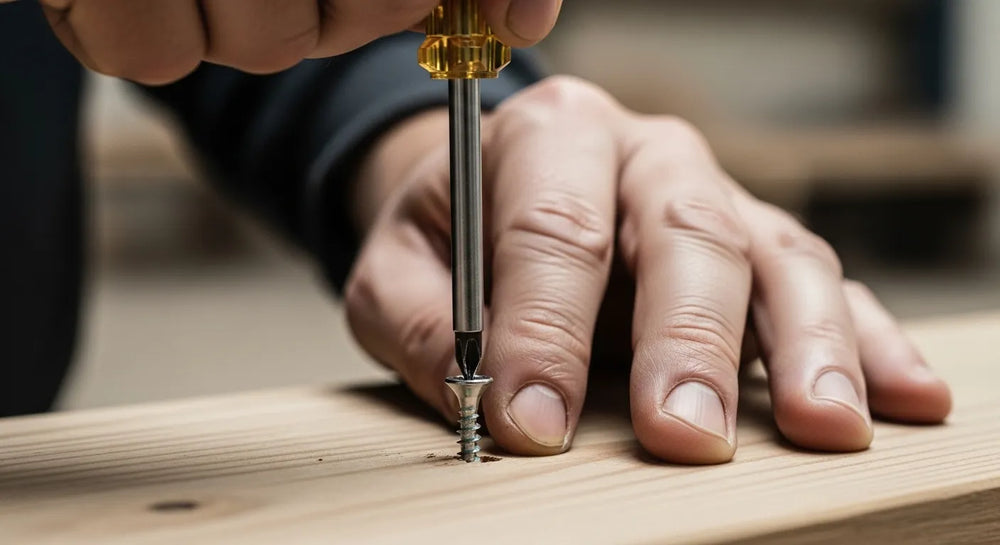
This is the final step that activates the anchor's holding power.
- Position the Item: Place your object over the inserted anchor, aligning the mounting hole with the anchor's opening.
- Drive the Screw: Insert the tip of the screw into the anchor and begin to turn it clockwise with a screwdriver. You should feel initial resistance as the screw threads bite into the plastic.
- Feel the Expansion: As you continue to drive the screw, the resistance will increase. This is the screw expanding the anchor's body and locking it into place.
- Snug, Not Stripped: Tighten the screw until the head is snug against the surface of the object you are mounting. It is crucial not to over-tighten. Applying too much torque can strip the plastic inside the anchor, causing it to lose its grip entirely.
Avoiding Common Pitfalls: Best Practices for Procurement and Installation
Even with a perfect process, certain missteps can lead to failure. Awareness of these common pitfalls is key to ensuring every installation is a success.
- Using the Wrong Drill Bit: This is, without a doubt, the number one cause of anchor failure. A hole that is 1/16th of an inch too large can reduce an anchor's holding power by over 50%. Always use the exact bit size specified by the manufacturer.
- Overloading the Anchor: Every anchor has a specified shear and tensile strength limit. Understand the weight of the object you are hanging and use multiple anchors to distribute the load if necessary. For any application involving significant weight or dynamic loads, upgrade to a heavy-duty metal fastener.
- Ignoring the Base Material: A high-quality ribbed anchor designed for drywall will perform poorly in concrete, and a conical masonry anchor will simply spin in a drywall hole. Match the anchor to the wall.
- Sourcing Low-Quality, Unverified Components: In an industrial or commercial setting, the risk associated with using subpar fasteners is too great. Inconsistent material composition (e.g., brittle recycled plastic), poor molding, and inaccurate dimensions are common in no-name import products. These defects can lead to anchors that crack during installation or fail under a load far below their supposed rating. This is a direct challenge to Supply Chain Transparency. By sourcing exclusively from our curated network of over 800 verified U.S. manufacturers, you gain absolute confidence in the material integrity and performance specifications of every component you purchase. You can learn more about our mission to champion American manufacturing here.
The Strategic Advantage of Sourcing U.S.-Made Fasteners
In today's volatile global market, the decision of where to source components has moved from a simple cost calculation to a complex strategic decision. For everything from fasteners to complex assemblies, choosing to source from American manufacturers offers tangible business advantages.
- Supply Chain Resilience: The past few years have exposed the fragility of long, complex global supply chains. Sourcing domestically drastically reduces lead times, eliminates the risk of customs delays, and insulates your projects from international shipping disruptions. When an MRO team faces an unexpected equipment breakdown, waiting weeks for a small but critical part is not an option. Our platform provides direct access to in-stock products from American facilities, ready to ship.
- Unwavering Quality and Compliance: U.S. manufacturers operate under some of the world's most stringent quality control and safety standards. For a design engineer specifying components for a critical application, this provides an unparalleled level of assurance. The parts you receive will match the specs you ordered, every single time.
- Driving the American Manufacturing Revival: Every purchase made from a domestic manufacturer is an investment in American jobs, innovation, and industrial independence. At Maden.co, we believe America's manufacturing revival is here, and our entire platform is built to fuel it. We are committed to democratizing access to this industrial base, making it as easy to buy from a factory in Ohio as it is from any global distributor. If you are a U.S. manufacturer committed to quality, we invite you to Register as a vendor and join the American manufacturing revival.
- Customer Empowerment through Digital Innovation: We leverage technology to reduce procurement friction. Our platform allows you to search millions of products, filter by precise technical specifications, compare options from different vendors, and complete your purchase in a single, streamlined transaction. Should you have any questions or require assistance sourcing a hard-to-find component, our U.S.-based team of experts is ready to provide support. Please do not hesitate to contact us with your inquiry.
Streamlining Procurement: Beyond the Component
Effective procurement is about more than just finding the right part at the right price. It's about optimizing the entire process to save time, manage budgets, and reduce risk. This is where a strategic partnership with a modern B2B marketplace can transform your operations. For a procurement manager under pressure to source a wide range of MRO supplies for multiple facilities, the ability to consolidate vendors and streamline purchasing is a game-changer.
Instead of managing dozens of accounts and purchase orders, you can access a vast catalog in one place. This efficiency directly reduces the Total Cost of Ownership by saving countless hours of administrative labor. Furthermore, we understand that managing cash flow is critical for businesses of all sizes. Stocking up on essential supplies or placing large orders for capital projects can strain budgets. To empower our customers, we've integrated a powerful financial tool directly into our platform. You can apply for Instant Financing at checkout to streamline your capital-intensive projects. This allows you to acquire the necessary materials to keep your projects moving forward while managing your cash flow with greater flexibility and control.
Conclusion
The humble plastic anchor is a testament to the fact that in the industrial world, there are no insignificant parts. A commitment to quality, precision, and excellence must extend to every component, no matter how small. A properly selected and installed anchor ensures safety, durability, and a professional finish, while a poorly chosen or installed one can lead to failure, rework, and risk. The key to success lies in understanding the different types of anchors, meticulously following the correct installation procedure, and, most importantly, sourcing high-quality components from trusted manufacturers.
By choosing to source from Maden.co, you are not just buying a part; you are investing in a more resilient supply chain, guaranteeing component quality, and supporting the resurgence of American manufacturing. Don't let a small fastener compromise the integrity of your next project. Explore our extensive catalog of American-made fastening solutions, from the versatile Tapered and Ribbed White Plastic Anchor to the reliable Ribbed Plastic Anchor and robust Conical Bantam Plastic Anchor. Empower your procurement process, enhance your project outcomes, and manage your budget effectively by applying for Instant Financing directly at checkout.
Frequently Asked Questions (FAQ)
1. Can I reuse a plastic anchor? It is strongly recommended not to reuse a plastic anchor. The initial installation process permanently deforms the plastic as it expands to grip the wall. A reused anchor will not provide the same holding power and is significantly more likely to fail under load. For safety and reliability, always use a new anchor for every installation.
2. What happens if my pilot hole is too big? If the pilot hole is too large, the anchor will not be able to expand sufficiently to grip the base material. It will either spin in the hole when you try to insert the screw or pull out easily under minimal load. You cannot use this hole as is. The best solution is to remove the loose anchor, patch the hole appropriately for the wall material, and then re-drill a new, correctly sized hole once the patch has fully cured.
3. How do I know the weight limit of a plastic anchor? The manufacturer specifies the load capacity (both shear and pull-out strength) on the product's packaging or in its official technical data sheet. It is crucial to consult this information before installation. On a marketplace like Maden.co, this technical data is provided on the product detail pages, ensuring you can select an anchor that safely meets the load requirements of your application.
4. Are all plastic anchors the same? Absolutely not. The type of plastic used (e.g., nylon is generally stronger and more durable than polyethylene), the specific design of the anchor (ribs, wings, conical shape), and the overall manufacturing quality control can vary dramatically. Sourcing from verified, reputable U.S. manufacturers ensures that you receive a high-quality component that performs consistently and meets its stated specifications, reducing the risk of failure.


