How to Use Plastic Wall Anchors on Drywall Correctly
Table of Contents
- Introduction
- The Critical Role of Wall Anchors: Understanding Drywall's Limitations
- Deconstructing the Plastic Wall Anchor: Types and Applications
- A Strategic Approach to Anchor Selection
- The Step-by-Step Installation Process for a Flawless Finish
- Common Mistakes and How to Avoid Them
- Sourcing with Confidence: The Maden.co Advantage
- Conclusion: Building with Precision and Pride
- Frequently Asked Questions (FAQ)
Introduction
A facilities manager hangs a new safety information board in the breakroom. A week later, it's on the floor, having ripped a chunk of drywall from the wall. This common failure isn't just an inconvenience; it's a symptom of a small but critical oversight—improperly installed fasteners. In industrial settings, maintenance projects, and commercial fit-outs, the integrity of every component matters. A simple plastic wall anchor, when used correctly, can mean the difference between a secure installation and a costly repair. This scenario highlights a crucial principle in any operational environment: the smallest details can have the largest impact on safety, efficiency, and total cost of ownership.
This article provides a definitive, technically sound guide for procurement managers, MRO professionals, and business owners on how to properly select and install plastic wall anchors in drywall. We will move beyond basic instructions to cover the critical nuances: understanding different anchor types, matching them to specific load requirements, and executing a flawless installation process. We'll explore the engineering behind these essential components and detail the common pitfalls that lead to failure. Our aim is to equip you with the practical expertise needed to ensure every item you mount—from heavy-duty shelving in a workshop to critical signage in a hallway—is secure, stable, and professionally finished. This commitment to industrial excellence and supply chain transparency is the foundation of everything we do at Maden.co.
By mastering this fundamental skill, you enhance the safety and functionality of your workspace while also reducing procurement friction and long-term maintenance costs. The core message is simple: leveraging the right American-made component and the correct installation technique is a strategic decision that pays dividends in reliability and performance.
The Critical Role of Wall Anchors: Understanding Drywall's Limitations
Before diving into the specifics of anchors, it's essential to understand the material you're working with. Drywall, also known as plasterboard or gypsum board, is the standard for interior walls in most modern construction. It consists of a layer of gypsum plaster pressed between two thick sheets of paper. While it offers excellent fire resistance, sound insulation, and a smooth finish for painting, its core structural weakness is its low density and brittle nature.
You cannot simply drive a screw into drywall and expect it to hold any significant weight. The gypsum core will crumble under the pressure and shear forces exerted by the screw's threads, creating a loose, unreliable connection. The screw will easily pull out, often taking a piece of the wall with it.
This is where a wall anchor becomes indispensable. Its purpose is to bypass the weakness of the drywall and create a secure mounting point.
An anchor functions by expanding behind or creating significant friction against the inside of the drywall panel. This distributes the load of the attached object over a much wider surface area than a screw alone, preventing the gypsum from crumbling and ensuring a strong, lasting hold.
For procurement professionals, this isn't just about hanging a picture; it's about ensuring asset integrity. When sourcing fasteners for a commercial or industrial project, understanding this principle is key to avoiding costly rework, potential safety hazards, and the operational downtime associated with failed installations.
Deconstructing the Plastic Wall Anchor: Types and Applications
Not all plastic anchors are created equal. They are engineered for different load capacities and installation methods. Choosing the correct type is the first and most important step in the process. At Maden.co, we champion digital innovation to make sourcing these specific components seamless, connecting you with a vast catalog of over 2.5 million products from our network of 800+ verified U.S. manufacturers.
Expansion Anchors (Ribbed Plastic Anchors)
This is the most common and recognizable type of plastic wall anchor. These anchors are designed with ribs or "wings" along their body.
- How They Work: When you drill a pilot hole and insert the anchor, the ribs grip the inside of the hole to prevent the anchor from spinning. As you drive a screw into the anchor, the anchor's tapered, split body expands, pressing firmly against the back of the drywall. This expansion creates a high-friction, wedge-like hold.
- Best For: Light to medium-duty applications. They are ideal for hanging items like smoke detectors, thermostats, small shelves, lightweight signage, and picture frames.
- Key Consideration: The success of an expansion anchor is highly dependent on drilling the correct size pilot hole. A hole that is too large will prevent the anchor from expanding properly, while a hole that is too small can damage the anchor or the drywall during insertion. For reliable, consistent performance in general-purpose applications, a quality Ribbed Plastic Anchor made in the U.S. provides the material integrity needed for a secure fit.
Self-Drilling Anchors (Threaded or "Zip-It" Anchors)
These anchors offer a more robust solution and often simplify the installation process by eliminating the need for a separate drill bit.
- How They Work: Self-drilling anchors feature a sharp, drill-like tip and coarse, wide threads along their body. You can drive them directly into the drywall using a Phillips head screwdriver or a drill with a screwdriver bit. The aggressive threads cut into the gypsum, creating a very secure hold. Once the anchor is flush with the wall, you drive your mounting screw into the center of the anchor.
- Best For: Medium-duty applications. They are an excellent choice for mounting shelving units, curtain rods, heavy mirrors, and small cabinets. Their design provides significantly more holding power than a standard ribbed anchor.
- Key Consideration: While they eliminate the pilot hole step, it's crucial to apply steady, even pressure during installation to prevent them from "stripping out" the drywall. For demanding tasks where reliability is paramount, a U.S.-manufactured Medium Duty Nylon Wall Anchor, Self-Drilling Drywall Zip-It® style is an excellent choice, engineered for superior grip and durability.
Sleeve-Type Anchors
While often made of metal (like Molly bolts), plastic versions of sleeve-type anchors exist and offer a strong alternative.
- How They Work: These anchors have a sleeve that, when the screw is tightened, compresses and expands outwards behind the drywall, similar to how a toggle bolt works but in a more compact form. The sleeve creates "wings" that brace against the interior wall surface.
- Best For: Medium to heavy-duty applications. They can handle more weight than ribbed or self-drilling anchors and are suitable for items like grab bars, heavy shelving, or wall-mounted equipment.
- Key Consideration: They typically require a larger pilot hole and can be more complex to install. They are a good choice when a high shear and tensile strength is required.
A Strategic Approach to Anchor Selection
Choosing the right anchor is a procurement decision that directly impacts project outcomes. It requires a clear understanding of the application's demands.
1. Evaluate the Load Weight
The single most important factor is the weight of the object you intend to hang. Anchors are rated for specific load capacities, which are typically listed on the packaging or in the product specifications. These ratings should be treated as maximums under ideal conditions.
- Light-Duty (5-20 lbs): Small picture frames, smoke detectors, clocks. Ribbed expansion anchors are usually sufficient.
- Medium-Duty (20-50 lbs): Large mirrors, shelving, curtain rods, heavy artwork. Self-drilling threaded anchors or heavier-duty expansion anchors, such as this Medium-Duty Nylon Wall Anchor for Drywall, are appropriate.
- Heavy-Duty (50+ lbs): Televisions, cabinets, grab bars, heavy-duty industrial shelving. For these loads, you should always try to locate a wall stud. If a stud is not available, you must use heavy-duty metal toggle bolts or sleeve anchors, as plastic anchors are generally not rated for this level of stress.
Professional Tip: Always err on the side of caution. If your object weighs 18 lbs, opt for an anchor rated for at least 25-30 lbs to build in a safety margin. Consider both shear strength (downward force) and tensile strength (pull-out force).
2. Match the Screw Size to the Anchor
Every plastic anchor is designed to work with a specific range of screw sizes (diameter and length). Using a screw that is too small will not cause the anchor to expand properly, resulting in a weak hold. A screw that is too large can split the anchor or damage the drywall. The product specifications will always indicate the compatible screw size. This level of detail is critical for design engineers and MRO buyers who require precise component matching for compliance and performance.
3. Consider the Drywall Thickness
Standard residential drywall is 1/2-inch thick, while 5/8-inch drywall (Type X) is often used in commercial buildings or on ceilings for its increased fire resistance. Ensure the anchor you choose is long enough to pass through the drywall and expand fully in the hollow space behind it. The anchor's "grip range" should be compatible with your wall's thickness.
The Step-by-Step Installation Process for a Flawless Finish
Executing a proper installation requires precision and the right tools. Rushing this process is the primary cause of anchor failure.
Step 1: Gather Your Tools and Materials
- The correct plastic wall anchors and matching screws
- Pencil for marking
- Tape measure
- Level
- Drill with the correct size drill bit (for expansion anchors)
- Screwdriver (manual or drill bit)
- Hammer or rubber mallet
- Safety glasses
Step 2: Mark the Installation Point
Use your tape measure and level to precisely mark where you want to install your anchor. A clear, accurate mark is the foundation for a professional-looking installation. Double-check your measurements before proceeding. If hanging a heavy item, use a stud finder first. Anchoring directly into a wood stud is always the strongest possible method and should be your first choice whenever possible.
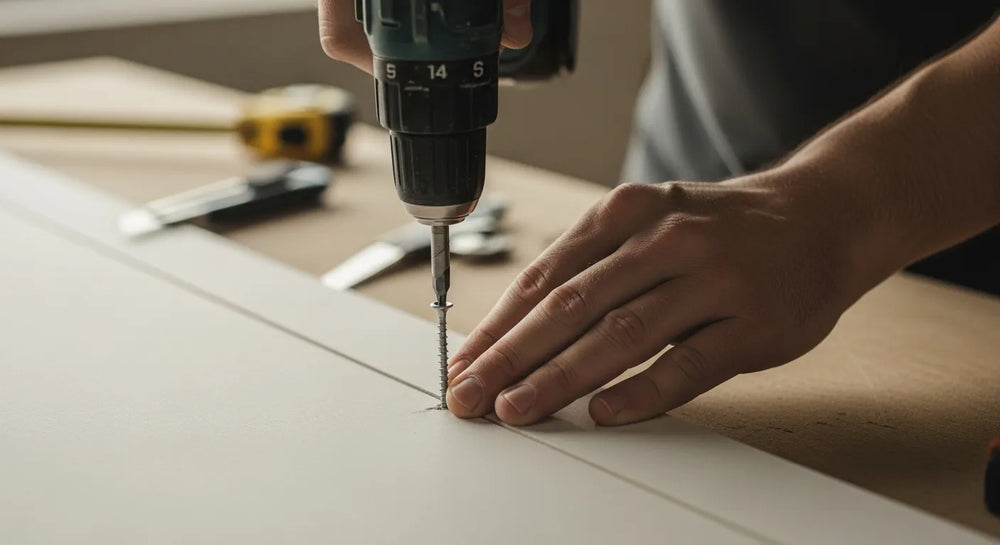
Step 3: Drill the Pilot Hole (for Expansion Anchors)
This is the most critical step for ribbed expansion anchors.
- Select the Correct Drill Bit: The anchor's packaging or technical specifications will state the exact drill bit size required. Do not guess. Using a bit that's 1/16th of an inch too large can compromise the anchor's holding power completely.
- Drill with Precision: Hold the drill perpendicular to the wall. Drill a clean, straight hole at your marked point. Drill only deep enough to pass through the drywall; there's no need to drill far into the wall cavity.
Step 4: Insert the Anchor
- For Expansion Anchors: Gently push the anchor into the pilot hole. It should be a snug fit. If it's too loose, your hole is too big. If it requires excessive force, your hole is too small. Once inserted most of the way, lightly tap it with a hammer or rubber mallet until the head of the anchor is flush with the surface of the drywall. It should not stick out or be recessed.
- For Self-Drilling Anchors: Place the sharp tip of the anchor on your mark. Using a screwdriver, apply firm, steady pressure and turn clockwise. The anchor will begin to bore its way into the drywall. Continue turning until the head of the anchor is flush with the wall. Do not overtighten, as this can strip the gypsum and ruin the hole.
Step 5: Secure the Item
Position your item (e.g., a shelf bracket) over the installed anchor. Insert the screw through the item's mounting hole and into the anchor. Turn the screw clockwise. You will feel resistance as the screw engages the anchor and causes it to expand. Continue tightening until the screw is snug. Again, avoid over-tightening. The screw should be firm, but cranking on it with excessive force can strip the anchor's internal threads or damage the wall.
Common Mistakes and How to Avoid Them
Even with the right components, installation errors can lead to failure. Here are the most common pitfalls to avoid:
- Using the Wrong Drill Bit: The most frequent error. Always match the bit to the anchor's specification.
- Over-Tightening: Whether installing the anchor or the final screw, excessive torque is your enemy. It can strip the anchor or the drywall, rendering the connection useless.
- Reusing an Old Hole: Never try to put a new anchor into a hole from an old one. The drywall around the hole is already compromised. Drill a new hole at least a few inches away.
- Ignoring Weight Limits: Do not attempt to hang a heavy object with a light-duty anchor. This is a recipe for failure and a potential safety hazard.
- Poor Quality Anchors: Sourcing from unverified suppliers can lead to inconsistent material quality, brittleness, and a higher failure rate. Partnering with verified U.S. manufacturers mitigates this risk.
Sourcing with Confidence: The Maden.co Advantage
In a professional environment, sourcing reliable components is as important as installing them correctly. For an MRO buyer facing an unexpected equipment breakdown or a design engineer needing specific material certifications for a new prototype, the ability to quickly find and finance a verified, U.S.-made part is a game-changer. This is where we come in.
Our mission at Maden.co is to democratize access to American manufacturing. We believe that sourcing high-quality, domestic components should be as accessible and convenient as any global alternative. This belief is woven into our platform, which reflects our core values of American Manufacturing Pride, Digital Innovation, and Customer Empowerment. You can learn more about our mission to champion American manufacturing here.
By connecting industrial buyers with a meticulously curated network of verified U.S. manufacturers, we help you build a more resilient and transparent supply chain. This reduces lead times, ensures compliance with critical industry standards, and improves your Total Cost of Ownership (TCO). When you source an essential component like a wall anchor through our marketplace, you're not just buying a piece of plastic; you're investing in reliability and supporting the American manufacturing revival.
For capital-intensive projects or large-volume MRO purchases, managing cash flow is paramount. That’s why we offer a strategic advantage at checkout. You can apply for Instant Financing to streamline your procurement process, allowing you to acquire the necessary materials without disrupting your operational budget.
Furthermore, if you are part of the backbone of this revival, we invite you to join us. Are you a U.S. manufacturer? Register as a vendor and join the American manufacturing revival.
Conclusion: Building with Precision and Pride
Mastering how to use plastic wall anchors on drywall is more than a simple maintenance task; it is an exercise in precision, safety, and strategic sourcing. By understanding the mechanical principles of drywall, selecting the appropriate anchor for the specific load, and following a meticulous installation process, you ensure the integrity and longevity of every mounted fixture. This attention to detail prevents costly damage, enhances workplace safety, and reflects a commitment to professional excellence.
Choosing to source high-quality, American-made anchors reinforces this commitment. It guarantees that the components you rely on are manufactured to the highest standards of quality and durability. This not only provides peace of mind but also strengthens the domestic supply chain, contributing to a more robust and self-reliant industrial ecosystem.
Take the next step in refining your procurement and maintenance operations. Explore the extensive catalog of U.S.-made fasteners and industrial components available on Maden.co. When you're ready to make a purchase, remember you can apply for Instant Financing at checkout to manage your cash flow effectively and equip your team for success. If you have specific sourcing questions, our team is ready to help.
Frequently Asked Questions (FAQ)
1. Can I reuse a plastic wall anchor?
No, it is not recommended to reuse a plastic wall anchor. Once an anchor has been expanded by a screw, its structural integrity is compromised. Removing the screw will not return the anchor to its original shape, and attempting to reuse it will result in a significantly weaker hold. Always use a new anchor for a new installation.
2. What should I do if the hole I drilled is too big for the anchor?
If the pilot hole is too large, the anchor will not grip properly and will likely spin in place or fail under load. Do not try to fill the gap with compound. The best solution is to move to a slightly different location (at least an inch or two away) and drill a new, correctly sized hole. Alternatively, you can use a larger anchor that corresponds to a larger drill bit, but this may require using a larger screw as well.
3. Do I still need a stud finder if I'm using a wall anchor?
Yes, using a stud finder is always the first and best step before drilling into any wall. The strongest possible way to hang any object is to drive a screw directly into a wooden stud. Wall anchors are specifically designed for use in the hollow sections of drywall between studs. You should only use an anchor when securing to a stud is not possible for your desired location.
4. How do I know the exact weight limit of my plastic anchor?
The weight limit, or load capacity, is almost always printed on the anchor's original packaging or included in the online product specifications. These ratings are determined by the manufacturer under ideal installation conditions. It's critical to check this information before purchasing and to choose an anchor with a weight limit that significantly exceeds the weight of the object you plan to hang to create a safe margin of error.


