Installing Plastic Drywall Anchors Without a Drill
Table of Contents
- Introduction
- Why Go Drill-Free? Scenarios and Strategic Advantages
- Understanding Drywall Anchor Types for Drill-Free Installation
- The Toolkit: Essential Manual Tools for Drill-Free Success
- Step-by-Step Installation Guide: The Manual Methods
- Pro-Tips and Common Pitfalls to Avoid
- Sourcing for Success: The Maden.co Advantage
- Conclusion
- Frequently Asked Questions (FAQ)
Introduction
Imagine this scenario: an MRO manager is tasked with outfitting a newly leased section of a warehouse. Safety signs, small fire extinguishers, and tool boards need to be mounted—and quickly. The facility manager, however, has restricted the use of power tools in this specific area to control dust contamination near a sensitive assembly line. In another part of the country, a field service technician is making a quick repair at a client site and realizes their drill battery is dead. These situations are not just minor inconveniences; in the world of industrial operations, they represent friction, delays, and potential impacts on project timelines and budgets. The ability to adapt and execute essential tasks with the tools at hand is a hallmark of operational excellence.
This is where the practical skill of installing plastic drywall anchors without a drill becomes more than just a handy trick—it becomes a strategic capability. This guide is designed for the professionals on the ground: the MRO buyers, facilities managers, and design engineers who understand that efficiency is measured in both minutes and materials. We will delve into the proper techniques, tool selection, and anchor types required to create secure, reliable mounting points in hollow walls without ever reaching for a power tool.
Our focus at Maden.co is to empower American industry by providing direct access to the components that keep facilities running and projects moving forward. We believe that mastering fundamental techniques, supported by high-quality, domestically sourced hardware, is a cornerstone of building a resilient and efficient operation. This article will provide a comprehensive, step-by-step methodology for drill-free anchor installation, ensuring your projects are completed to the highest standard, regardless of the tools available.
Why Go Drill-Free? Scenarios and Strategic Advantages
While a power drill is often the go-to tool for expediency, there are numerous professional scenarios where a manual, drill-free approach is not just an alternative, but the superior choice. Understanding these contexts allows procurement and MRO teams to plan more effectively, equipping their staff with the right components and knowledge to handle any situation. This strategic foresight directly impacts the Total Cost of Ownership (TCO) by reducing labor time, preventing costly mistakes, and minimizing operational disruptions.
Common Industrial and Commercial Scenarios
- Controlled Environments: In cleanrooms, laboratories, food processing facilities, or data centers, dust and debris are contaminants. The fine gypsum dust created by drilling can compromise sensitive equipment or sterile environments. A manual installation method produces minimal dust, making it the required procedure in these settings.
- Noise-Sensitive Areas: In occupied offices, healthcare facilities, or residential buildings where maintenance work is being performed, the noise from a power drill can be highly disruptive. A quiet, manual installation respects the operational environment and avoids complaints.
- Lack of Power Access: On large construction sites, in remote utility closets, or during a power outage, access to an electrical outlet may not be possible. Relying solely on battery-powered tools introduces its own logistical challenges of keeping batteries charged. Manual methods are completely independent of a power source.
- Low-Volume, High-Frequency Tasks: For a technician making dozens of small installations across a large facility—like mounting small sensors or cable clamps—setting up a drill for each one is inefficient. A simple pouch with a screwdriver and a handful of anchors is far more agile.
- Minimizing Wall Damage: In temporary spaces, leased commercial properties, or when dealing with older, more fragile drywall, a drill can sometimes cause excessive damage if not handled with care. A manual approach offers greater tactile feedback and control, allowing for a cleaner, more precise hole that is easier to patch later.
Embracing these techniques aligns with our core value of Industrial Excellence. It's about having the versatility and expertise to apply the right solution to every challenge, ensuring safety, efficiency, and quality in every task.
Understanding Drywall Anchor Types for Drill-Free Installation
The success of any drill-free installation hinges on selecting the correct type of anchor for the job. Not all anchors are designed for this application, and choosing the wrong one can lead to a weak hold or a damaged wall. At Maden.co, we provide transparent access to specifications for millions of U.S.-made products, empowering you to make informed decisions. Let's explore the primary categories of plastic anchors well-suited for manual installation.
Self-Drilling Anchors
These are the heroes of drill-free installation. As the name implies, self-drilling anchors are engineered with a sharp, aggressive point and coarse threads that are designed to cut their own pilot hole directly into the drywall. They offer the fastest and most straightforward installation path when a drill isn't an option.
Key Features:
- Mechanism: The anchor itself acts as the drill bit. As you turn it with a screwdriver, it carves a perfectly sized hole and threads itself securely into the gypsum panel.
- Efficiency: They eliminate the separate step of creating a pilot hole, significantly reducing installation time.
- Considerations: They work best in standard 1/2-inch or 5/8-inch drywall and are typically intended for light- to medium-duty applications.
A prime example of this design is the Medium Duty Nylon Wall Anchor #6 Self-Drilling Drywall Zip-It®. This American-made component is a staple for MRO professionals needing to quickly mount items like smoke detectors, thermostats, or lightweight signage. Its nylon construction provides durability without being brittle, a testament to the quality that comes from sourcing from verified domestic manufacturers.
Expansion Anchors (Ribbed Style)
Expansion anchors are a classic and highly reliable choice. They function by expanding within the wall cavity as a screw is driven into them, creating a tight, friction-based hold against the back of the drywall. While they require a pilot hole to be created first, their holding power is often substantial.
Key Features:
- Mechanism: The anchor body is inserted into a pre-made hole. As the screw threads into the anchor, it forces the split end to flare out, locking it in place.
- Ribbed Design: The exterior ribs are a critical feature. They bite into the surrounding drywall, preventing the anchor from spinning in the hole as the screw is tightened—a common point of failure with lower-quality, smooth-sided anchors.
- Versatility: They come in a wide range of sizes to accommodate different screw gauges and load requirements.
For applications requiring a robust hold for items like shelving brackets or small cabinets, the Ribbed Plastic Anchor is an industry standard. The challenge, of course, is creating that pilot hole without a drill, a process we will detail step-by-step. Choosing a quality ribbed anchor ensures that once you’ve done the manual work of creating the hole, the installation will be secure and spin-free.
Standard Tapered/Conical Anchors
These are some of the most common and economical types of plastic anchors. Similar to ribbed anchors, they require a pilot hole and work by expansion. Their simple, tapered design has been a reliable solution for light-duty tasks for decades.
Key Features:
- Mechanism: They function on the same expansion principle as ribbed anchors, though their shape is a simple cone.
- Application: Best suited for very light loads where high shear or tensile strength is not the primary concern, such as hanging pictures, clocks, or small decorative items.
- Installation: The process is nearly identical to that of a ribbed anchor, requiring a carefully created manual pilot hole.
The Medium Duty Nylon Wall Anchor #8 for Drywall is a versatile option in this category. Sourcing such a fundamental component through a transparent platform like ours provides peace of mind. You know you're getting a product made from quality materials, ensuring predictable performance every time. This commitment to Supply Chain Transparency is a core part of our mission; you can learn more about our mission to champion American manufacturing here.
The Toolkit: Essential Manual Tools for Drill-Free Success
While the "drill-free" aspect is the focus, a successful installation still requires a few basic hand tools. Assembling a small, dedicated kit for this purpose can empower any technician to handle these tasks with professional results.
For Creating the Pilot Hole (Non-Self-Drilling Anchors)
The critical step for installing expansion or tapered anchors is creating a clean, correctly sized pilot hole.
- Phillips Head Screwdriver: This is often the most readily available tool. Choose a screwdriver with a sharp, well-defined point. The technique involves using pressure and a twisting motion to pierce the drywall paper and then ream out the gypsum core.
- Awl or Gimlet: These are specialized tools designed for creating small holes. An awl has a sharp, straight point, while a gimlet has a screw-like tip. Both offer excellent control and create a very clean starting point, minimizing damage to the wall surface. They are an invaluable addition to any MRO toolkit.
- Nail: In a pinch, a nail can be used. Select a nail with a diameter slightly smaller than the body of the anchor. It can be tapped in gently with a hammer and then removed with pliers, leaving a starter hole.
For Seating and Driving Anchors
- Screwdrivers (Multi-Bit or Dedicated Phillips/Flathead): You will need a screwdriver that properly fits both the head of the self-drilling anchor (if used) and the head of the screw you will use to finish the installation. Using the wrong size bit is the number one cause of stripping a screw or anchor head.
- Hammer or Rubber Mallet: A lightweight hammer or, preferably, a rubber mallet is essential for gently tapping expansion anchors into their pilot holes until they are flush with the wall. The soft face of a mallet is ideal as it prevents damage to the anchor or the wall surface.
Step-by-Step Installation Guide: The Manual Methods
With the right anchor and tools selected, it's time to execute the installation. The technique varies slightly depending on the anchor type. Precision and patience are more important than force.
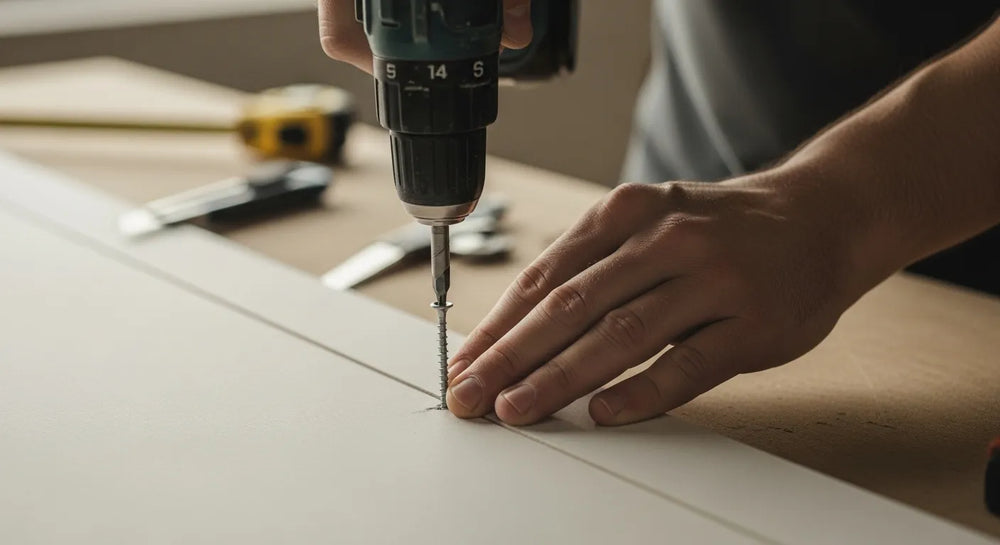
Method 1: Installing Self-Drilling Anchors
This is the most direct drill-free method. We’ll use the Medium Duty Nylon Wall Anchor #6 Self-Drilling Drywall Zip-It® as our example.
- Mark Your Location: Use a pencil to make a small, precise mark on the wall where the center of the anchor should be.
- Position the Anchor: Place the sharp tip of the self-drilling anchor directly on your mark.
- Apply Initial Pressure: Using a Phillips screwdriver that fits snugly in the anchor's head, apply firm, steady, inward pressure. This will embed the tip into the drywall paper, preventing it from "walking" or skipping across the surface.
- Turn and Drive: Begin turning the screwdriver clockwise. You will feel the anchor's threads engage and start cutting into the drywall. Maintain consistent pressure. The anchor should pull itself into the wall.
- Set It Flush: Continue turning until the head of the anchor is perfectly flush with the surface of the drywall. It's crucial not to overtighten. Overtightening can strip the gypsum, compromising the anchor's hold. The anchor head should not be countersunk or recessed into the wall.
- Insert the Screw: Place your item over the anchor, insert the corresponding screw, and tighten until it is snug. The installation is complete.
Method 2: Installing Ribbed Expansion Anchors
This method requires creating a pilot hole manually. We'll reference the installation of a Ribbed Plastic Anchor.
- Mark Your Location: As before, mark the wall clearly.
- Create the Starter Point: Take a sharp Phillips screwdriver or an awl. Place the tip on the mark and press firmly to create a small dimple. For more control, you can gently tap the end of the screwdriver handle with the palm of your hand or a small hammer. This pierces the outer paper layer and prevents tearing.
- Widen the Hole: Once the tip is through, begin twisting the screwdriver or awl back and forth while maintaining gentle inward pressure. This action will ream out the soft gypsum core. The goal is to create a hole that is the same diameter as the anchor's body (not including the ribs).
- Test the Fit: Periodically check the hole size by attempting to insert the anchor. The fit should be snug. You should need to apply light pressure to push it in. If it slides in easily, the hole is too big, and the anchor will not hold effectively.
- Seat the Anchor: Once the hole is correctly sized, push the anchor in as far as you can with your thumb. Then, use a rubber mallet or gently tap with a hammer to drive it the rest of the way until its flange is flush with the wall. The ribs will bite into the drywall, preventing it from spinning.
- Drive the Screw: Position your fixture, insert the appropriate size screw, and tighten. You will feel the resistance increase as the screw causes the anchor's hidden end to expand and grip the back of the drywall. Stop when the screw is snug.
Method 3: Installing a Standard Tapered Anchor
The process for a standard anchor like the Medium Duty Nylon Wall Anchor #8 for Drywall is nearly identical to the ribbed anchor method, with one key consideration.
- Follow Steps 1-4 from Method 2: The process of marking, starting, and widening the pilot hole is the same.
- Precision is Key: Since these anchors lack the aggressive external ribs of their counterparts, the precision of the pilot hole is even more critical. A hole that is even slightly too large will almost certainly result in the anchor spinning once you try to drive the screw. Aim for a fit that requires a firm push or gentle tap to seat.
- Seat and Secure: Gently tap the anchor flush with the wall. When driving the screw, you may need to apply slight inward pressure on the screw at the beginning to ensure the anchor expands enough to "bite" before it has a chance to spin.
This level of detail and commitment to proper technique is a reflection of our value of Customer Empowerment. We provide not only the components but also the knowledge to help you use them effectively, ensuring the success and safety of your projects.
Pro-Tips and Common Pitfalls to Avoid
Even with the right tools and techniques, small mistakes can compromise the integrity of the installation. Keep these professional tips in mind to ensure a perfect result every time.
Key Takeaway: The integrity of a drywall anchor installation lies in finesse, not force. Drywall is a composite of paper and gypsum—a strong yet brittle material that rewards a patient and precise approach.
The Do's of Drill-Free Installation
- Do Check for Obstructions: Before making any hole, check for what's behind the drywall. Use a stud finder to locate studs, pipes, or wiring. The "knock test" can also help—a hollow sound indicates a clear space, while a solid thud suggests a stud. Anchors are only for hollow cavities.
- Do Match the Screw to the Anchor: Every anchor is designed for a specific range of screw sizes. This information is usually available on the packaging or the product specification sheet. Using a screw that is too thin will fail to expand the anchor, while a screw that is too thick can split it.
- Do Respect Load Ratings: Always use an anchor rated for the weight of the object you are hanging, with a significant safety margin. Load ratings are a critical piece of data for any MRO or engineering application.
- Do Ensure the Anchor is Flush: The flange or head of the anchor must sit perfectly flush against the wall surface before you insert the screw. A protruding anchor will not hold correctly and will prevent your mounted item from sitting flat.
The Don'ts of Drill-Free Installation
- Don't Use Excessive Force: The most common mistake is trying to hammer an anchor into a hole that is too small or overtightening a screw. This will crush the drywall, damage the anchor, and result in a complete failure of the fastening point.
- Don't Make the Pilot Hole Too Big: A loose anchor is a useless anchor. It's always better to start with a smaller hole and gradually enlarge it until you achieve a snug fit.
- Don't Reuse Anchors: Once an anchor has been installed and a screw has been driven into it, its expansion mechanism has been used. Removing it and trying to reuse it elsewhere will result in significantly reduced holding power.
- Don't Ignore Material Quality: In a professional setting, the reliability of a simple component like a drywall anchor is non-negotiable. Sourcing cheap, unverified hardware can lead to failures that cost far more in time and repairs than the initial savings.
Sourcing for Success: The Maden.co Advantage
For a procurement manager under pressure to source a specific component, a design engineer needing material certifications for a new prototype, or an MRO buyer facing an unexpected equipment breakdown, the ability to quickly find and finance a verified, U.S.-made part is a game-changer. The seemingly simple drywall anchor is a perfect microcosm of a larger supply chain challenge: ensuring quality, consistency, and reliability for even the most basic components.
This is the problem we solve at Maden.co. Our mission is to democratize access to American manufacturing, proving that American-made components are as accessible and convenient as any global alternative. We connect industrial buyers with a network of over 800+ verified U.S. manufacturers, offering a catalog of over 2.5 million products. This direct line to domestic suppliers embodies our commitment to the American Manufacturing Pride that is driving the nation's industrial revival.
When you source anchors through our platform, you're not just buying a piece of plastic; you are investing in a more resilient and transparent supply chain. And for larger projects or facility-wide upgrades that require thousands of components, we offer a strategic tool to manage your capital. You can apply for Instant Financing at checkout to streamline your capital-intensive projects, preserving cash flow while acquiring the necessary materials to keep your operations running smoothly.
Are you a U.S. manufacturer producing quality industrial components? We invite you to be part of this movement. Register as a vendor and join the American manufacturing revival. For buyers with unique or hard-to-find component needs, our team is standing by. If you have specific sourcing questions, our team is ready to help.
Conclusion
Mastering the skill of installing plastic drywall anchors without a drill is a testament to the resourcefulness and adaptability required in modern industrial and commercial environments. It is a practical technique that saves time, minimizes disruption, and ensures professional results even when conditions are not ideal. Success is not merely about avoiding the drill; it is about a systematic approach that involves understanding the different types of anchors, selecting the right one for the application, and executing the installation with precision and care.
The reliability of these installations, however, begins long before the tools ever touch the wall. It starts with a commitment to sourcing high-quality, dependable components. By choosing American-made anchors from verified manufacturers, you are building a foundation of quality that ensures safety and long-term performance.
We encourage you to explore the extensive catalog of fasteners, MRO supplies, and industrial components available on Maden.co. Empower your team with the best materials our country has to offer and build a more resilient, efficient, and proudly American operation. And remember to leverage strategic tools like Instant Financing at checkout to make your procurement process as powerful as the products you source.
Frequently Asked Questions (FAQ)
1. What is the best manual tool for making a pilot hole in drywall? While a Phillips screwdriver is often the most convenient tool, a dedicated awl or gimlet provides the most control and creates the cleanest hole. Their sharp points pierce the drywall paper without tearing it, and their tapered shafts allow for precise widening of the hole, leading to a more secure anchor fit.
2. Can I use a hammer to install a self-drilling anchor? No, you should never use a hammer with a self-drilling anchor. These anchors are designed to be driven with a screwdriver. The sharp tip and threads cut their own way into the drywall. Hammering them will blunt the tip, destroy the threads, and likely cause significant damage to the wall, resulting in a completely failed installation.
3. How do I know what size screw to use with my plastic anchor? The anchor's packaging or the manufacturer's technical data sheet will specify the appropriate range of screw diameters (gauges) and lengths. Using a screw that is too small in diameter will not expand the anchor sufficiently, leading to poor holding power. A screw that is too large can split the anchor. The screw should be long enough to pass through the object you are mounting and fully engage the threads deep inside the anchor.
4. What should I do if the anchor starts spinning in the hole? A spinning anchor is a sign that the pilot hole is too large or the drywall around it has become stripped. Unfortunately, it is very difficult to salvage. The best course of action is to remove the anchor, create a new hole an inch or two away, and start over, being more careful to create a snug-fitting pilot hole. Trying to "fix" a spinning anchor with glue or filler is generally not recommended for professional applications where load-bearing reliability is required.


