How Sleeve Anchors Work: A Technical Breakdown
Table of Contents
- Introduction
- The Core Mechanics: How Expansion Creates Holding Power
- Selecting the Right Sleeve Anchor: A Buyer's Guide
- Proper Installation: The Key to Performance
- Practical Applications in Industrial Settings
- Conclusion
- FAQ
Introduction
A single loose fastener on a production line can bring operations to a grinding halt. In a high-traffic warehouse, a poorly secured piece of equipment isn't just an inconvenience; it's a significant safety liability. For procurement managers, MRO buyers, and engineers, the integrity of an entire project often comes down to the smallest components—the anchors holding everything together. Among the most versatile and reliable of these components is the sleeve anchor. But how exactly does this common piece of hardware generate such immense holding power in unforgiving materials like concrete and brick? Understanding the mechanics behind a sleeve anchor is crucial for ensuring safety, compliance, and operational excellence.
This article provides a detailed technical breakdown of how sleeve anchors work. We will move beyond a superficial overview to explore the physics of expansion and friction that give these fasteners their strength. We will dissect the anchor's components, analyze the various types available, and provide a clear framework for selecting the right anchor for your specific application. Our goal is to empower you with the knowledge to make informed procurement decisions that enhance supply chain resilience and support the backbone of American industry. Here at Maden.co, we believe that access to high-quality, U.S.-made industrial components is fundamental to this success, proving every day that "America's manufacturing revival is here." This guide is a reflection of that commitment—providing the practical expertise you need to build, maintain, and operate with confidence.
The Core Mechanics: How Expansion Creates Holding Power
At its heart, a sleeve anchor is a pre-assembled expansion-style fastener. Its entire design is centered on a simple yet powerful principle: converting the rotational force of tightening a nut or bolt into outward radial pressure. This pressure forces a metal sleeve to expand and press firmly against the interior walls of a pre-drilled hole in a masonry base material. This immense frictional force is what prevents the anchor from pulling out.
To truly grasp how sleeve anchors work, let's break down the process and the role of each component.
Anatomy of a Sleeve Anchor
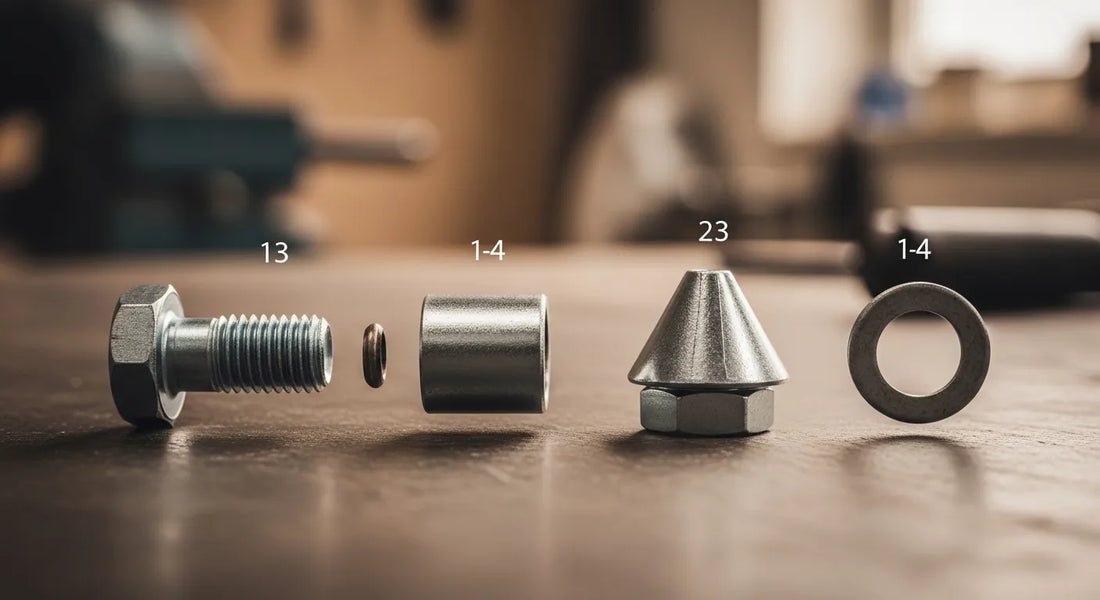
A standard sleeve anchor consists of four primary parts, each with a critical function:
- The Threaded Bolt or Stud: This is the core of the anchor. It features a flared, cone-shaped end that sits inside the sleeve. The other end is threaded and typically equipped with a pre-assembled nut and washer. As you tighten the nut, it pulls the threaded stud upwards.
- The Expansion Sleeve: This is the cylindrical metal tube that surrounds the stud. It is split for a portion of its length, usually into four segments. These splits allow the sleeve to expand outwards when force is applied from within. The length and thickness of the sleeve are key factors in determining the anchor's holding strength.
- The Tapered Expander or Cone: This is the crucial wedge-shaped component at the bottom of the threaded stud. As the stud is drawn upward during tightening, this cone is pulled into the bottom of the expansion sleeve. Its angled shape forces the split sections of the sleeve to expand outwards.
- The Nut and Washer: Located at the top of the anchor, the nut and washer are used to tighten the assembly. The washer helps distribute the load evenly across the surface of the fixture being fastened, preventing damage and ensuring a secure connection.
The Step-by-Step Expansion Process
The magic happens in a sequence of carefully engineered mechanical actions:
- Insertion: The entire pre-assembled anchor is inserted into a properly drilled hole in the base material (e.g., concrete, brick, or block). The top of the anchor, with its nut and washer, remains outside the hole, flush against the item you are securing.
- Initial Tightening: As you begin to turn the nut with a wrench, you are pulling the threaded stud upwards, towards the surface.
- Wedge Engagement: This upward movement pulls the cone-shaped expander at the bottom of the stud into the lower portion of the expansion sleeve.
- Radial Expansion: The cone acts like a wedge, forcing the split sections of the sleeve to flare outwards. This is the critical moment of expansion. The sleeve segments are pushed against the inner walls of the drilled hole with tremendous force.
- Friction Lock: The outward pressure creates a massive amount of friction between the exterior of the sleeve and the interior of the concrete or masonry. This friction is what generates the anchor's "holding value" or pull-out strength. The rougher the inside of the hole, the greater the friction and the stronger the hold.
- Final Clamping: As the nut is tightened to the specified torque, the fixture is securely clamped between the washer and the surface of the base material, creating a stable, load-bearing connection.
This elegant mechanical process is what makes the sleeve anchor such a reliable workhorse for a wide range of medium-to-heavy-duty fastening applications across countless industrial settings.
Selecting the Right Sleeve Anchor: A Buyer's Guide
Choosing the correct sleeve anchor is not a one-size-fits-all decision. A miscalculation can lead to fastener failure, project delays, or serious safety incidents. Procurement professionals and engineers must consider several factors to ensure the anchor they source meets the precise demands of the application. Our mission at Maden.co is to democratize access to American manufacturing, and a key part of that is providing the expertise to navigate these critical decisions. You can learn more about our mission to champion domestic producers and supply chain transparency.
1. Base Material Compatibility
Sleeve anchors are designed exclusively for solid masonry materials. Their expansion mechanism relies on the base material being hard and dense enough to resist the outward pressure of the sleeve.
- Ideal Materials: Poured concrete, solid concrete block (CMU), brick, and dense stone.
- Unsuitable Materials: Do not use sleeve anchors in soft or hollow materials like drywall, plaster, or hollow block. The expansion force will crack, crush, or blow out the base material, resulting in a complete failure of the fastening. For hollow block, specialized sleeve anchors with a longer sleeve that can bridge the hollow section are required.
2. Load Requirements: Tensile vs. Shear
Understanding the forces that will be acting on the anchor is paramount. There are two primary types of loads:
- Tensile Load (Pull-Out Force): This is the force trying to pull the anchor straight out of the hole. Imagine hanging a heavy motor from a ceiling-mounted bracket—the weight of the motor creates a tensile load on the anchors.
- Shear Load (Side-to-Side Force): This is the force acting perpendicular to the anchor, trying to slice it in half. A common example is securing the base plate of a machine to a concrete floor. The vibration and operational forces of the machine create shear loads on the anchors.
Most applications involve a combination of both tensile and shear forces. You must select an anchor with published load values that exceed the maximum anticipated loads for your project. Always consult the manufacturer's technical data sheets for specific load ratings, and remember that these values are often based on ideal conditions (e.g., specific concrete strength, perfect installation).
3. Anchor Dimensions: Diameter, Length, and Embedment
- Diameter: A larger diameter anchor generally provides greater holding power. The diameter chosen will depend on the weight of the item being fastened and the size of the mounting holes in its fixture. Common diameters range from 1/4" to 3/4".
- Length: The anchor's length must be sufficient to pass through the fixture you are mounting and achieve the required minimum embedment depth in the base material. The formula is: Anchor Length = Thickness of Fixture + Minimum Embedment Depth + Space for Nut and Washer.
- Embedment Depth: This is the most critical dimension for holding strength. It refers to how deep the anchor is embedded into the concrete. Deeper embedment provides a stronger hold by engaging a larger area of the base material. Each anchor diameter has a manufacturer-specified minimum embedment depth that must be achieved for the anchor to meet its load ratings.
4. Head Style and Configuration
Sleeve anchors come in several head styles, each suited for different applications:
- Hex Head: The most common type, tightened with a standard wrench or socket. Ideal for most general-purpose machinery and equipment mounting.
- Flat Head (Countersunk): Features a beveled head that sits flush with the surface of the fixture when installed. This is used when a smooth, non-protruding finish is required.
- Round Head (Mushroom Head): A low-profile, smooth head that is tamper-resistant and less likely to snag objects. Often used for installing window frames or fixtures where aesthetics are a concern.
- Acorn Nut: This version uses a decorative, dome-shaped nut that provides a finished look and covers the exposed threads of the stud, offering protection from damage or injury.
5. Environmental Considerations and Material Composition
The environment where the anchor will be installed dictates the material and plating required.
- Zinc-Plated Carbon Steel: This is the standard for most indoor, dry applications. The zinc plating offers a basic level of corrosion resistance but is not suitable for wet or corrosive environments.
- Hot-Dipped Galvanized Steel: Offers a thicker, more robust layer of zinc protection. It's a better choice for humid areas or outdoor applications where exposure to moisture is a concern.
- Stainless Steel (Types 304 and 316): The premium choice for corrosion resistance. Type 304 is suitable for outdoor and freshwater environments, while Type 316 offers superior protection in saltwater and chemical exposure settings, such as food processing plants or coastal infrastructure.
Sourcing domestically-made fasteners ensures that the material specifications and plating processes meet stringent U.S. standards, a cornerstone of building a resilient and reliable supply chain. We partner with over 800 verified U.S. manufacturers to provide unparalleled access to components that meet these exact specifications.
Proper Installation: The Key to Performance
An anchor's holding power is only as good as its installation. A high-quality anchor installed improperly will fail under load. Following a precise installation procedure is not just recommended; it is mandatory for safety and performance.
Step 1: Drilling the Hole
- Use the Right Bit: Always use a carbide-tipped drill bit that meets ANSI standards. The diameter of the drill bit must be the same as the diameter of the anchor. A 1/2" anchor requires a 1/2" hole.
- Drill to the Correct Depth: The hole must be drilled deeper than the anchor's minimum embedment depth. A good rule of thumb is to drill the hole at least 1/2" deeper than the anchor's length. This provides space for any dust and debris that cannot be removed from the bottom of the hole, ensuring the anchor can be inserted to the proper depth.
- Drill Straight: Ensure the hole is drilled perpendicular to the surface of the base material. An angled hole can compromise the anchor's holding power and create alignment issues with the fixture.
Step 2: Cleaning the Hole
This is the most frequently skipped step, and it is arguably the most critical for achieving maximum holding capacity. Dust and debris left in the hole act as a lubricant, preventing the expansion sleeve from making solid contact with the concrete. This can reduce the anchor's holding strength by up to 60%.
- Blow: Use a can of compressed air or a manual air pump to blow all the loose dust and debris out of the hole.
- Brush: Use a stiff wire brush with a diameter that matches the hole size. Insert it to the bottom and scrub the sides of the hole vigorously to dislodge any remaining particles.
- Blow Again: Repeat the process of blowing the hole out to remove all the loosened debris. The hole should be completely clean before proceeding.
Step 3: Inserting the Anchor
- Place the fixture you are fastening over the clean hole.
- Insert the pre-assembled sleeve anchor through the hole in the fixture and into the hole in the base material.
- You may need to gently tap the top of the anchor with a hammer to get it seated properly. The washer should be snug against the surface of the fixture.
Step 4: Setting the Anchor
- Using a torque wrench or a standard wrench, begin tightening the nut on top of the anchor.
- As you tighten, you will feel the resistance increase as the sleeve begins to expand and grip the walls of the hole.
- Continue tightening until the anchor is snug. For critical applications, it is essential to tighten the nut to the manufacturer's recommended installation torque value. Over-tightening can damage the concrete or the anchor itself, while under-tightening will result in a weak connection.
Practical Applications in Industrial Settings
Understanding the theory is important, but seeing how sleeve anchors perform in the real world demonstrates their true value. For MRO buyers and facility managers, these fasteners are indispensable for daily operations and safety compliance.
Consider the challenge of installing new safety barriers in a busy warehouse. The base plates of these systems must be anchored securely to the concrete floor to withstand potential impacts from forklifts and other equipment. For a standard installation in a non-critical area, a product like the Jesco Guard Rails 10ft Safety Yellow Barrier Rail would require four to six medium-duty sleeve anchors per base plate. The hex head sleeve anchor is perfect for this, providing strong shear and tensile resistance to keep the barrier firmly in place.
In areas where access needs to be flexible, a removable barrier system might be necessary. The base plates for a solution like the Jesco 8 ft Guards Rail Safety Yellow Lift Out Type are still permanently anchored to the floor with sleeve anchors, guaranteeing a secure foundation for the removable posts. This showcases the anchor's ability to provide permanent strength for modular systems.
For high-risk zones, such as a charging station for electric forklifts or along a major equipment aisle, the stakes are much higher. A direct impact is not just possible but likely. Here, a procurement manager would specify a robust system like the Jesco Extra Heavy Duty 96” Welded Rail System. Securing this heavy-duty barrier requires larger diameter, longer sleeve anchors capable of withstanding extreme shear forces. This is a scenario where sourcing high-quality, American-made fasteners isn't just a preference—it's a requirement for ensuring worker safety and operational integrity.
In each of these cases, the ability to quickly source both the safety equipment and the correct U.S.-made fasteners from a single, reliable platform dramatically reduces procurement friction. That is the value we strive to provide—a seamless connection to the components that keep American industry running safely and efficiently. If you have specific sourcing questions about finding the right fastener for your application, our team is ready to help.
Conclusion
The sleeve anchor, though simple in appearance, is a product of precise engineering. Its ability to transform rotational force into immense radial pressure allows it to create an incredibly secure bond in solid masonry, making it an essential component in industrial construction, equipment installation, and MRO tasks. Understanding how it works—from the function of its individual components to the critical importance of a clean drill hole—is what separates a successful, safe installation from a potential failure point.
By prioritizing proper selection based on load, base material, and environment, and by adhering to meticulous installation procedures, you can leverage the full strength and reliability of this versatile fastener. At Maden.co, our commitment is to not only provide access to over 2.5 million American-made products but also to empower you with the technical knowledge needed to use them effectively. We believe in strengthening domestic supply chains and championing the producers who form the bedrock of our industrial capacity. If you are a U.S. manufacturer who shares this vision of industrial excellence and digital innovation, we invite you to Register as a vendor and join the American manufacturing revival.
For your next project requiring secure anchoring, explore our vast catalog of U.S.-made fasteners. Find the exact components you need and streamline your procurement process. And to better manage your capital expenditures on larger projects, remember that you can apply for Instant Financing at checkout to keep your operations running smoothly.
FAQ
1. Can sleeve anchors be used in drywall or wood?
No. Sleeve anchors are designed exclusively for solid, brittle base materials like concrete, brick, and block. The expansion mechanism requires a hard, unyielding material to press against. In a soft material like drywall, the sleeve would simply crush the material and pull out. In wood, the expansion force can split the wood fibers, and a lag screw would provide a much more secure fastening.
2. Is it possible to reuse a sleeve anchor?
It is strongly advised not to reuse a sleeve anchor. Once the sleeve has been expanded during the initial installation, it becomes permanently deformed. Removing the anchor and attempting to reinstall it will result in a significantly weaker hold, as the sleeve cannot expand to its original tension a second time. For safety and reliability, always use a new anchor for each installation.
3. How tight should a sleeve anchor be tightened?
The anchor should be tightened until it is snug and the fixture is firmly secured. For critical applications, it is best to use a torque wrench and tighten the nut to the manufacturer's specified installation torque value, which can be found on the product's technical data sheet. Over-tightening can cause the concrete to crack (a condition known as spalling) or can damage the anchor's threads, while under-tightening will not provide the required holding power.
4. What is the main difference between a sleeve anchor and a wedge anchor?
The primary difference is their expansion mechanism and application range. A sleeve anchor uses a full-length sleeve that expands and creates friction along the entire embedment depth, making it versatile for concrete, brick, and block. A wedge anchor, on the other hand, has a small expansion clip at the very bottom. It provides its holding power by the wedge-shaped clip being forced between the stud and the concrete wall. Wedge anchors are typically used for heavy-duty applications in solid concrete only and generally offer higher tensile strength than sleeve anchors of the same diameter.