How to Install Anchor Bolts for Industrial Use
Table of Contents
- Introduction
- Understanding Anchor Bolt Fundamentals: More Than Just a Fastener
- The Pre-Installation Checklist: Planning for Success
- A Step-by-Step Guide: How to Install Anchor Bolts Correctly
- The Crucial Role of Tensioning in High-Load Applications
- Post-Installation Inspection and Common Pitfalls
- The Maden.co Advantage: Sourcing with Confidence and Resilience
- Conclusion: Building a Stronger Foundation for American Industry
- Frequently Asked Questions (FAQ)
Introduction
A single, improperly installed anchor bolt can be the silent catalyst for catastrophic failure. Imagine a multi-ton piece of machinery shifting from its foundation, a critical support column failing under load, or a pipeline vibrating loose—all because the connection to the concrete base was compromised. For procurement managers, MRO (Maintenance, Repair, and Operations) buyers, and design engineers, the stakes are incredibly high. An installation error is not just a procedural mistake; it's a direct threat to operational safety, project timelines, and the company's bottom line. This article moves beyond a simple checklist to provide a deep, practical understanding of how to install anchor bolts correctly. We will explore the fundamental principles, detail the step-by-step processes for both mechanical and chemical anchors, and highlight the critical post-installation verification steps. The core message is clear: mastering anchor bolt installation is a foundational element of industrial safety and structural integrity, a process that begins long before the drill ever touches the concrete—it starts with sourcing high-quality, traceable, American-made components.
Understanding Anchor Bolt Fundamentals: More Than Just a Fastener
Before a single hole is drilled, a comprehensive understanding of what anchor bolts are and the forces they manage is essential. They are the critical interface between a structural or non-structural element and its concrete foundation, responsible for transferring immense loads safely and reliably.
What Are Anchor Bolts and Why Are They Critical?
At their core, anchor bolts are heavy-duty fasteners designed to secure objects to a concrete base. This can range from securing steel columns and heavy industrial machinery to anchoring racking systems and critical safety barriers. Their primary function is load transfer. When a machine vibrates, a building sways under wind load, or a railing is pushed, the anchor bolt system is what prevents failure. This makes their proper selection and installation a non-negotiable aspect of industrial engineering and construction. A failure in this system doesn't just mean a loose piece of equipment; it can lead to progressive structural collapse and severe safety incidents. This is why our commitment at Maden.co is to provide unfettered access to components from verified U.S. manufacturers, ensuring that the part you specify is the part you get, with the material integrity to match.
Key Types of Anchor Bolts for Industrial Applications
The term "anchor bolt" is a broad category encompassing several distinct designs, each engineered for specific applications, load types, and base materials. Choosing the correct type is the first step toward a successful installation.
Mechanical Expansion Anchors
These anchors function by expanding within the drilled hole, creating a friction or keying effect against the walls of the concrete. They are generally used for static load applications and are valued for their immediate load-bearing capacity.
- Wedge Anchors: These are extremely popular for heavy-duty fastening into solid concrete. A wedge-shaped clip at the bottom of the bolt expands as the nut is tightened, creating a powerful and reliable hold. They are ideal for securing structural steel plates, machinery bases, and support columns.
- Sleeve Anchors: Highly versatile, sleeve anchors can be used in a variety of base materials, including concrete, brick, and block. The sleeve expands along the length of the anchor as the bolt or screw is tightened, distributing the load over a wider area.
- Drop-In Anchors: Primarily used for medium-duty overhead applications like suspending pipe hangers, ductwork, or cable trays. A setting tool is used to expand the anchor within the pre-drilled hole, creating female threads to accept a bolt or threaded rod.
Adhesive (Chemical) Anchors
Adhesive anchors consist of a two-part epoxy, polyester, or vinyl ester resin that is injected into the drilled hole before the threaded rod or rebar is inserted. The adhesive bonds chemically with both the anchor element and the concrete, creating an incredibly strong, monolithic connection.
- Benefits: They often provide higher load capacities than mechanical anchors, especially in lower-strength concrete. They are also ideal for applications involving significant vibration, as the adhesive dampens dynamic loads. Furthermore, the adhesive completely seals the hole, protecting the anchor from moisture and corrosion—a key benefit in harsh industrial environments.
Cast-in-Place Anchors
These are the strongest type of anchor, as they are positioned in the formwork before the concrete is poured. The wet concrete cures around them, forming an integral, inseparable connection.
- Types: Common designs include L-bolts, J-bolts, and headed anchor bolts (anchor bolts with a forged head). They are specified by structural engineers for the most demanding applications, such as column bases for large buildings, foundations for heavy machinery, and supports for bridge structures.
The Pre-Installation Checklist: Planning for Success
The quality of an anchor bolt installation is determined long before the tools come out. A thorough pre-installation process prevents costly errors and ensures the final connection meets all design specifications and safety requirements. This phase embodies our value of Industrial Excellence—a focus on precision and foresight.
Step 1: Material and Environmental Assessment
First, evaluate the base material. Is it solid, uncracked concrete? What is its compressive strength (psi)? The age and condition of the concrete can significantly impact the holding power of any anchor. Older, lower-strength concrete may require a larger anchor or a chemical adhesive to achieve the necessary load capacity.
Next, consider the environment. Will the anchor be exposed to moisture, corrosive chemicals, or extreme temperature fluctuations? This dictates the required material and coating. Sourcing a stainless steel or hot-dip galvanized anchor from a trusted U.S. manufacturer provides the material traceability needed to guarantee long-term performance and prevent premature failure due to corrosion.
Step 2: Load Calculation and Anchor Selection
The design engineer is responsible for calculating the specific loads the anchor must resist. These include:
- Tension Load (Pull-out): Forces acting to pull the anchor straight out of the hole.
- Shear Load: Forces acting perpendicular to the axis of the anchor, trying to slice it off.
- Combined Loads: Many applications involve a combination of tension and shear forces.
The engineer must select an anchor that not only meets these load requirements but also accounts for factors like edge distance (how close the anchor is to the edge of the concrete) and spacing (how close anchors are to each other). Our platform is designed to support this critical decision-making process, providing detailed specifications and technical data sheets to ensure engineers and procurement managers can confidently select the right American-made component for the job.
Step 3: Gathering the Right Tools and Equipment
Using the wrong tools is a direct path to a failed installation. A standard checklist includes:
- Drilling Equipment: A rotary hammer drill with a carbide-tipped bit that meets ANSI standards for diameter tolerance. Using a worn or incorrect-sized bit will result in an improperly sized hole.
- Hole Cleaning Tools: A stiff wire brush correctly sized for the hole diameter and a source of oil-free compressed air or a high-velocity blower. This step is non-negotiable.
- Installation Tools: A calibrated torque wrench for mechanical anchors, a hammer for setting the anchor, and a proper dispensing tool for chemical adhesives.
- Personal Protective Equipment (PPE): Safety goggles, gloves, and a dust mask are essential to protect against concrete dust and adhesive chemicals.
A Step-by-Step Guide: How to Install Anchor Bolts Correctly
With planning complete, the focus shifts to execution. Precision at every stage is paramount. The following steps outline the proper installation procedures for the two most common post-installed anchor types.
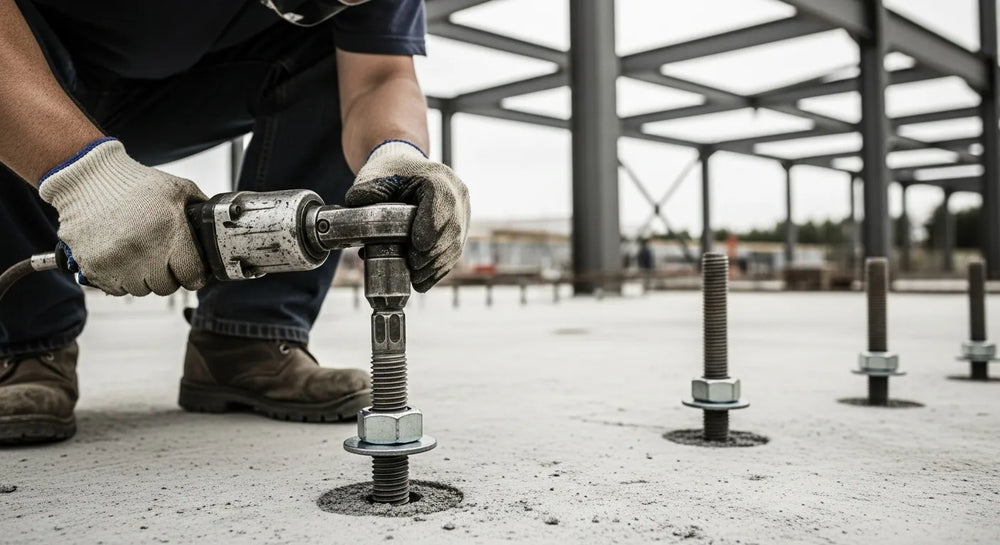
Installation Process for Mechanical Expansion Anchors (e.g., Wedge Anchors)
- Drilling the Hole: Using the rotary hammer drill and correct bit, drill a hole to the specified diameter and embedment depth. It is critical to hold the drill perpendicular to the concrete surface to ensure the hole is straight. The depth of the hole should typically be slightly deeper than the required anchor embedment to accommodate any dust that cannot be fully removed.
- Cleaning the Hole: This is the most critical and most frequently neglected step in the entire process. Debris left in the hole prevents the anchor's expansion mechanism from making full contact with the concrete, drastically reducing its load capacity. The proper procedure is a four-step cycle: blow the hole out with compressed air, scrub it with a wire brush, blow it out again, and brush it again. The hole is not clean until no more dust emerges.
- Inserting the Anchor: Assembling the anchor with the nut and washer, carefully tap it into the clean hole with a hammer until the washer is snug against the surface of the fixture. Ensure the anchor reaches the specified embedment depth.
- Setting the Anchor and Applying Torque: Using a calibrated torque wrench, tighten the nut to the manufacturer's specified installation torque value (T_inst). This action pulls the bolt upward, forcing the expansion clip down and outward to wedge it tightly against the concrete. Do not use an impact wrench, as it provides no torque control and can easily lead to over-torquing, which can damage the concrete or the anchor itself.
Installation Process for Adhesive (Chemical) Anchors
- Drilling and Meticulous Cleaning: The process starts the same as with a mechanical anchor, but hole cleaning is even more vital. The bond strength of the adhesive is entirely dependent on its ability to adhere to a clean, rough concrete surface. Any dust acts as a bond-breaker. The "blow-brush-blow" cleaning method is mandatory.
- Preparing and Dispensing the Adhesive: Attach the mixing nozzle to the adhesive cartridge. Before injecting into the hole, dispense a small amount of adhesive onto a piece of cardboard until the color is uniform and consistent. This ensures the two parts of the resin are properly mixed. Insert the nozzle to the bottom of the hole and slowly inject the adhesive, withdrawing the nozzle as the hole fills to avoid creating air pockets. Fill the hole approximately two-thirds full.
- Inserting the Anchor Rod: Insert the threaded rod or rebar into the adhesive-filled hole with a slow, turning motion. This ensures the adhesive fully coats the threads and eliminates any remaining air voids. Position the rod at the correct embedment depth and ensure it remains centered and immobile.
- Curing Time: This is a period of patience. The adhesive must be allowed to cure for the manufacturer-specified time before any load is applied. Cure times vary significantly based on the type of adhesive and the ambient and concrete temperature. Attempting to load the anchor before it has fully cured will result in failure.
The Crucial Role of Tensioning in High-Load Applications
For standard applications, applying the correct torque is sufficient. However, in critical high-load scenarios—such as securing the foundation bolts for a wind turbine, a heavy press, or a large chemical reactor—simply measuring torque is not enough.
Beyond Torque: Why Tensioning Matters
Torque is a measure of rotational force, but what truly secures the joint is tension, also known as preload. This is the clamping force or stretching of the bolt that holds the components together. The relationship between torque and tension can be highly variable, affected by friction under the nut and in the threads. In critical joints, achieving a precise and uniform preload across all bolts is essential for safety and long-term performance. This is where hydraulic tensioning comes in.
Advanced Tensioning Tools and Techniques
Bolt tensioners work by stretching the bolt axially. The operator applies hydraulic pressure to the tool, which pulls on the bolt. Once the desired elongation (and thus preload) is reached, the nut is run down to lock that tension in place. This method eliminates the inaccuracies of torque and ensures a highly precise and consistent clamping force.
This level of precision is the hallmark of Industrial Excellence. For an MRO buyer or project manager tasked with a critical equipment installation, sourcing not just the bolts but also the right tensioning equipment is paramount. Specialized, high-performance tools define the success of these projects.
- For applications requiring a max operating pressure of 21,750 psi and accommodating bolt sizes from 1.75 to 2 inches, the American-made Enerpac FTR-Series Foundation Bolt Tensioner (FTR4) offers the control and power needed for precise bolt loading.
- When working with larger bolt sizes in the 2.25 to 2.50-inch range, the detailed specifications for the robust Enerpac FTR-Series FTR6 model are readily available on our platform to ensure a perfect match for your needs.
- For the most demanding jobs involving bolts up to 3 inches in diameter, the powerful Enerpac FTR-Series FTR7 tensioner delivers the necessary force and reliability to secure your most critical assets.
Post-Installation Inspection and Common Pitfalls
The job isn't finished once the nut is tightened. Verification is the final step in ensuring the integrity of the connection.
Verifying a Successful Installation
For mechanical anchors, this often involves using a calibrated torque wrench to check that the installation torque has been achieved and maintained. For critical applications, proof loading may be required. This involves using a specialized hydraulic rig to apply a specific tension load (typically a percentage of the anchor's yield strength) to verify its holding capacity in the base material. A visual inspection should also be conducted to check for any signs of concrete cracking or anchor damage.
Common Installation Mistakes to Avoid
Avoiding these common errors can save enormous amounts of time, money, and rework, directly improving the Total Cost of Ownership (TCO) of any project.
- Improper Hole Cleaning: The number one cause of anchor failure.
- Incorrect Embedment Depth: Too shallow, and the anchor won't have the capacity to handle the load.
- Over- or Under-Torquing: Over-torquing can crack the concrete or yield the bolt, while under-torquing means the anchor is not properly set.
- Ignoring Adhesive Cure Times: Loading an adhesive anchor prematurely will guarantee failure.
- Drilling into Rebar: Hitting reinforcing steel can damage the rebar and the drill bit and compromise the anchor's position.
The Maden.co Advantage: Sourcing with Confidence and Resilience
A flawless installation is impossible without the right component. This is where the procurement process becomes a foundational part of the engineering solution.
Empowering Your Procurement Process
For a procurement manager under immense pressure to source a specific DIN-compliant anchor bolt, or a design engineer needing verified material certifications for a new prototype, the search can be frustrating and time-consuming. We address this head-on. Our platform is built on the value of Customer Empowerment, simplifying the discovery and acquisition of millions of U.S.-made parts.
Our Commitment to American Manufacturing
Our mission is to democratize access to the American manufacturing ecosystem. We connect industrial buyers directly with a network of over 800+ verified U.S. manufacturers, championing the quality, innovation, and pride that define American industry. By fostering Supply Chain Transparency, we help you build a more resilient and reliable supply chain, insulating your operations from the volatility of global logistics. You can learn more about our mission to champion American manufacturing here. For the dedicated American manufacturers who produce these superior components, we offer a direct path to the market. Are you a U.S. manufacturer? Register as a vendor and join the American manufacturing revival.
Streamlining Your Operations
We are dedicated to reducing procurement friction. Our platform consolidates the sourcing process, allowing you to find, specify, and purchase the exact components you need with unparalleled efficiency. Should you have unique sourcing requirements or need assistance locating a specific part, please do not hesitate to reach out. Our team is ready to help you find a solution.
Conclusion: Building a Stronger Foundation for American Industry
Proper anchor bolt installation is a meticulous process—a blend of engineering science, procedural precision, and the use of high-quality components. It is the invisible bedrock of industrial safety and operational reliability. Getting it right protects assets, ensures personnel safety, and upholds the structural integrity of your entire facility.
Don't let sourcing challenges or supply chain uncertainties compromise the foundation of your projects. Explore our extensive catalog of U.S.-made industrial components to build a more resilient, efficient, and reliable procurement process. For capital-intensive projects or large-volume purchases that require flexible cash flow, you can apply for Instant Financing directly at checkout, empowering you to secure the high-quality American-made parts you need without delay.
Frequently Asked Questions (FAQ)
1. What is the most common mistake when installing anchor bolts? By far, the most common and critical mistake is improper hole cleaning. Concrete dust left in the drilled hole acts as a lubricant and bond-breaker, preventing both mechanical and chemical anchors from achieving their full load capacity. A rigorous "blow-brush-blow" cleaning process is essential for a reliable installation.
2. Can I install an anchor bolt in old or cracked concrete? Yes, but with significant considerations. Older concrete may have a lower compressive strength, requiring the anchor to be de-rated (its allowable load capacity reduced). For cracked concrete, you must use an anchor specifically designed and tested for use in cracked concrete applications, as standard anchors can lose a significant portion of their strength. Adhesive anchors often perform very well in these situations.
3. How do I know what torque to apply to a mechanical anchor? Always refer to the manufacturer's installation instructions for the specific anchor you are using. The specified installation torque (T_inst) is engineered to create the correct expansion force without damaging the anchor or the concrete. Using a calibrated torque wrench is the only way to ensure this value is applied accurately.
4. Why choose a chemical anchor over a mechanical one? Chemical anchors are often chosen for applications requiring very high load capacities, resistance to vibration, or when anchoring close to concrete edges where the expansion forces of a mechanical anchor could cause cracking. They are also ideal for securing threaded rod in deep embedment or non-standard hole sizes and for providing a watertight seal in corrosive environments.


