How to Install Anchor Bolts in a Concrete Foundation
Table of Contents
- Introduction
- Understanding the Critical Role of Foundation Anchor Bolts
- Selecting the Right Anchor Bolt for the Application
- The Pre-Pour Method: Installing Cast-in-Place Anchor Bolts
- The Post-Pour Method: A Guide to Drilled-In Anchors
- The Apex of Precision: Advanced Bolt Tensioning
- Building a Resilient Supply Chain with Maden.co
- Conclusion: Your Foundation for Success
- Frequently Asked Questions
Introduction
A single misaligned anchor bolt on a major construction site can trigger a cascade of delays, costing thousands in lost time and rework. This isn't a hypothetical scenario; it's a frustrating reality for project managers and engineers who know that the structural integrity of an entire project—from a heavy-duty industrial press to a towering wind turbine—rests on these deceptively simple components. The strength of the final structure is not just determined by the quality of the concrete or the steel I-beams, but by the precision and care taken to install the anchor bolts that connect them. This connection point is where immense forces are transferred and managed, and any failure here can be catastrophic.
This article moves beyond a superficial overview to provide a detailed, actionable guide for procurement managers, MRO buyers, and engineers on the correct procedures for installing anchor bolts in concrete foundations. We will explore the critical differences between cast-in-place and post-installed anchors, detail the step-by-step processes for each method, and delve into the often-overlooked science of proper tensioning. The goal is to equip you with the knowledge to ensure every anchor point is a bastion of strength and reliability, safeguarding your project's longevity and performance. Ultimately, mastering this fundamental process is a critical step in building stronger, safer, and more resilient infrastructure across America.
Understanding the Critical Role of Foundation Anchor Bolts
At its core, a foundation anchor bolt is a heavy-duty fastener designed to secure structural elements to a concrete foundation. Its purpose is to transfer loads—including tension (pull-out forces), shear (lateral forces), and dynamic loads from vibrations—from the attached structure safely into the concrete mass. From securing building columns and heavy machinery to anchoring support towers and industrial racking, these components are the linchpin of modern construction and industrial installation.
The emphasis on proper installation cannot be overstated. An incorrectly installed anchor bolt is not just a wasted component; it's a latent point of failure. The load-bearing capacity of an anchor is directly dependent on a series of factors executed during installation: the cleanliness of the drilled hole, the precise embedment depth, the condition of the concrete, and the application of correct torque or tension. Failure to control these variables can reduce an anchor's capacity by over 50%, completely undermining the design specifications and creating a significant safety hazard.
This is why, at Maden.co, our mission is to do more than just supply parts. We aim to empower American industry by providing both the high-quality components and the foundational knowledge needed for excellence. By connecting you with over 2.5 million products from our network of 800+ verified U.S. manufacturers, we help ensure that the first link in your structural chain—the anchor bolt itself—is of the highest quality, ready to perform as specified when installed with the professional diligence it requires.
Cast-in-Place vs. Post-Installed Anchors: A Foundational Choice
The first major decision in any anchoring project is choosing between two primary categories of anchor bolts: cast-in-place and post-installed.
- Cast-in-Place Anchors: As the name implies, these anchors are positioned within the formwork before the concrete is poured. Common types include L-bolts, J-bolts, and headed anchor bolts with a plate washer embedded deep in the foundation. They become an integral, monolithic part of the concrete structure as it cures around them.
- Post-Installed Anchors: These are installed into holes drilled in the concrete after it has hardened and cured. This category is vast and includes mechanical expansion anchors (like wedge and sleeve anchors) and adhesive anchors (which use epoxy or other chemical compounds to bond a threaded rod to the concrete).
The choice between them is dictated by project requirements. Cast-in-place anchors generally offer the highest load capacities and are the preferred method for new construction involving immense structural loads. Post-installed anchors provide greater flexibility, allowing for machinery placement or retrofitting in existing structures where pre-setting bolts is not an option.
Selecting the Right Anchor Bolt for the Application
Choosing the correct anchor bolt is a critical engineering decision that goes far beyond simply matching a thread size. A procurement manager or engineer must consider a range of variables to ensure safety, performance, and long-term reliability.
Key Selection Criteria
Before drilling a single hole, a thorough assessment of the following factors is mandatory:
-
Load Requirements: What forces will the anchor resist?
- Tensile Load: Pull-out force, acting along the axis of the anchor.
- Shear Load: Lateral or side-to-side force, acting perpendicular to the anchor's axis.
- Combined Loads: Many applications involve a combination of both tensile and shear forces.
- Dynamic Loads: Is the attached machinery subject to vibration or cyclical loading? This requires anchors specifically rated for dynamic conditions, such as undercut or certain high-performance adhesive anchors.
-
Concrete Condition and Strength: The base material is half of the anchoring system.
- Compressive Strength (psi): The specified load capacity of any anchor is tied to the concrete's strength.
- Cracked vs. Uncracked Concrete: Concrete under tension can develop fine cracks. Anchors used in these zones must be specifically rated for "cracked concrete" to ensure they maintain their holding power.
-
Environmental Factors: Where will the anchor be installed?
- Corrosion: For outdoor, marine, or chemical plant environments, stainless steel (e.g., Type 304 or 316) or hot-dip galvanized anchors are essential to prevent premature failure from rust.
- Temperature: Both high and low temperatures can affect the performance of anchors, especially adhesive types, which have specific installation and service temperature ranges.
-
Geometric Constraints: Spacing and placement are governed by strict rules.
- Edge Distance: Installing an anchor too close to the edge of a concrete slab can cause the concrete to break out under load.
- Spacing: Placing anchors too close to each other can cause their load cones (the area of concrete they engage) to overlap, reducing the capacity of the entire group. Manufacturers provide minimum edge and spacing distance requirements that must be followed.
Sourcing components that meet these precise specifications is a core challenge we address. Our platform is built on the values of Industrial Excellence and Supply Chain Transparency, allowing you to filter and find components that meet critical standards, complete with the material certifications and technical data sheets you need to make an informed decision.
The Pre-Pour Method: Installing Cast-in-Place Anchor Bolts
The cast-in-place method demands precision and foresight, as mistakes are literally set in stone. However, when executed correctly, it yields the strongest possible anchor point.
Step-by-Step Installation Process
Step 1: Meticulous Layout and Planning
The process begins not on the job site, but with the engineering blueprints. Every anchor bolt location must be precisely calculated. These locations are then transferred onto the concrete formwork using chalk lines, surveyor's marks, or laser alignment tools. Accuracy at this stage is paramount; an error of even a fraction of an inch can prevent heavy machinery or a steel column from seating correctly.
Step 2: Fabricating an Anchor Bolt Template
To ensure the bolts remain perfectly positioned and plumb during the chaotic process of a concrete pour, a template is essential. This is typically a rigid frame made from plywood or steel with holes drilled at the exact locations specified in the plans. The template serves as a jig, holding the upper, threaded portion of the anchor bolts securely.
Step 3: Securing the Bolts and Rebar Cage
The anchor bolts are inserted through the template, with nuts threaded on both the top and bottom to lock them in place. The entire assembly (template with bolts) is then lowered into the formwork and firmly secured to the rebar cage using tie wire. This integration with the steel reinforcement is crucial for distributing the load throughout the foundation. The embedment depth (how deep the bolt goes into the concrete) and the projection (how much thread extends above the final concrete surface) must be double-checked against the plans.
Step 4: Protecting the Threads and Pouring the Concrete
Before the pour, the exposed threads of the anchor bolts must be protected from concrete slurry and physical damage. This is typically done by wrapping them in heavy-duty tape or covering them with a plastic sleeve. During the pour, care must be taken to ensure the concrete flows evenly around the bolts without displacing them. Using a concrete vibrator near the bolts helps eliminate air pockets, ensuring a solid bond, but it must be done carefully to avoid knocking the assembly out of alignment.
Step 5: Post-Pour Verification
Immediately after the concrete is poured and screeded, the alignment and projection of the bolts should be checked one last time. Minor adjustments can sometimes be made while the concrete is still wet. Once the concrete has achieved its initial set, the template can be removed, and the protective wrapping on the threads should be taken off to prevent it from bonding permanently.
The Post-Pour Method: A Guide to Drilled-In Anchors
Post-installed anchors offer incredible versatility for retrofitting, equipment upgrades, and projects where the final layout isn't known at the time of the foundation pour. Success here hinges on disciplined adherence to a precise installation procedure.
Universal Steps for All Post-Installed Anchors
No matter which type of post-installed anchor you use, the first two steps are universal and absolutely critical to the anchor's final performance.
Safety First: Personal Protective Equipment (PPE)
Drilling into concrete generates a large amount of fine silica dust, which is a serious respiratory hazard. Always wear a properly fitted respirator (N95 or better), safety glasses or goggles to protect from flying debris, and gloves.
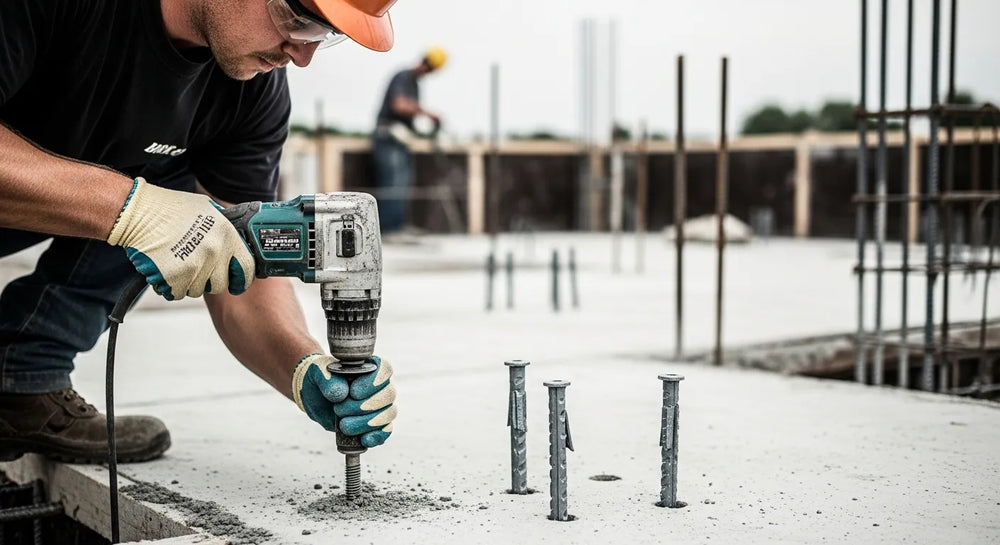
Step 1: Drilling a Precision Hole
The quality of the hole dictates the quality of the anchor installation.
- Use the Right Tool: A rotary hammer is the preferred tool for drilling into concrete, as it combines rotation with a hammering action to efficiently pulverize the material.
- Select the Correct Bit: Use a carbide-tipped drill bit that matches the manufacturer-specified diameter for the anchor. A worn bit can create an undersized hole, while the wrong type of bit can create an irregular one.
- Drill to the Correct Depth: The hole must be drilled deeper than the anchor's required embedment to allow space for dust and debris to collect at the bottom. Use the depth gauge on your rotary hammer or wrap a piece of tape around the bit to mark the target depth.
- Maintain Perpendicularity: Drill the hole as straight and perpendicular to the concrete surface as possible. An angled hole will side-load the anchor and compromise its capacity.
Step 2: The Non-Negotiable Hole Cleaning Procedure
This is the single most common point of failure for post-installed anchors. A dusty hole can reduce the holding capacity of both mechanical and adhesive anchors by more than half. The "blow-brush-blow" method is the industry standard.
Critical Process: Blow-Brush-Blow
- Blow: Insert the nozzle of an oil-free compressed air blower to the bottom of the hole and blow it out for several seconds until dust is no longer visibly exiting the hole.
- Brush: Insert a properly sized, stiff-bristled wire brush (nylon for adhesive anchors) to the bottom of the hole. Twist and scrub the sides of the hole vigorously for several full strokes to dislodge any remaining dust particles.
- Blow Again: Repeat the compressed air blowout to remove all the dust loosened by the brush. For critical applications, this entire cycle should be repeated.
Installing Mechanical Expansion Anchors
These anchors, such as the common wedge anchor, work by expanding a clip or sleeve against the walls of the hole, creating a secure hold through friction.
- Assemble the Anchor: Ensure the nut and washer are on the threaded end of the anchor.
- Insert the Anchor: Gently tap the anchor through the fixture you are fastening and into the cleaned hole until the washer and nut are snug against the fixture.
- Set the Anchor: Using a hammer, drive the anchor into the hole until it is seated at the proper embedment depth.
- Apply Torque: Using a calibrated torque wrench, tighten the nut to the manufacturer's specified torque value (ft-lbs or N-m). This action pulls the cone-shaped end of the anchor up into the expansion clip, forcing it outward to engage the concrete. Do not overtighten, as this can break the concrete or damage the anchor.
Installing Adhesive (Chemical) Anchors
Adhesive anchors offer some of the highest load capacities and are excellent for applications near edges or in cracked concrete, as they induce very little stress on the base material.
- Prepare the Adhesive: Insert the two-part adhesive cartridge into the proper dispensing gun. Attach the mixing nozzle.
- Purge the Nozzle: Dispense the first few pumps of adhesive onto a piece of cardboard or scrap until the color of the epoxy is uniform and consistent. This ensures the two parts are properly mixed.
- Inject the Adhesive: Insert the nozzle to the bottom of the cleaned hole. Begin injecting the adhesive, slowly withdrawing the nozzle as the hole fills. The goal is to fill the hole about two-thirds full from the bottom up to avoid creating air pockets.
- Insert the Anchor Element: Slowly insert the threaded rod or rebar into the adhesive-filled hole with a slight twisting motion. This ensures the threads are fully coated and eliminates any voids.
- Observe Cure Times: Do not disturb or apply any load to the anchor until the manufacturer's specified cure time has passed. This time varies significantly based on the adhesive type and the ambient temperature.
The Apex of Precision: Advanced Bolt Tensioning
For the most critical applications—securing the base of a skyscraper's steel column, a port crane, or a massive generator—simply torquing a nut is not enough. Torque is an indirect and often unreliable measure of bolt tension due to the unpredictable effects of friction between the threads and the nut face. True clamping force comes from achieving a precise amount of bolt stretch, known as tension.
This is where hydraulic bolt tensioners become indispensable. These specialized tools fit over the projecting bolt thread and grip it. Hydraulic pressure is then applied to a cylinder, which stretches the bolt axially to a precise, calculated load. With the bolt held in this elongated state, the nut is easily run down the thread until it is snug against the joint surface. When the hydraulic pressure is released, the bolt attempts to return to its original length, creating a powerful and highly accurate clamping force.
For engineers and project managers overseeing capital-intensive projects where foundation stability is paramount, specifying the use of advanced tensioning tools is a critical risk mitigation strategy. The ability to source reliable, American-made tensioning equipment is vital. For these demanding applications, tools like the Enerpac FTR-Series Foundation Bolt Tensioners (5-Stud) are not a luxury but a necessity for ensuring uniform load distribution. These systems are designed to handle a range of stud diameters and load requirements, providing the certifiable accuracy that critical infrastructure demands. The different models, such as the Enerpac FTR-Series (7-Stud) for larger applications, ensure that the specified preload is achieved on every single bolt. Sourcing a high-quality, U.S.-made tool like the Enerpac FTR-Series (6-Stud) from a trusted domestic marketplace provides the assurance that your equipment is calibrated, certified, and ready for the job.
For large-scale projects, procuring this type of essential equipment can represent a significant capital outlay. This is a challenge our platform directly addresses. With our Instant Financing option, available during the checkout process, businesses can acquire the critical tools they need to ensure installation excellence without disrupting their cash flow. You can apply for Instant Financing at checkout to streamline your capital-intensive projects.
Building a Resilient Supply Chain with Maden.co
The success of any industrial project relies on a strong, transparent, and efficient supply chain. At Maden.co, our entire business model is built on the principle of strengthening American manufacturing and empowering the businesses that depend on it. Our vision is to become the definitive platform that proves American-made components are as accessible and convenient as any global alternative, driving the manufacturing revival. You can learn more about our mission to champion American manufacturing here.
For a procurement manager under pressure to source a specific grade of anchor bolt with material certifications, or an MRO buyer facing an unexpected equipment installation, the ability to quickly find and finance a verified, U.S.-made part is a game-changer. We provide a direct line to the heart of America's industrial base, reducing procurement friction and improving the Total Cost of Ownership (TCO) by ensuring quality and reliability.
This commitment to building a robust domestic supply chain is a two-way street. The strength of our marketplace comes from the excellence of our manufacturing partners. Are you a U.S. manufacturer? Register as a vendor and join the American manufacturing revival. If you have specific sourcing questions or need help finding a hard-to-locate component, our team is ready to help.
Conclusion: Your Foundation for Success
The installation of an anchor bolt is a moment of profound importance in any construction or industrial project. It is the physical embodiment of a structure's stability and a testament to the installer's skill and diligence. From selecting the appropriate anchor type for the load and environment to the meticulous execution of drilling, cleaning, and tensioning, every step is a link in a chain of structural integrity. Compromising on any of these steps is a risk that no project can afford to take.
By understanding these detailed procedures and prioritizing precision, you are not just fastening steel to concrete; you are laying the foundation for safety, performance, and long-term durability. Don't let procurement hurdles compromise your project's foundation. Explore our vast catalog of U.S.-made fasteners and industrial equipment on Maden.co today. Find the exact components you need, ensure their quality by sourcing from verified American manufacturers, and leverage our Instant Financing at checkout to build a stronger, more resilient future.
Frequently Asked Questions
1. Can I install anchor bolts in old or existing concrete?
Yes, absolutely. This is the primary application for post-installed anchors. Both mechanical expansion anchors and adhesive anchors are specifically designed for use in existing, fully cured concrete. However, it's crucial to assess the condition of the old concrete. It should be free of significant cracks, spalling, or degradation. If the concrete's quality is questionable, a structural engineer should be consulted to perform tests and determine its suitability for anchoring.
2. What is the most common reason anchor bolts fail?
The overwhelming majority of post-installed anchor failures are attributable to improper installation, not a defect in the anchor itself. The single most common mistake is inadequate hole cleaning. Dust and debris left in a drilled hole act as a lubricant, preventing a mechanical anchor's expansion sleeve from properly gripping the concrete or severely compromising the bond strength of an adhesive anchor. Other common reasons include under- or over-torquing, incorrect embedment depth, and loading an adhesive anchor before it has fully cured.
3. How close to the edge of the concrete can I install an anchor bolt?
Every anchor bolt manufacturer provides a specification for the "critical" and "minimum" edge distance. Installing an anchor closer than the minimum recommended distance is highly discouraged, as it can cause the concrete to "break out" in a cone shape when a load is applied, leading to a complete failure of the anchor point. As a general rule, adhesive anchors can often be placed closer to an edge than mechanical expansion anchors because they induce less stress into the concrete during installation. Always consult the manufacturer's technical data sheet for the specific anchor you are using.
4. Why is using a calibrated torque wrench so important for mechanical anchors?
Using a calibrated torque wrench is critical because it is the only way to ensure the anchor is set according to the manufacturer's specifications. The specified torque is engineered to apply the correct amount of expansion force to the anchor's sleeve or clip. Under-torquing means the anchor will not expand enough to achieve its rated load capacity and could pull out under load. Over-torquing is equally dangerous, as it can over-stress the concrete, causing it to crack or spall, or even damage the anchor bolt itself, leading to premature failure.


