How to Install Concrete Anchors: A Professional Guide
Table of Contents
- Introduction
- Understanding the Foundation: Why Proper Anchor Installation Matters
- Types of Concrete Anchors: Choosing the Right Tool for the Job
- Pre-Installation Checklist: Tools and Materials
- The 7-Step Professional Installation Process
- Critical Safety Protocols and Best Practices
- The Maden.co Advantage: Sourcing American-Made Anchors
- Conclusion
- Frequently Asked Questions (FAQ)
Introduction
A single bolt, less than a foot long, can be the difference between a secure industrial installation and a catastrophic failure. Imagine a heavy-duty robotic arm, a critical safety guardrail, or an entire pallet racking system—all of them depend on the unseen, often underappreciated strength of the concrete anchors holding them to the foundation. When an anchor fails, it's rarely the fault of the hardware itself. More often, the failure point is a direct result of improper installation. This isn't just a maintenance headache; it's a significant risk to safety, operations, and the bottom line. For the procurement manager facing project delays or the MRO buyer responding to an urgent repair, understanding the nuances of how to install concrete anchors is not a trivial skill; it's a core competency.
This article is designed to be your definitive resource for mastering the professional installation of concrete anchors. We will move beyond basic instructions to provide the in-depth knowledge required for industrial, commercial, and heavy-duty applications. We will explore the critical differences between anchor types, detail the essential tools and preparation steps, and provide a comprehensive, step-by-step installation process that prioritizes safety and long-term reliability. We'll also highlight common pitfalls and explain how sourcing high-quality, American-made components from a trusted B2B marketplace like Maden.co is the first and most crucial step in ensuring structural integrity. Our goal is to empower you with the expertise to ensure every anchor you specify and install contributes to a safer, more efficient, and more resilient operation.
Understanding the Foundation: Why Proper Anchor Installation Matters
In the world of industrial maintenance and construction, the integrity of a fastening is paramount. A concrete anchor is more than just a piece of metal; it's a critical component in a complex system designed to transfer immense loads—tensile (pull-out) and shear (sideways)—from a fixture into a concrete base material. The success of this load transfer hinges entirely on the quality of the installation.
A poorly installed anchor creates a weak link in the structural chain. The potential consequences range from inconvenient to catastrophic:
- Safety Hazards: The most significant risk is to personnel. An improperly anchored safety barrier, such as a Jesco Guard Rails 10ft Safety Yellow Barrier Rail, can fail under impact, leading to serious injury. Similarly, overhead equipment or racking that comes loose poses a severe threat.
- Equipment Damage: Heavy machinery, conveyor systems, and sensitive equipment rely on stable, vibration-resistant mounting. Anchor failure can lead to costly damage and misalignment, causing production to grind to a halt.
- Operational Downtime: When an anchor fails, the subsequent repair is rarely quick. It involves removing the failed anchor, potentially repairing the damaged concrete, and re-installing the fixture, all of which translates to lost production time and increased MRO costs.
- Compliance and Liability: Many industrial installations are governed by strict building codes and OSHA regulations. A failure due to improper installation can result in significant fines, legal liability, and damage to a company's reputation.
At Maden.co, our mission is built on the principle of Industrial Excellence. We believe that strengthening American manufacturing begins at the most fundamental level—with reliable, high-quality components. By connecting buyers with verified U.S. manufacturers, we champion a transparent and dependable supply chain. You can learn more about our mission to champion American manufacturing here. Proper installation is the final, critical step in realizing the full value of these superior components.
Types of Concrete Anchors: Choosing the Right Tool for the Job
The first step in a successful installation is selecting the appropriate anchor for the specific application. The choice depends on several factors: the type and condition of the concrete, the weight and type of load (static, dynamic, or shock), environmental conditions, and any relevant code requirements. Here’s a breakdown of the most common categories used in industrial settings.
Mechanical Expansion Anchors
These are the workhorses of the concrete fastening world. They function by expanding against the sides of the drilled hole, creating a powerful friction-based hold.
- Wedge Anchors: Ideal for heavy-duty applications in solid concrete. A wedge anchor consists of a threaded stud with a clip or wedge at the bottom. As the nut is tightened, the clip is pulled up and expands, wedging itself firmly in the hole. They are excellent for mounting racking, structural steel, and heavy machinery.
- Sleeve Anchors: These are versatile and can be used in a wider range of base materials, including concrete block and brick. A sleeve anchor has an expansion sleeve that runs the full length of the anchor body, providing a more distributed holding pressure.
- Shield Anchors: These are designed for heavy loads and are available in various configurations. A prime example is the Zamac Alloy Single Expansion Shield Anchor, which is ideal for securing fixtures that may need to be removable. The internal cone expands the shield against the concrete as the bolt is tightened, creating a secure connection. These are often used for attaching support ledgers, brackets, and motors.
- Drop-In Anchors: These are female anchors that sit flush with the concrete surface. A setting tool is used to drive an internal plug downward, expanding the anchor body. They are perfect for applications where a flush surface is needed, such as overhead threaded rod installations for pipe hangers or cable trays.
Undercut Anchors
For the most critical, high-load applications, such as securing the base of an Jesco Extra Heavy Duty 96" Welded Rail System, undercut anchors provide the highest level of security. They create a mechanical interlock with the concrete. This requires a special drilling process to create an "undercut" or bell-shaped cavity at the bottom of the hole. The anchor then expands to fill this cavity, creating a positive lock that is not reliant solely on friction and is exceptionally resistant to dynamic and shock loads.
Screw Anchors
Often referred to by brand names like Tapcon®, these anchors are incredibly popular for light to medium-duty applications due to their ease of installation. They are threaded fasteners that tap their own threads into a pre-drilled hole in the concrete. They are fast to install, removable, and excellent for mounting electrical boxes, conduit straps, and light signage.
Adhesive (Epoxy) Anchors
Adhesive anchors offer the highest load-bearing capacity and are the go-to solution for challenging situations, such as anchoring into cracked concrete or close to an edge. This system involves injecting a two-part epoxy or adhesive into a clean hole, followed by the insertion of a threaded rod or rebar. The adhesive bonds chemically with both the anchor and the concrete, creating an incredibly strong, stress-free fastening. They are essential for seismic retrofitting, rebar doweling, and anchoring in corrosive environments.
Pre-Installation Checklist: Tools and Materials
A professional outcome requires professional preparation. Before you begin the installation process, assemble all necessary tools and personal protective equipment (PPE). Rushing this step is a common cause of installation errors.
Essential Tools and Equipment:
- Rotary Hammer Drill or Hammer Drill: For industrial applications in solid concrete, a rotary hammer with an SDS-style chuck is essential. A standard hammer drill may suffice for smaller anchors or softer base materials.
- Carbide-Tipped Drill Bit: The bit must match the specified diameter for the anchor you are using. A worn bit will create an undersized hole, preventing proper anchor installation. Always use a bit that meets ANSI standards.
- Wire Brush: A nylon or steel brush with a diameter correctly sized for the hole is non-negotiable for cleaning debris from the sides of the hole.
- Compressed Air or Blower Bulb: To remove all dust and debris from the hole after drilling and brushing.
- Torque Wrench: Absolutely critical for setting mechanical expansion anchors to the manufacturer's specified torque value (Nm or ft-lbs). Over-torquing can damage the anchor or the concrete, while under-torquing will result in a weak connection.
- Hammer: For tapping anchors into place.
- Tape Measure and Marker: For accurate layout.
- Level: To ensure the fixture is installed correctly.
Personal Protective Equipment (PPE):
- Safety Glasses or Goggles: Protect your eyes from concrete dust and debris.
- Gloves: Protect your hands during drilling and handling anchors.
- Hearing Protection: Rotary hammers are loud and can cause hearing damage over time.
- Dust Mask or Respirator: Inhaling crystalline silica dust from concrete is a serious health hazard.
The 7-Step Professional Installation Process
Following a precise, methodical process is the key to a safe and reliable anchor installation. Skipping or rushing any of these steps, especially hole cleaning, is the leading cause of anchor failure.
Step 1: Mark Your Location
Accuracy starts here. Use a tape measure and marker to precisely lay out the hole locations according to your project plans. Ensure you are meeting the minimum edge distance and spacing requirements specified by the anchor manufacturer. Anchoring too close to an edge or to another anchor can significantly reduce holding power and may even crack the concrete. Use a level to ensure your fixture will be mounted plumb and true.
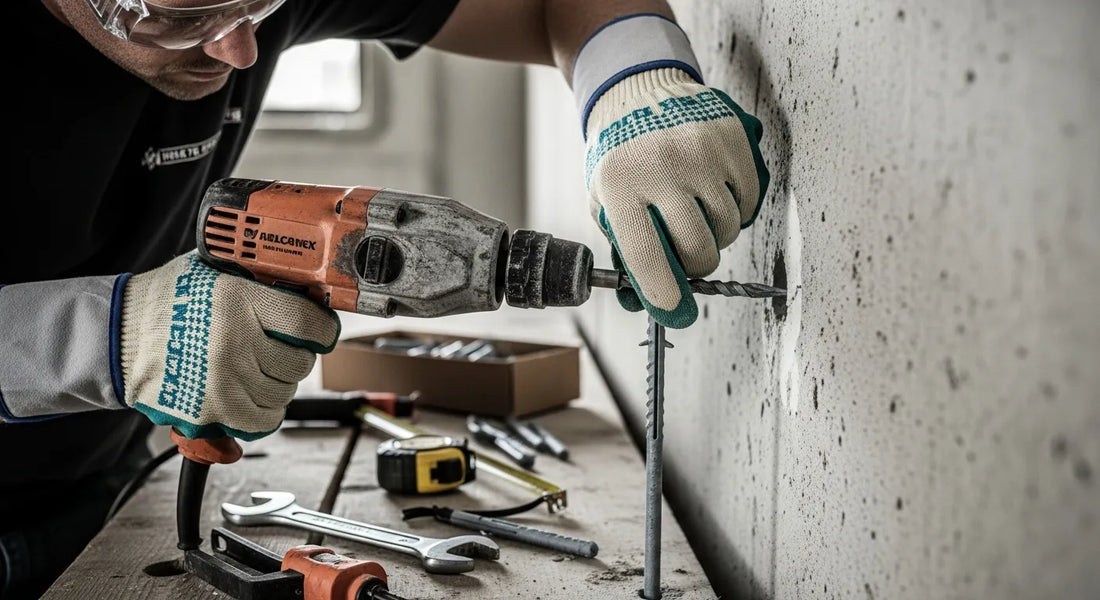
Step 2: Drill the Hole
Select the correct ANSI-standard carbide-tipped drill bit for your anchor diameter. Set the depth stop on your rotary hammer to the required embedment depth. Drilling too shallow will prevent the anchor from setting correctly; drilling too deep can be inefficient and may interfere with setting drop-in anchors. Hold the drill perpendicular to the concrete surface and drill the hole to the specified depth. Avoid excessive movement, as this can create an oversized, out-of-round hole.
Step 3: Clean the Hole (The Most Critical Step)
This is the step that is most often performed improperly, and it is the single greatest contributor to anchor failure. Concrete dust left in the hole acts like a lubricant, preventing the expansion mechanism of a mechanical anchor from properly gripping the concrete walls. For adhesive anchors, dust prevents the epoxy from bonding correctly.
The Professional Cleaning Process (Blow-Brush-Blow):
- Blow: Use compressed air or a high-powered blower bulb to blow all loose dust and debris out of the hole.
- Brush: Insert a properly sized wire brush and scrub the sides of the hole vigorously to dislodge any remaining dust particles.
- Blow Again: Use compressed air or the blower bulb one final time to remove all dislodged particles. A clean hole is essential for the anchor to achieve its published load rating.
Step 4: Install the Anchor
For a mechanical expansion anchor like a wedge or sleeve anchor, lightly tap it through the fixture and into the hole with a hammer until the washer and nut are snug against the fixture. For a drop-in anchor, tap it into the hole until it is flush with the surface. For a shield anchor like the Zamac Alloy Single Expansion Shield Anchor, insert the shield body into the hole first. For adhesive anchors, inject the epoxy from the bottom of the hole outwards to avoid air pockets, then slowly insert the threaded rod with a twisting motion.
Step 5: Set the Anchor
The method for setting the anchor depends on the type:
- Wedge/Sleeve Anchors: This is where the torque wrench is used. The setting process is accomplished by tightening the nut.
- Drop-In Anchors: Insert the manufacturer-provided setting tool into the anchor and strike it firmly with a hammer until the shoulder of the tool meets the top of the anchor. This drives the internal plug and expands the anchor.
- Adhesive Anchors: The "setting" is the curing process. You must wait for the manufacturer-specified cure time before applying any load. This time can vary significantly based on temperature.
Step 6: Attach the Fixture
If you haven't already installed the anchor through the fixture (as with a wedge anchor), you can now place your fixture over the anchor. For drop-in anchors, you will thread a bolt through your fixture and into the anchor. For adhesive anchors, you will place the fixture over the protruding threaded rod and secure it with a washer and nut.
Step 7: Final Inspection and Torquing
This is the final quality control check. For all mechanical anchors, use a calibrated torque wrench to tighten the nut to the Installation Torque (T_inst) specified in the manufacturer's technical data sheet. Do not guess or use an impact wrench, as this almost always leads to over-torquing. Once torqued, visually inspect the anchor and the surrounding concrete for any signs of cracking or distress.
Critical Safety Protocols and Best Practices
Beyond the installation steps, a professional approach requires adherence to broader safety and quality standards.
- Always Read the Instructions: Every anchor is slightly different. Always consult the Manufacturer's Printed Installation Instructions (MPII) before starting.
- Know Your Concrete: Assess the age and condition of the concrete. Older or lower-strength concrete may require a different anchor type or a reduced load application.
- Respect Edge and Spacing Distances: Failing to adhere to minimum distances is a primary cause of concrete breakout failure.
- Never Over-Torque: Over-torquing can yield the steel of the anchor bolt or crush the surrounding concrete, leading to a complete loss of holding power.
- Load Test When Required: For critical life-safety applications or when working with concrete of unknown quality, on-site proof loading (testing) of anchors may be required by the project engineer.
The Maden.co Advantage: Sourcing American-Made Anchors
The entire installation process, no matter how perfectly executed, is built on the quality of the component itself. For a procurement manager under pressure to source a specific component, a design engineer needing material certifications, or an MRO buyer facing an unexpected breakdown, the ability to quickly find and finance a verified, U.S.-made part is a game-changer. This is the core of our value proposition.
At Maden.co, we are committed to driving America's manufacturing revival. We provide direct access to over 2.5 million products from a network of over 800 verified U.S. manufacturers. This commitment to an all-American supply chain provides tangible benefits:
- Supply Chain Transparency: Know exactly where your components are coming from, ensuring quality control and material traceability.
- Industrial Excellence: U.S.-made fasteners are produced to rigorous standards, ensuring consistent performance and compliance with specifications like DIN and NPT.
- Customer Empowerment: Our platform reduces procurement friction, allowing you to find, compare, and purchase critical components efficiently.
For businesses looking to partner with us and expand their reach, we encourage you to join the movement. Are you a U.S. manufacturer? Register as a vendor and join the American manufacturing revival.
Conclusion
Mastering how to install concrete anchors is a non-negotiable skill in any industrial setting. It is a process that demands precision, the right tools, and an uncompromising commitment to following every step. From choosing the correct anchor type for the application to the critical final torquing, each action contributes directly to the safety of your personnel, the integrity of your equipment, and the efficiency of your operations.
The foundation of any secure installation, however, begins long before a drill ever touches the concrete. It starts with sourcing high-quality, reliable components from trusted manufacturers. By choosing to source American-made anchors, you are investing in superior quality, supply chain resilience, and the future of domestic industry.
Don't let a faulty installation become your next operational bottleneck or safety incident. We invite you to explore the extensive catalog of U.S.-made industrial components on Maden.co. Streamline your procurement process, enhance your project's integrity, and build with confidence. For larger projects or capital-intensive equipment installations, you can apply for Instant Financing at checkout to manage your cash flow effectively and get the job done right. If you have specific sourcing questions, our team is ready to help.
Frequently Asked Questions (FAQ)
1. What is the most common reason concrete anchors fail?
The single most common reason for failure, particularly with mechanical expansion anchors, is improper hole cleaning. Concrete dust left in the pre-drilled hole prevents the anchor's expansion mechanism from making solid contact with the base material, drastically reducing its friction-based holding power and ability to achieve its published load rating.
2. Can I reuse a concrete anchor?
Generally, no. Mechanical expansion anchors like wedge and sleeve anchors are designed for a single use. The expansion process permanently deforms the clip or sleeve, and attempting to reuse them will result in a significantly weaker and unreliable connection. Screw-type anchors can sometimes be removed and reused in a new hole, but it is always best practice to use a new anchor for any critical application.
3. How long does epoxy need to cure for an adhesive anchor?
The cure time for adhesive (epoxy) anchors varies significantly based on the specific product formulation and the ambient temperature of the concrete and air. Curing can take anywhere from 30 minutes to 24 hours or more. It is absolutely essential to consult the manufacturer's technical data sheet for the specific product you are using to find the correct cure time for your environmental conditions before applying any load.
4. What's the difference between a wedge anchor and a sleeve anchor?
The primary difference is their expansion mechanism and ideal use case. A wedge anchor has a small expansion clip at the very bottom, which provides a concentrated, high-strength grip deep inside solid concrete, making it ideal for heavy-duty static loads. A sleeve anchor has an expansion sleeve that runs along the body of the anchor, distributing the load over a larger surface area. This makes it more versatile and suitable for use in a wider range of base materials, including softer or hollow materials like concrete block or brick, where a wedge anchor's concentrated force could cause a blowout.