How to Install Needle Roller Bearings for Peak Performance
Table of Contents
- Introduction
- The Critical Role of Needle Roller Bearings in Modern Machinery
- Pre-Installation: Setting the Stage for Success
- The Installation Process: A Detailed Walkthrough
- Post-Installation Checks and Initial Run-In
- Partnering for Success: The Maden.co Advantage
- Conclusion
- Frequently Asked Questions (FAQ)
Introduction
An unexpected shutdown on a primary production line. The jarring silence is broken only by the frantic calls of the maintenance team. The culprit? A single, prematurely failed needle roller bearing. The cost isn't just the price of a replacement component; it's thousands of dollars in lost production per hour, potential order delays, and a significant hit to operational efficiency. This scenario is all too common, and it often traces back not to a faulty part, but to a faulty installation process. The precision engineered into a high-quality bearing is rendered useless if it isn't mounted correctly.
This article serves as an authoritative, step-by-step guide for maintenance professionals, MRO buyers, and design engineers on how to install needle roller bearings correctly, the first time. We will move beyond the basic steps to explore the nuances of preparation, the different mounting techniques, critical post-installation checks, and the common pitfalls that can lead to catastrophic failure. Our goal is to empower you with the knowledge to not only perform the installation but to understand why each step is critical for ensuring the longevity and reliability of your machinery.
Ultimately, achieving industrial excellence hinges on the synergy between sourcing superior components and employing meticulous installation practices. By mastering this process, you protect your capital investments, enhance operational uptime, and contribute to a more robust and reliable manufacturing ecosystem.
The Critical Role of Needle Roller Bearings in Modern Machinery
Before diving into the "how," it's essential to appreciate the "why." Needle roller bearings are unsung heroes in countless applications where space is at a premium but load capacity cannot be compromised. Their unique design, featuring cylindrical rollers with a large length-to-diameter ratio, allows them to handle significantly higher radial loads than a similarly sized ball bearing. This makes them indispensable in:
- Automotive transmissions and engine components (e.g., rocker arms, pistons, pumps)
- Industrial gearboxes and pumps
- Robotics and automated assembly lines
- Power tools and two-stroke engines
- Heavy-duty material handling equipment
The very nature of their design—a large contact area between the rollers and raceways—means that precision is not a luxury; it's a fundamental requirement. Even microscopic misalignment or contamination introduced during installation can create stress concentrations, leading to premature spalling, brinelling, and eventual failure. This is where the commitment to quality, both in the component itself and in the installation process, pays dividends.
At Maden.co, our mission is to provide direct access to this level of quality by connecting industrial buyers with a vast network of verified U.S. manufacturers. We believe that a resilient supply chain is built on a foundation of superior, domestically sourced components. When you select a needle roller bearing from our catalog, you are not just buying a part; you are investing in the reliability and performance that underpins America's manufacturing revival.
Pre-Installation: Setting the Stage for Success
A successful installation begins long before the bearing touches the shaft. Meticulous preparation accounts for more than half of the process's success and is the single most effective way to prevent premature failure. Rushing this stage is a false economy that will invariably lead to increased costs and downtime later.
Step 1: Verification and Component Inspection
Assume nothing. Every component, new or old, must be rigorously inspected before assembly.
- Part Number Verification: Cross-reference the part number on the bearing and its packaging with the engineering drawings, bill of materials (BOM), or maintenance manual. A simple mix-up can lead to incorrect fits and immediate damage.
- Bearing Inspection: Carefully unbox the new bearing in a clean area immediately before installation. Visually inspect it under good lighting for any signs of shipping damage, corrosion (rust), or manufacturing defects. Handle it with clean, dry hands or gloves to prevent moisture transfer. Do not remove any factory-applied preservative unless the manufacturer's instructions specifically require it.
-
Shaft and Housing Inspection: This is arguably the most critical pre-installation check. Use calibrated measuring tools like micrometers and bore gauges to verify the dimensions of the bearing seat on the shaft and in the housing.
- Dimensions: Check that the diameters are within the specified tolerances for the required interference or clearance fit.
- Roundness: Ensure the shaft and housing are not out-of-round (oval).
- Surface Finish: The surfaces should be smooth and free of burrs, nicks, or scratches. Use a fine abrasive cloth or stone to carefully remove any imperfections. Any raised metal can create a high point that will concentrate stress on the bearing.
- Cleanliness: Thoroughly clean the shaft and housing with a lint-free cloth and an appropriate solvent to remove all old lubricant, debris, and preservatives.
Step 2: Gathering the Right Tools and Equipment
Using the wrong tools is a direct path to bearing damage. Never use a standard hammer and punch or a generic piece of pipe to drive a bearing into place. This practice almost guarantees damage to the delicate raceways and cage.
Essential Toolkit:
- Mechanical or Hydraulic Press: For controlled, even application of force during press-fitting.
- Proper Fitting Tools: Use bearing mounting tool kits with precision-machined arbors, sleeves, or mandrels that match the bearing's inner and outer ring diameters. This ensures force is applied squarely to the correct ring.
- Induction Heater or Temperature-Controlled Oil Bath: For thermal mounting of larger bearings.
- Calibrated Measurement Tools: Micrometers, bore gauges, and feeler gauges.
- Temperature-Indicating Crayons or an Infrared Thermometer: To monitor bearing temperature during heating.
- Clean, Lint-Free Wipes and Solvents.
- Personal Protective Equipment (PPE): Safety glasses and thermal gloves for hot mounting.
Step 3: Preparing the Work Environment
The installation area must be treated like a surgical theater for machinery.
- Cleanliness: The area should be as clean and dust-free as possible. Contamination is a primary cause of bearing failure. A single grain of sand or a metal filing can destroy a bearing's finely machined surfaces.
- Organization: Lay out all tools and components on a clean surface in the order they will be used. This prevents confusion and reduces the time the new bearing is exposed to the environment.
- Lighting: Ensure the workspace is well-lit to allow for clear visual inspection at every stage of the process.
The Installation Process: A Detailed Walkthrough
With all preparations complete, you can proceed with the installation. The two primary methods are press-fitting (cold mounting) and thermal fitting (hot mounting). The choice depends on the bearing size and the type of fit required.
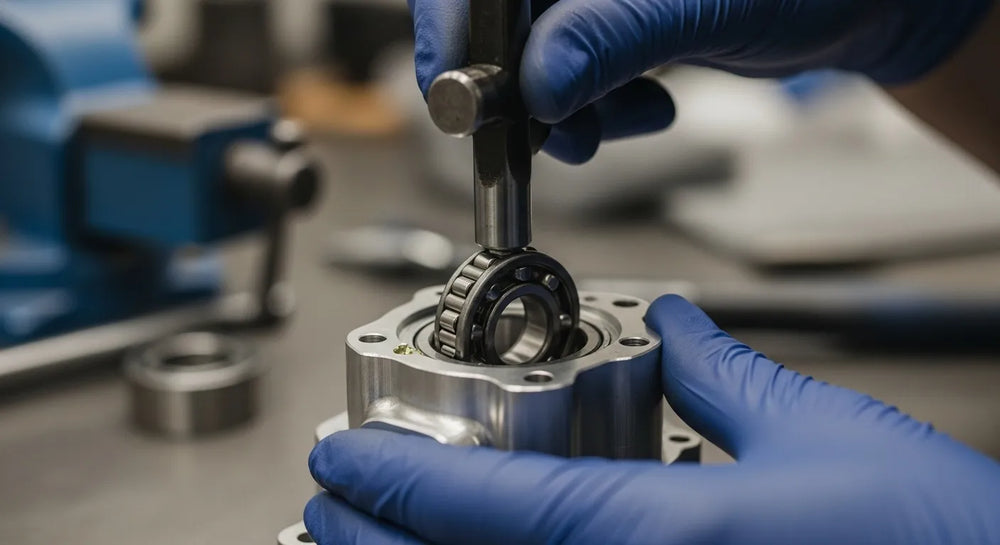
Method 1: Press-Fitting (Cold Mounting)
This is the most common method for smaller needle roller bearings, particularly drawn cup types. The guiding principle is simple but absolute: apply steady, even pressure only to the ring that has the interference fit.
-
If Mounting in a Housing (interference fit on the outer ring):
- Lightly coat the outer diameter of the bearing and the housing bore with a thin film of light oil or mounting paste to prevent galling.
- Select a mounting tool (sleeve or arbor) with an outside diameter that matches the bearing's outer ring. The tool must make square contact with the face of the outer ring only.
- Place the bearing squarely at the mouth of the housing bore.
- Position the mounting tool against the bearing's outer ring.
- Using a press, apply slow, steady pressure to drive the bearing into the housing until it is fully seated against the housing shoulder. Listen and feel for any signs of binding. If it doesn't feel right, stop and reassess.
-
If Mounting on a Shaft (interference fit on the inner ring):
- Lightly lubricate the shaft seat and the bearing's inner bore.
- Select a mounting sleeve that makes contact only with the face of the inner ring.
- Support the outer ring if possible, but ensure no pressing force is transmitted through the rollers.
- Place the bearing squarely on the end of the shaft.
- Using a press, apply slow, steady force to the mounting sleeve to slide the bearing onto the shaft until it is seated against the shaft shoulder.
Scenario: An MRO manager faces an urgent breakdown on a packaging line's conveyor system. The faulty component is a standard pulley bearing. Speed and reliability are paramount. By accessing Maden.co, they can quickly identify and source a U.S.-made LP Series 0.5" Bore, 2.5" OD Needle Roller Bearing Pulley. The maintenance team, armed with the correct press-fitting tools and technique, can perform a swift and accurate installation, minimizing downtime and restoring production with a component they can trust.
Method 2: Thermal Fitting (Hot Mounting)
For larger bearings or those with a very tight interference fit, the force required for press-fitting can be excessive and risks damaging the components. Thermal fitting uses the principle of thermal expansion to make installation nearly effortless. The housing is heated (or the shaft is cooled) to temporarily increase its diameter, allowing the bearing to be slipped into place easily.
- Determine the Target Temperature: The required temperature difference depends on the bearing size, material, and the degree of interference. As a general rule, heating the bearing to a temperature of 80-100°C (150-212°F) above the shaft temperature is sufficient. Crucially, never heat a bearing above 125°C (257°F), as this can cause permanent metallurgical changes, altering its dimensions and reducing its hardness and load capacity.
- Heat the Bearing: The preferred method is an induction heater. It provides fast, even, and clean heating while also demagnetizing the bearing. If an induction heater isn't available, a temperature-controlled oil bath can be used, but this method carries a higher risk of contamination. Open flames must never be used.
- Monitor the Temperature: Use temperature-indicating crayons or a non-contact infrared thermometer to constantly monitor the bearing's temperature, ensuring it does not exceed the 125°C limit.
- Perform the Installation: Once the target temperature is reached, use clean, thermally insulated gloves to quickly and carefully move the bearing and slide it onto the shaft or into the housing. It should slide on smoothly until it rests against the shoulder.
- Cooling: Hold the bearing in place against the shoulder as it cools and contracts, locking it into position. Allow it to cool naturally in ambient air. Do not quench it with water or oil, as this can cause cracking.
Scenario: A design engineer is developing a new heavy-duty winch for a critical lifting application. The design requires a bearing that can handle immense radial loads within a compact footprint. They select the robust, American-made LP Series 0.5" Bore, 3" OD Needle Roller Bearing Pulley for its superior specifications. Due to the tight interference fit needed to handle the high loads, the engineer specifies a thermal mounting procedure in the assembly instructions, ensuring a stress-free installation that preserves the component's integrity and maximizes the winch's service life.
Post-Installation Checks and Initial Run-In
The job isn't finished once the bearing is in place. A few final checks are essential to validate the installation.
Verifying Proper Seating and Alignment
Slowly rotate the shaft or housing by hand. The movement should be smooth and quiet, with no noticeable grinding, catching, or binding. If the bearing has a separable inner or outer ring, use a feeler gauge to confirm that it is seated squarely against its shoulder.
Lubrication: The Lifeblood of Your Bearing
Proper lubrication is as critical as proper installation. It reduces friction, dissipates heat, prevents corrosion, and flushes out contaminants.
- Choosing the Right Lubricant: Always follow the machinery manufacturer's recommendation for lubricant type (oil or grease) and viscosity. Factors include speed, load, temperature, and operating environment. For example, a system operating in a marine or highly corrosive environment would demand a specialized component and lubricant. Sourcing a part like the PullPro™ 316 Stainless Steel Rope Sheave Bearing and pairing it with a high-quality, water-resistant marine grease is essential for preventing premature failure and protecting the investment.
- Applying the Correct Amount: This is a common point of failure. Over-greasing a bearing can cause it to run hot due to churning, leading to premature lubricant degradation and failure. Under-greasing starves the components of lubrication. For bearings that are not pre-lubricated or sealed, a general guideline is to fill 30-50% of the bearing's free space with grease.
The Initial Run-In Procedure
After lubrication, run the equipment at a low speed under no load. Monitor the bearing's temperature and listen for any unusual noises. Vibration analysis equipment can provide a more detailed assessment. The temperature will rise initially and then should stabilize. A continuously rising temperature or a sharp spike is a sign of a problem—likely incorrect installation, improper lubrication, or excessive preload—and the equipment should be stopped immediately for inspection.
Partnering for Success: The Maden.co Advantage
Mastering the technical aspects of bearing installation is a significant step toward industrial excellence. However, the process begins with sourcing a component you can trust. This is the core of our value proposition. At Maden.co, our vision is to become the definitive platform that proves American-made components are as accessible and convenient as any global alternative. We achieve this by championing values of American Manufacturing Pride, Digital Innovation, and absolute Supply Chain Transparency.
When you source from us, you gain more than just a part; you gain a strategic partner.
- Customer Empowerment: We provide procurement managers and engineers with detailed technical specifications, transparent pricing, and direct access to a catalog of over 2.5 million products from more than 800 verified U.S. manufacturers. This reduces procurement friction and allows you to make informed decisions that improve your Total Cost of Ownership (TCO). If you have specific sourcing questions, our team is ready to help.
- Supply Chain Resilience: By choosing domestically manufactured components, you insulate your operations from the volatility of global supply chains, reducing lead times and enhancing predictability. Our entire business model is built on this principle; you can learn more about our mission to champion American manufacturing here.
- Strategic Financing: We understand that large-scale MRO projects or prototype development can be capital-intensive. That’s why we offer a powerful tool to manage your cash flow effectively. You can apply for Instant Financing at checkout to streamline your capital-intensive projects, allowing you to procure the necessary components without delaying critical work.
For the manufacturers who form the backbone of this nation's industrial strength, we invite you to join our mission. By listing your products on our marketplace, you gain access to a nationwide audience of professional buyers actively seeking high-quality, American-made goods. Are you a U.S. manufacturer? Register as a vendor and join the American manufacturing revival.
Conclusion
A needle roller bearing is a marvel of precision engineering, but its performance is ultimately in the hands of the technician who installs it. A meticulous, by-the-book installation process—from initial inspection and cleaning to the final run-in—is not just best practice; it is a fundamental investment in the reliability and productivity of your equipment. It is the difference between a machine that runs smoothly for its entire designed lifecycle and one that causes costly, unscheduled downtime.
By combining disciplined installation techniques with the high-quality, verified U.S.-made components available on Maden.co, you build a powerful foundation for operational success. We encourage you to explore our extensive catalog of industrial components and discover how partnering with us can strengthen your supply chain. When you're ready to invest in reliability, remember to leverage our Instant Financing option at checkout to make your procurement process as efficient and seamless as possible.
Frequently Asked Questions (FAQ)
1. Can I reuse a needle roller bearing after it has been removed? As a general rule, it is not recommended. The force required to dismount a bearing, especially one that was press-fit, can cause microscopic damage (brinelling) to the raceways and rollers that is not visible to the naked eye. This damage will significantly shorten the bearing's new service life. It is always more cost-effective in the long run to replace it with a new one.
2. What is the main difference in procedure between installing a drawn cup and a solid race needle bearing? Drawn cup bearings have a thin, stamped outer shell and must be installed using a mandrel that has a slight relief or step to ensure pressing force is only applied to the stamped end, not the open end. Pressing on the open end can distort the cup. Solid race (or machined) bearings are more robust, and the pressing tool should make contact across the entire face of the ring being fitted.
3. How do I know if I've over-greased a bearing? The most common symptom of over-greasing is a rapid and significant increase in operating temperature shortly after startup. The excess grease causes churning, which generates friction and heat. This can lead to the grease breaking down and leaking from the seals. If you detect this, the bearing should be stopped, cleaned, and re-lubricated with the correct amount of grease.
4. Why is it so important to only apply pressure to the ring being fitted? Applying pressure to the wrong ring transmits the mounting force directly through the rolling elements (the needles). The contact area between a roller and the raceway is very small, meaning the mounting force creates extremely high contact stress. This can easily dent or deform the raceways and rollers, creating noise, vibration, and leading to a drastically reduced operational life.


