How to Install Sleeve Anchors for Secure Fastening
Table of Contents
- Introduction
- Understanding the Sleeve Anchor: More Than Just a Fastener
- Pre-Installation Checklist: Planning for Success
- The Definitive 6-Step Installation Process
- Advanced Considerations and Troubleshooting
- Securing Your Facility: Beyond a Single Anchor
- Joining the American Manufacturing Revival
- Conclusion
- Frequently Asked Questions (FAQ)
Introduction
A project grinds to a halt. The installation of a critical piece of safety equipment is delayed, not because the equipment is missing, but because the right fastener—a seemingly simple component—is unavailable or untrustworthy. For a maintenance manager facing an urgent repair or a design engineer specifying components for a new build, this scenario is all too common. The integrity of an entire assembly, from heavy machinery to essential safety barriers, often depends on the correct installation of a single, powerful fastener: the sleeve anchor. This isn't just about a bolt in a hole; it's about operational uptime, regulatory compliance, and personnel safety. A fastening that fails can have catastrophic consequences.
This article provides a professional-grade, comprehensive guide to the proper selection and installation of sleeve anchors. We will move beyond basic instructions to cover the technical nuances that separate a temporary fix from a permanent, reliable solution. We will explore how to assess your base material, select the appropriate anchor for the load, and follow a precise, step-by-step installation process that guarantees maximum holding power. Our focus is on delivering the industrial excellence that professionals demand. Properly installing a sleeve anchor is a fundamental skill that underpins industrial safety and structural integrity, and sourcing the right American-made components from a transparent supply chain is the first and most critical step toward success.
Understanding the Sleeve Anchor: More Than Just a Fastener
Before turning a single wrench, it is crucial to understand the mechanics and types of sleeve anchors. This knowledge empowers procurement managers and engineers to specify the correct component, ensuring both project efficiency and long-term structural safety. Sourcing from a reliable marketplace like Maden.co ensures you have access to a wide variety of these essential components from verified U.S. manufacturers.
What is a Sleeve Anchor?
A sleeve anchor is a pre-assembled expansion-style anchor designed for fastening into solid and some hollow masonry materials, such as concrete, brick, and block. Its primary advantage is its versatility and the exceptional holding power it derives from a simple, robust mechanical action. As the anchor's nut or screw is tightened, it pulls a tapered cone-shaped stud up through an expansion sleeve. This forces the sleeve to flare outwards, creating a powerful 360-degree compression force against the inner walls of the drilled hole. This friction-based grip is what gives the sleeve anchor its significant tensile (pull-out) and shear (side-to-side) load-bearing capabilities.
The Anatomy of a High-Quality Sleeve Anchor
A sleeve anchor consists of four primary components, and the quality of each part contributes to the overall strength and reliability of the fastening.
- Threaded Stud and Expander Cone: This is the core of the anchor. The threaded portion accepts the nut, while the bottom features an integral tapered cone. As the stud is drawn upward, this cone is the "wedge" that initiates the expansion.
- Expansion Sleeve: This cylindrical metal sleeve surrounds the stud. It is designed with slits or a specific geometry that allows it to expand uniformly when the cone is pulled into it. The material and thickness of this sleeve are critical for achieving the required holding power.
- Washer: A washer is included to distribute the load from the nut evenly across the surface of the fixture being fastened, preventing damage and ensuring a secure connection.
- Nut or Head: Sleeve anchors come with different head styles to suit various applications. The most common is a finished hex nut, but they are also available with flat (countersunk), acorn, and round heads.
The quality of these components is non-negotiable. Sourcing from a platform dedicated to American manufacturing provides a level of supply chain transparency that is often missing from other channels. At Maden.co, we connect you with U.S. suppliers who adhere to stringent quality control standards, ensuring the steel grades, plating processes, and dimensional tolerances of every anchor meet industrial specifications. This commitment is central to our mission, which you can learn more about in our story of championing American manufacturing here.
Common Types and Their Industrial Applications
Choosing the right head style is determined by the specific application:
- Hex Nut Head: The most common and versatile type. It is ideal for mounting machinery, securing structural supports, attaching pallet racking, and installing heavy-duty safety equipment. The external hex nut allows for high torque application with a standard socket wrench.
- Flat Head (Countersunk): This type features a Phillips or slotted drive and a tapered head that sits flush with the surface of the fixture. It is used in applications where a smooth, non-protruding finish is required, such as installing door frames, window sills, or certain types of signage.
- Round Head (Mushroom Head): A low-profile, smooth-headed anchor that offers a clean aesthetic finish. It is often used for lighter-duty applications like fastening conduits, electrical junction boxes, or shelving brackets where snagging is a concern.
- Acorn Nut Head: Similar to the hex nut style but capped with a decorative, rounded acorn nut. It provides a finished look while protecting the threads from damage or corrosion.
Pre-Installation Checklist: Planning for Success
Proper preparation accounts for 80% of a successful sleeve anchor installation. Rushing this stage often leads to anchor failure, wasted time, and compromised safety. A methodical approach ensures that every anchor performs to its maximum engineered capacity.
Assessing the Base Material: Concrete, Brick, or Block?
The substrate you are anchoring into is the most important variable. Its condition and composition will dictate the type of anchor to use and its ultimate holding power.
- Poured Concrete: This is the ideal base material for sleeve anchors. It provides a solid, consistent medium for the expansion sleeve to grip. However, it's important to know the concrete's compressive strength (measured in PSI). A new, high-strength industrial slab (4000+ PSI) will provide significantly more holding power than older, lower-strength concrete.
- Brick: When anchoring into brick, always aim for the solid center of the brick, avoiding the mortar joints. Mortar is significantly weaker and will not provide a reliable hold. The quality and age of the brick also matter; older, softer bricks may be prone to cracking or spalling under the expansion force.
- Concrete Block (CMU): This requires careful consideration. If anchoring into a solid, grout-filled cell of a concrete block, the performance will be similar to solid concrete. However, if anchoring into the hollow section of the block, the holding power will be dramatically reduced. In these cases, the anchor's sleeve must be long enough to expand against the thicker back wall of the block's web.
Selecting the Right Sleeve Anchor for the Job
Once you've identified the base material, you must select an anchor with the correct specifications for your fixture and load requirements.
-
Diameter: The diameter of the anchor is the primary determinant of its strength. A larger diameter provides greater resistance to both pull-out and shear forces.
-
Length: The anchor's length is determined by adding the thickness of the material being fastened to the required minimum embedment depth in the base material.
Professional Tip: Always choose an anchor that provides at least the manufacturer's recommended minimum embedment. Deeper embedment generally leads to higher holding power, especially in lower-strength base materials.
-
Material and Finish: The operating environment dictates the anchor's material. For dry, indoor applications, a standard zinc-plated carbon steel anchor is sufficient. For outdoor use, damp environments, or areas exposed to corrosive chemicals, a 304 or 316 stainless steel anchor is essential to prevent rust and degradation.
Essential Tools and Personal Protective Equipment (PPE)
Having the right tools is not a luxury; it is a requirement for a professional installation.
- Rotary Hammer Drill: For drilling into concrete and masonry, a rotary hammer is vastly more effective and efficient than a standard drill.
- ANSI-Compliant Carbide-Tipped Masonry Bit: The drill bit must be the exact same diameter as the sleeve anchor you are installing. Using an ANSI-compliant bit ensures the hole tolerance is correct for the anchor to function properly.
- Wire Brush and Compressed Air/Bulb Blower: For cleaning the hole. This is a non-negotiable step.
- Torque Wrench with Socket Set: To ensure the anchor is tightened to the manufacturer's specified torque. Using a standard wrench or an impact driver often leads to over-tightening or under-tightening, both of which can cause failure.
- Hammer: For gently tapping the anchor into place.
- PPE: Always wear safety glasses to protect from dust and debris, as well as work gloves to protect your hands.
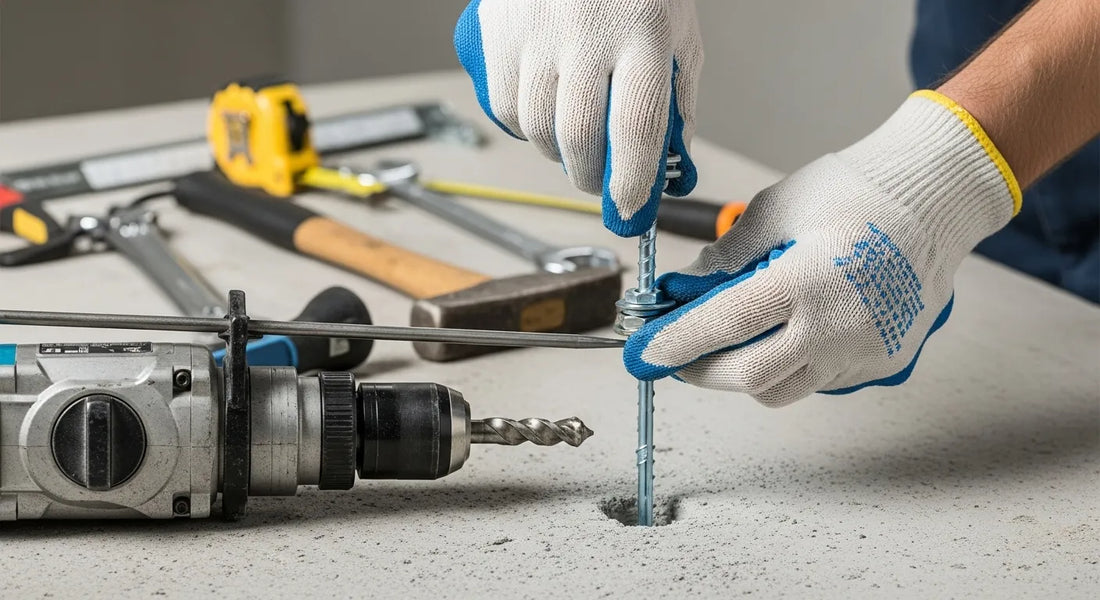
The Definitive 6-Step Installation Process
Following these steps meticulously will ensure each sleeve anchor is installed for maximum safety and performance. This process reflects the industrial excellence we value, transforming a simple task into a precision operation.
Step 1: Drilling the Hole with Precision
Using your rotary hammer drill and the correctly sized carbide-tipped bit, drill a hole into the base material. The hole must be drilled to a depth that is at least 1/2 inch deeper than the anchor's minimum embedment depth. This extra space allows any residual dust or debris to settle at the bottom without obstructing the anchor. Mark the required depth on your drill bit with a piece of tape to ensure consistency across multiple installations. Maintain the drill perpendicular (at a 90-degree angle) to the surface to ensure the anchor sits straight and the load is distributed evenly.
Step 2: Thoroughly Cleaning the Drilled Hole
This is the most frequently skipped step, and its omission is a primary cause of anchor failure. Dust and debris left in the hole act as a lubricant and prevent the expansion sleeve from making solid contact with the base material, drastically reducing its frictional grip and holding power. The professional method involves a "brush and blow" technique:
- Insert a wire brush (sized to the hole diameter) and scrub the sides of the hole vigorously to dislodge all loose particles.
- Use a can of compressed air or a handheld bulb blower to blow all the dust out of the hole.
- Repeat this brush-and-blow cycle at least two times to ensure the hole is completely clean.
Step 3: Assembling and Inserting the Anchor
The sleeve anchor comes pre-assembled. Ensure the nut is threaded onto the top of the stud, flush with the end. This protects the threads from damage when you tap the anchor into the hole. Position the anchor in the cleaned hole and gently tap it with a hammer until the washer and nut are snug against the surface of the base material. The anchor should fit snugly; if it is too loose, your hole is oversized.
Step 4: Placing the Fixture
With the anchor in place, you can now position your fixture. For this step, you will remove the nut and washer, place the fixture over the anchor's stud, then replace the washer and hand-tighten the nut. This ensures the fixture is properly aligned before final tightening.
Step 5: Setting the Anchor with a Torque Wrench
This is where precision is paramount. Using a calibrated torque wrench, tighten the nut to the manufacturer's specified installation torque value. As you tighten, you will feel the resistance increase as the internal cone is pulled up, expanding the sleeve against the walls of the hole.
Critical Warning: Do not use an impact wrench. The high, uncontrolled rotational speed of an impact wrench can easily over-torque the anchor. Over-tightening can cause the base material to crack, damage the anchor's threads, or even shear the stud, leading to a complete failure of the fastening. Under-tightening means the sleeve is not fully expanded and will not achieve its rated load capacity.
Typically, 3 to 5 full turns of the nut are required after it makes contact with the fixture to properly set the anchor. However, always defer to the manufacturer's technical data sheet for the exact torque specification.
Step 6: Final Inspection and Load Confirmation
Once torqued, perform a final visual inspection. The fixture should be completely snug against the mounting surface with no gaps. The anchor should feel solid and unmoving. Do not apply the full working load immediately if possible; allow the system to settle before subjecting it to operational forces.
Advanced Considerations and Troubleshooting
Even with a perfect process, challenges can arise. Understanding how to navigate them is the mark of an experienced professional.
Understanding Minimum Embedment Depth and Edge/Spacing Distances
Two critical engineering concepts govern where you can safely place an anchor:
- Edge Distance: This is the minimum distance from the center of an anchor to a free, unsupported edge of the concrete or masonry. Placing an anchor too close to an edge can cause the concrete to break out or "spall" under the expansion forces.
- Spacing Distance: This is the minimum distance between two anchors. Placing anchors too close together causes their expansion force cones to overlap, which can lead to cracking of the base material between them and a reduction in the holding power of both anchors.
Always consult the anchor manufacturer's technical data for these minimum distances, as they vary by anchor diameter and the strength of the base material.
Common Installation Mistakes and How to Avoid Them
- Anchor Spins in the Hole: This usually means the hole was drilled too large or the base material is too soft or hollow. You must abandon this hole, drill a new one at a safe distance, and use the correct bit size.
- Anchor Won't Tighten: This can happen if the hole is not deep enough, preventing the anchor from being fully seated, or if the threads are damaged.
- Concrete Cracks During Tightening: This is a clear sign of over-torquing or placing the anchor too close to an edge.
If you encounter any of these issues, it is essential to stop and diagnose the problem. A compromised fastening is a significant safety risk. If you have specific sourcing questions or need help identifying the right component for a difficult application, our team of experts is ready to help.
Securing Your Facility: Beyond a Single Anchor
A single, perfectly installed sleeve anchor is a testament to quality workmanship. But for MRO managers, safety officers, and facility engineers, the true goal is to create safe, compliant, and efficient operational environments. This involves scaling from a single component to a complete system.
From Component to System: Anchoring for Safety and Compliance
The anchors you install are the foundation for larger safety systems. In warehouses, manufacturing plants, and distribution centers, one of the most common and critical applications for heavy-duty sleeve anchors is the installation of permanent safety guard rails. These systems protect personnel from forklift traffic, define safe pedestrian walkways, and safeguard valuable equipment from accidental impacts. The integrity of the entire guard rail system depends entirely on the strength of the anchors holding its base plates to the concrete floor.
Practical Application: Installing Heavy-Duty Safety Barriers
Consider a procurement manager tasked with improving warehouse safety under a tight deadline. They need to source not only the correct sleeve anchors but also the guard rail systems themselves. This is where a unified procurement platform becomes a strategic advantage.
- For standard-duty protection along pedestrian paths and around workstations, the Jesco 10ft Safety Yellow Barrier Rail provides a high-visibility, reliable barrier that can be quickly installed with appropriately sized sleeve anchors.
- In high-traffic forklift aisles or near loading docks where the risk of impact is severe, a more robust solution is non-negotiable. The Jesco Extra Heavy Duty 96" Welded Rail System is engineered for maximum durability, and installing it with 3/4" diameter, high-strength sleeve anchors is paramount to its effectiveness.
- For areas that require frequent but controlled access, such as around machinery needing regular maintenance, the Jesco 8 ft. Lift-Out Type Guard Rail offers modular flexibility without compromising safety, as its posts are securely anchored to the floor.
Streamlining Procurement for Large-Scale Projects
Outfitting an entire facility is a capital-intensive project. Sourcing all the necessary components—from anchors to guard rails—from a single platform that connects you to over 800+ verified U.S. manufacturers not only simplifies logistics but also enhances supply chain resilience. At Maden.co, we further reduce procurement friction with a key feature designed for business agility. You can apply for Instant Financing at checkout to streamline your capital-intensive projects, managing cash flow effectively while getting the equipment you need without delay.
Joining the American Manufacturing Revival
Our mission at Maden.co is to democratize access to American manufacturing, proving that U.S.-made components are as accessible and convenient as any global alternative. We believe that a strong domestic supply chain is the backbone of industrial excellence and innovation. By choosing to source from our network, you are not just buying a part; you are investing in quality, transparency, and the skilled American workforce. America's manufacturing revival is here, and every order placed contributes to it.
Are you a U.S. manufacturer committed to quality and excellence? We invite you to be part of the solution. Register as a vendor and join a marketplace dedicated to showcasing the very best of American industry.
Conclusion
The proper installation of a sleeve anchor is a blend of science, precision, and quality components. The three pillars of a secure fastening are always: meticulous selection of the right anchor for the base material and load, scrupulous preparation of the drill hole, and the disciplined application of the correct torque. Cutting corners on any of these steps compromises the safety and integrity of the entire structure.
For today’s industrial professionals, success is about building resilient, safe, and efficient operations. This starts at the component level. Stop procurement friction and eliminate supply chain uncertainty. Explore the vast catalog of over 2.5 million U.S.-made industrial components on Maden.co and use our Instant Financing at checkout to equip your facility for success, confident in the knowledge that you are building with the best America has to offer.
Frequently Asked Questions (FAQ)
1. Can I reuse a sleeve anchor? No, a sleeve anchor should never be reused. Once the sleeve has been expanded during the initial installation, it becomes permanently deformed. Attempting to reinstall it will result in significantly reduced holding power and is a major safety risk. Always use a new anchor for every installation.
2. What's the difference between a sleeve anchor and a wedge anchor? Both are expansion anchors for concrete, but they work differently. A sleeve anchor expands along the length of its sleeve, providing a grip that is suitable for concrete, brick, and block. A wedge anchor has a small expansion clip at the very bottom, which creates a concentrated expansion force. Wedge anchors are typically stronger but are only suitable for use in solid concrete.
3. How do I know what size drill bit to use? The rule is simple: the diameter of the drill bit must be the same as the diameter of the sleeve anchor. A 1/2" sleeve anchor requires a 1/2" carbide-tipped masonry drill bit. Using an oversized bit will result in a loose fit and anchor failure, while an undersized bit will prevent the anchor from being installed.
4. What happens if I over-tighten a sleeve anchor? Over-tightening is dangerous and can lead to several types of failure. It can place excessive stress on the base material, causing the concrete or brick to crack and spall. It can also strip the threads of the anchor itself or, in extreme cases, shear the anchor stud completely. Using a calibrated torque wrench is the only way to ensure the correct setting force is applied.