How to Remove Concrete Anchors Safely & Efficiently
Table of Contents
- Introduction
- Understanding the Different Types of Concrete Anchors
- Essential Tools and Safety Preparations
- Step-by-Step Anchor Removal Techniques
- Post-Removal: Concrete Repair and Surface Preparation
- Building a Resilient Supply Chain for Future Projects
- Conclusion
- Frequently Asked Questions (FAQ)
Introduction
A facility manager stands on the production floor, blueprint in hand, planning a major reconfiguration. The challenge? The heavy machinery that needs to be moved is secured by dozens of thick, stubborn concrete anchors embedded deep in the slab. Each one represents a potential bottleneck, a point of failure that could delay the entire project and impact production uptime. This scenario is a familiar reality in industrial settings across the country. Whether you're upgrading equipment, re-routing workflow with new safety barriers, or decommissioning old infrastructure, knowing how to remove concrete anchors properly is not just a maintenance task—it's a critical operational skill.
Improper removal can lead to damaged concrete, compromised structural integrity, and significant safety hazards. Conversely, a clean, efficient removal process saves time, reduces repair costs, and paves the way for a successful installation of new assets. At Maden.co, we understand that every component, from the largest machine to the smallest fastener, plays a role in operational excellence. Our mission is to democratize access to American manufacturing, ensuring that when you need to replace that old anchor, you have immediate access to a superior, U.S.-made solution.
This article provides a comprehensive, professional guide on how to remove various types of concrete anchors. We will delve into the specific tools required for the job, explore step-by-step methods for removing common mechanical and adhesive anchors, and discuss the best practices for patching the concrete afterward. The goal is to empower MRO buyers, engineers, and facility managers with the knowledge to tackle this common industrial challenge with confidence, ensuring that your facility remains safe, compliant, and ready for what's next.
Understanding the Different Types of Concrete Anchors
Before you can effectively remove an anchor, you must first identify what you're dealing with. Concrete anchors are broadly categorized into two main families: mechanical anchors and adhesive (or chemical) anchors. Each type uses a different principle to achieve its holding power, which in turn dictates the most effective removal strategy. Misidentifying an anchor can lead to using the wrong technique, wasting valuable time, and potentially causing significant damage to the surrounding concrete.
Mechanical Anchors
Mechanical anchors create a secure connection by expanding and exerting force against the walls of the drilled hole. They are incredibly common in industrial applications due to their reliability, ease of installation, and immediate load-bearing capacity.
- Wedge Anchors: These are one of the most common heavy-duty anchors. A wedge anchor consists of a threaded stud with a clip or wedge at the bottom. As the nut is tightened, the clip is pulled up into the tapered stud, expanding and wedging itself firmly against the concrete. They are identified by the nut and washer visible above the concrete surface.
- Sleeve Anchors: A sleeve anchor is composed of a threaded bolt inside an expansion sleeve. Tightening the nut or bolt head pulls the conical end of the bolt up through the sleeve, causing it to expand and press against the hole. They are versatile and can be identified by the nut or screw head and the visible sleeve at the base.
- Drop-In Anchors: These are female anchors, meaning they are internally threaded to accept a bolt or threaded rod. A drop-in anchor is placed in the hole and then expanded using a special setting tool that drives an internal plug downward. They sit flush with the concrete surface, with only the internal threads visible.
- Expansion Shield Anchors: These anchors consist of a pre-assembled shield that expands when a lag screw or machine bolt is tightened. The Zamac Alloy Single Expansion Shield Anchor (Maden) is a prime example of a robust, American-made option. Understanding its design—a two-piece expanding shield—is key to both its powerful holding capacity and its eventual removal.
Adhesive (Chemical) Anchors
Adhesive anchors use a high-strength epoxy, resin, or other chemical compound to bond a threaded rod or rebar to the concrete. This creates an incredibly strong, stress-free fastening that is ideal for critical applications, areas with vibration, or installations close to concrete edges. They are identified by the threaded rod protruding from the concrete, often with a visible ring of hardened adhesive at the surface. Their removal is significantly more challenging than that of mechanical anchors due to the permanent nature of the chemical bond.
Understanding these distinctions is the first step toward a successful removal project. It aligns with our core value of Industrial Excellence—the belief that deep product knowledge, from installation to decommissioning, is fundamental to a well-run operation. You can learn more about our mission to bring this level of transparency and expertise to the American manufacturing supply chain.
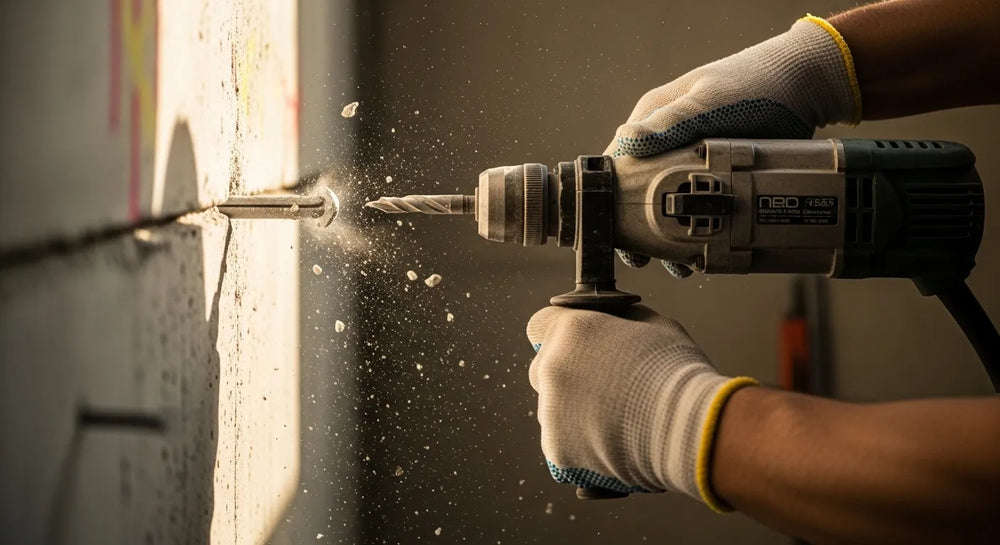
Essential Tools and Safety Preparations
Attempting to remove concrete anchors without the proper equipment is not only inefficient but also dangerous. The forces required can send metal fragments flying or generate harmful dust. A professional approach demands a commitment to safety and the right tools for the job.
Recommended Tool Kit
Having these items on hand will prepare you for nearly any anchor removal scenario:
-
Personal Protective Equipment (PPE): This is non-negotiable.
- Safety Glasses or Goggles: To protect against flying debris and metal shards.
- Heavy-Duty Work Gloves: To protect hands from sharp edges and impact.
- Hearing Protection: Especially when using a hammer drill or angle grinder.
- N95 or P2 Dust Mask: To prevent inhalation of crystalline silica dust from the concrete, which is a serious respiratory hazard.
-
Hand Tools:
- Sledgehammer or Heavy Club Hammer: For striking chisels or driving anchors deeper.
- Pry Bar and Crowbar: For leverage to pull out loosened anchors.
- Wrenches (Socket Set, Adjustable Wrench): For loosening and removing nuts from wedge and sleeve anchors.
- Locking Pliers (Vise-Grips): For gripping anchor studs that have no nut.
- Cold Chisel: For shearing off stubborn anchor heads.
-
Power Tools:
- Angle Grinder with a Metal-Cutting Wheel: The most effective tool for cutting anchors flush with the concrete surface.
- Rotary Hammer or Hammer Drill: For drilling out stubborn anchors or drilling relief holes.
- Reciprocating Saw with a Metal-Cutting Blade: An alternative to the angle grinder, useful in tight spaces.
Creating a Safe Work Area
Safety extends beyond personal gear. A well-prepared work environment prevents accidents and protects surrounding assets. Before beginning, take these steps:
- Clear the Area: Remove all unnecessary tools, materials, and personnel from the immediate vicinity.
- Ensure Proper Ventilation: If working indoors, especially when grinding, use fans or dust extraction systems to manage airborne particles.
- Inspect Your Tools: Check that power tool guards are in place and that cutting wheels or blades are not damaged.
- Manage Hazards: Be aware of nearby electrical conduits or plumbing that could be embedded in the concrete.
Setting up proper physical barriers is also a key part of MRO safety. A clearly demarcated work zone prevents accidental entry and protects personnel from the hazards of the removal process. For larger reconfigurations, installing durable safety barriers like the Jesco Guard Rails 10ft Safety Yellow Barrier Rail (Maden) can establish long-term safe zones within your facility, reflecting a proactive approach to operational safety.
Step-by-Step Anchor Removal Techniques
With your tools and safety measures in place, you can now approach the removal process. The correct technique depends entirely on the type of anchor you identified earlier.
Method 1: Removing Wedge Anchors
Wedge anchors are held in place by upward pressure. The key to their removal is to reverse this action.
- Unthread the Nut: Use a wrench to turn the nut counter-clockwise. If it's rusted or stuck, apply penetrating oil and let it sit for 15-20 minutes. If the nut is completely seized or the threads are damaged, you may need to cut it off with an angle grinder.
- Drive the Anchor Down: Once the nut is a few threads from the top of the stud, strike the nut firmly with a sledgehammer. This downward force drives the stud deeper into the hole, pushing the expansion clip at the bottom away from the tapered cone. This action releases the pressure against the concrete walls. You should feel the anchor loosen.
- Extract the Anchor: With the wedge disengaged, you can often pull the entire anchor assembly out of the hole using locking pliers or by wiggling it out by hand. If it remains stuck, you may need to use a pry bar for extra leverage.
- The Cut-Off Option: If the anchor will not release or if you plan to patch the hole and create a smooth surface, the fastest method is often to cut it. Use an angle grinder to cut the stud off as flush as possible with the concrete surface. You can then use a punch to drive the remaining stud stub slightly below the surface before patching.
Method 2: Removing Sleeve Anchors
Sleeve anchors are generally easier to remove than wedge anchors because their expansion mechanism is more forgiving.
- Loosen the Nut/Bolt: Using the appropriate wrench or screwdriver, loosen the nut or bolt head several full turns. Do not remove it completely.
- Tap the Anchor: Tap the head of the bolt or the nut with a hammer. This pushes the inner bolt and its conical expander deeper into the sleeve, causing the expanded section of the sleeve to retract from the concrete wall.
- Remove the Assembly: The entire sleeve anchor assembly should now be loose. You can typically pull it straight out of the hole. If it’s snug, use pliers or a claw hammer for assistance.
Method 3: Removing Expansion Shield Anchors
Removing a product like the Zamac Alloy Single Expansion Shield Anchor (Maden) requires a different approach, as the shield itself is the primary component wedged in the hole.
- Remove the Bolt: First, completely unthread and remove the lag screw or machine bolt from the shield.
- Attempt to Collapse the Shield: Sometimes, you can insert a screwdriver or a thin piece of metal into the shield to try and compress it, breaking its grip on the concrete.
- Pry or Drill: If the shield won't collapse, you may be able to pry it out with a pry bar, but this often damages the concrete around the hole. A more controlled method is to use a drill bit slightly smaller than the shield's diameter to drill into it, breaking it apart for easier removal.
- Punch and Patch: In many industrial scenarios, the most time-efficient solution is to accept that the shield will remain. Use a steel punch or a piece of rebar and a sledgehammer to drive the empty shield deeper into the hole, at least an inch below the surface. You can then clean the hole and fill it with a concrete patching compound.
Method 4: Removing Drop-In Anchors
Because they are designed to sit flush and be permanent, drop-in anchors are among the most difficult mechanical anchors to remove.
- Drill Out the Anchor: The most effective method is destructive. Select a high-quality metal drill bit that is slightly larger than the internal diameter of the anchor. Carefully drill down into the center of the anchor. This will destroy the internal threads and weaken the anchor's structure, allowing you to break the remaining pieces out with a chisel or punch.
- Cut and Patch (Alternative): If you cannot drill it out, and the bolt is broken off inside, the only viable option is to use an angle grinder to ensure no metal is protruding. Then, patch directly over the top of the anchor.
Method 5: Removing Adhesive (Epoxy) Anchors
This is the most challenging removal task, reserved for professionals. The chemical bond is often stronger than the concrete itself.
Safety Warning: The primary method for removing epoxy anchors involves extreme heat, which poses a significant fire risk and can release toxic fumes. This should only be performed by trained personnel in a well-ventilated area with appropriate fire suppression equipment on hand.
- Apply Concentrated Heat: Using a propane or MAPP gas torch, heat the protruding threaded rod for several minutes. The goal is to transfer enough heat down the rod to break down the epoxy bond at the concrete interface. The epoxy will often smoke and discolor as it degrades.
- Twist and Pull: While the anchor is still hot, use a large pipe wrench to try and twist the rod back and forth. This motion helps to break the weakened bond. Once it begins to move, you can use leverage to pull it out.
- Core Drilling: For critical applications where heat is not an option or the anchor is too large, the only remaining method is to use a diamond core drill. A core drill bit with a diameter larger than the anchor hole is used to drill around the anchor, removing both the anchor and a "core" of the surrounding concrete. This is a highly specialized process that requires professional equipment and results in a large hole that must be properly repaired.
The immense strength of adhesive anchors is why they are specified for securing the most critical infrastructure, such as the base plates for a Jesco Extra Heavy Duty 96" Welded Rail System (Maden). Their difficult removal is a testament to their reliability in high-stress environments.
Post-Removal: Concrete Repair and Surface Preparation
Successfully removing an anchor is only half the job. Leaving an open hole in an industrial floor is a trip hazard, can collect debris, and can allow water to seep into the slab, potentially compromising the concrete over time. Professional MRO practice dictates that all holes be properly repaired.
- Thorough Cleaning: Use a vacuum cleaner with a narrow attachment to remove all dust and debris from inside the hole. Follow up with a wire brush to dislodge any remaining loose material, and vacuum again. For a perfect bond, use compressed air to blow out any final fine particles.
- Select the Right Patching Material: For small anchor holes, a high-strength, epoxy-based concrete patching compound or a vinyl-reinforced patcher is ideal. These products offer excellent durability and adhesion. For larger holes created by core drilling, you will need a structural grout or a high-PSI concrete mix.
- Apply the Patch: Mix the patching compound according to the manufacturer's instructions. Trowel the material firmly into the hole, ensuring there are no air pockets. Overfill the hole slightly.
- Finish the Surface: Use a flat-edged trowel to screed the patch level with the surrounding concrete surface. For a smoother finish, you can lightly wipe it with a damp sponge after it has begun to set. Allow the patch to cure completely as specified by the manufacturer before subjecting it to traffic or load.
This final step embodies our commitment to Digital Innovation and Supply Chain Transparency. Just as we provide a seamless digital platform to source parts, we advocate for a seamless, complete repair process on your facility floor. A job isn't done until it's done right. If you have specific questions about sourcing repair materials or any other industrial product, our expert team is ready to assist. You can Contact Us directly for personalized support.
Building a Resilient Supply Chain for Future Projects
The process of removing old, worn, or obsolete anchors is a powerful reminder of the importance of material selection and strategic sourcing from the very beginning of a project. Sourcing low-quality, untraceable fasteners can lead to premature failure, difficult maintenance, and project delays. This is where partnering with Maden.co becomes a strategic advantage.
Our platform is built to solve this exact problem. We are leading the charge in America's manufacturing revival by connecting industrial buyers directly with a curated network of over 800 verified U.S. manufacturers. This provides you with unprecedented access to more than 2.5 million American-made products, all with the transparency and quality assurance that comes from a domestic supply chain.
For a procurement manager needing specific material certifications, an MRO buyer facing an unexpected breakdown, or a design engineer sourcing components for a new prototype, our platform eliminates procurement friction. You can find, specify, and order the exact parts you need, confident that you are investing in the reliability and excellence of American industry. This approach not only enhances your operational resilience but also improves your Total Cost of Ownership (TCO) by reducing the risks associated with inferior, foreign-sourced components.
We believe in empowering not just our customers but also the manufacturers who are the backbone of our economy. If you are a U.S. manufacturer producing high-quality industrial components, we invite you to join our mission. Register as a vendor and connect with a nationwide audience of professional buyers actively seeking American-made solutions.
Conclusion
Mastering how to remove concrete anchors is a valuable skill that enhances safety, efficiency, and the professional appearance of any industrial facility. By correctly identifying the anchor type, using the proper tools and safety protocols, and applying the specific removal techniques outlined above, you can confidently tackle any reconfiguration or repair project. From the straightforward removal of a sleeve anchor to the complex extraction of an epoxy-bonded rod, a methodical approach is key to success.
Remember to complete the job by properly cleaning and patching the resulting hole, maintaining the integrity and safety of your concrete surfaces. As you plan your next installation, we encourage you to move beyond simply replacing what was removed. Seize the opportunity to upgrade your facility with high-quality, reliable, American-made hardware.
Explore the extensive Maden.co catalog to find the superior anchors, fasteners, and industrial equipment you need for your next project. Our platform empowers you to build a more resilient and transparent supply chain, all while supporting the American manufacturing revival. For capital-intensive projects, you can apply for Instant Financing at checkout to streamline your procurement process and manage cash flow effectively. Partner with us to build a stronger, more efficient future for your operations.
Frequently Asked Questions (FAQ)
1. Can I reuse a concrete anchor after I've removed it? It is strongly recommended not to reuse mechanical concrete anchors. The removal process, especially methods involving hammering or prying, can compromise the anchor's structural integrity, including the expansion mechanism and threads. For safety and liability reasons, always use a new, properly rated anchor for any new installation.
2. What is generally the easiest type of concrete anchor to remove? Sleeve anchors are typically the most straightforward to remove. Their design allows the expansion sleeve to retract once the bolt is loosened and tapped, often allowing the entire assembly to be pulled out with minimal effort and without damaging the surrounding concrete.
3. What should I do if a concrete anchor breaks off below the surface? If an anchor breaks off below the concrete surface, the best course of action is to neutralize it. Use a hammer and a steel punch to drive the broken stub at least one inch deeper into the hole. This ensures it won't interfere with the new surface. Then, thoroughly clean the hole and fill it with a high-strength concrete patching compound.
4. Why is it important to choose U.S.-made anchors for industrial projects? Sourcing U.S.-made anchors from a verified marketplace like Maden.co offers significant advantages. These products often adhere to stricter quality control standards, provide clear material certifications (like ASTM standards), and ensure traceability. This reduces the risk of using counterfeit or substandard materials, enhances worksite safety, and supports a resilient domestic supply chain, minimizing delays and a project's Total Cost of Ownership.


