Achieving Precision: How to Screw Straight into Wood
Table of Contents
- Introduction
- The Indispensable Value of Straight Screws in Industrial Applications
- Understanding Wood Dynamics: A Prerequisite for Precision
- Essential Tools and Their Role in Achieving Straightness
- Prepping for Success: Beyond Just Drilling
- The Art of Driving a Screw Straight: Technique and Control
- Choosing the Right Screw for the Job: A Strategic Decision
- Common Pitfalls and How to Avoid Them
- The Strategic Advantage of Sourcing U.S.-Made Fasteners with Maden.co
- Conclusion
- Frequently Asked Questions (FAQ)
Few things are as frustrating in manufacturing, MRO, or design as a screw that veers off course, splitting a valuable piece of wood, marring a carefully crafted surface, or compromising the structural integrity of a component. A crooked screw isn't merely an aesthetic flaw; it's a sign of wasted material, lost time, and a potential point of failure in critical applications. For procurement managers, MRO buyers, and design engineers, the seemingly simple act of driving a screw straight into wood underpins the quality, safety, and longevity of countless projects. Precision in this fundamental task ensures reliable assemblies, maintains material strength, and ultimately contributes to the overall success and reputation of a product or structure.
At Maden.co, we understand that excellence in industrial applications begins with meticulous attention to detail and access to the highest quality components. Our mission is to democratize access to American manufacturing, providing a seamless connection between industrial buyers and over 2.5 million American-made products from our network of 800+ verified U.S. manufacturers. This post will delve into the comprehensive techniques, essential tools, and critical considerations required to consistently drive screws straight into wood, ensuring not just a perfect finish, but a robust and enduring connection every time. We'll explore everything from understanding wood dynamics and preparing your materials to selecting the ideal U.S.-made fasteners, all aimed at empowering you to achieve industrial excellence.
Introduction
In the intricate world of industrial design, maintenance, and operations, the integrity of a fastened joint is paramount. Whether securing a critical panel in an industrial enclosure, assembling robust furniture for commercial use, or fastening components in a heavy-duty packaging line, the ability to drive a screw straight and securely into wood is a foundational skill. Yet, achieving this seemingly straightforward task consistently and precisely requires more than just a power drill and a box of screws. It demands an understanding of material science, proper tool selection, and methodical technique.
Imagine a design engineer finalizing a prototype where aesthetic precision is as crucial as structural stability, only to have a misaligned screw compromise the wood grain and create an unsightly bulge. Or consider an MRO buyer replacing a crucial wooden component in a machinery setup; a poorly driven screw could lead to premature wear or even catastrophic failure. The ripple effects of such errors extend beyond immediate frustration, impacting project timelines, increasing material waste, and potentially escalating total cost of ownership (TCO). This guide is crafted to elevate your proficiency, transforming a common challenge into a reliably executed process. We aim to equip you with the knowledge to consistently achieve straight, strong, and reliable screw connections in wood, underscoring our commitment to industrial excellence and customer empowerment. By mastering these techniques and leveraging the quality of American-made components available on Maden.co, you can ensure that every fastener contributes positively to your project's success.
The Indispensable Value of Straight Screws in Industrial Applications
The seemingly trivial act of driving a screw straight into wood holds significant implications across various industrial sectors. Beyond mere aesthetics, a precisely driven screw directly contributes to the structural integrity, longevity, and overall reliability of assemblies. Understanding these critical benefits underscores why this fundamental skill is so vital for procurement managers, MRO buyers, and design engineers.
Enhanced Structural Integrity and Load Bearing
When a screw is driven straight, its threads engage uniformly with the wood fibers along its entire length. This optimal engagement maximizes the screw's pull-out resistance and shear strength, distributing the load evenly and effectively securing the joint. A crooked screw, however, creates uneven pressure points, can misalign wood fibers, and results in compromised thread engagement. This significantly reduces its ability to withstand forces, making the joint weaker and more prone to failure under stress or vibration. In applications where structural integrity is non-negotiable, such as in heavy machinery platforms, commercial building frameworks, or industrial jig assemblies, the strength derived from straight screw installation is paramount.
Prevention of Material Damage and Splitting
Wood is a natural material with distinct grain patterns and varying densities. Driving a screw without proper preparation or technique, especially near edges or into end grain, can cause the wood to split or crack. This damage not only weakens the material but also necessitates costly repairs or complete component replacement, directly impacting project budgets and timelines. A straight screw, guided by a correctly sized pilot hole, minimizes the risk of splitting by gently displacing wood fibers rather than forcing them apart abruptly. This protection of the material preserves the integrity of the workpiece and ensures the longevity of the assembly.
Improved Aesthetic Quality and Professional Finish
While functionality often takes precedence in industrial settings, the aesthetic quality of a finished product or installation still holds value. Crooked or proud screw heads detract from a professional appearance, suggesting a lack of precision and attention to detail. In applications like architectural millwork, bespoke industrial furniture, or display fixtures, a clean, flush, and uniform screw installation reflects a commitment to quality craftsmanship. For design engineers, ensuring screws sit perfectly straight and flush means their designs translate accurately from concept to reality, maintaining the intended visual appeal and design integrity.
Reduced Procurement Friction and Total Cost of Ownership (TCO)
The immediate costs associated with a crooked screw – a ruined piece of wood, a stripped screw, or a compromised joint – are easily quantifiable. However, the long-term impact on TCO is often overlooked. Rework, project delays, increased material consumption, and potential warranty claims all accumulate, driving up overall expenses. By mastering the art of driving straight screws and sourcing high-quality, consistent fasteners from verified U.S. manufacturers, businesses can significantly reduce these hidden costs. Procurement managers who prioritize quality American-made fasteners contribute to operational efficiency, minimizing waste and ensuring projects are completed on schedule and within budget.
For a procurement manager under pressure to source a specific DIN 931 compliant hex cap screw, a design engineer needing specific material certifications for a new prototype, or an MRO buyer facing an unexpected equipment breakdown, the ability to quickly find and finance a verified, U.S.-made part is a game-changer. These are the kinds of tangible benefits that extend beyond the immediate task, influencing the broader operational success of a business. At Maden.co, we champion these efficiencies, providing a marketplace where quality and precision are never compromised.
Understanding Wood Dynamics: A Prerequisite for Precision
Before driving any fastener, a fundamental understanding of wood's inherent characteristics is essential. Wood is anisotropic, meaning its properties vary depending on the direction of measurement, particularly along and across the grain. This distinct quality heavily influences how it reacts to stress, moisture, and the insertion of a screw.
Grain Direction and Its Implications
The grain of wood refers to the longitudinal arrangement of its fibers. This directionality is critical:
- With-the-Grain (Side Grain): Driving a screw perpendicular to the grain (into the face or edge of a board) is generally the strongest and safest method. The screw threads engage with numerous intact wood fibers, providing excellent holding power and minimizing the risk of splitting.
- Across-the-Grain (End Grain): Driving a screw into the end of a board (parallel to the grain) is inherently weaker. The screw threads run between the ends of the wood fibers, offering less resistance and significantly reduced pull-out strength. Furthermore, end grain is much more susceptible to splitting due to the wedge effect of the screw. When screws must be driven into end grain, extra precautions like larger pilot holes, specialized fasteners, or reinforcing techniques are often necessary.
Wood Species and Density
Different wood species possess varying densities and hardness levels, directly impacting how they respond to screw insertion:
- Softwoods (e.g., Pine, Fir, Cedar): These woods are generally easier to penetrate but are also more prone to splitting and have lower screw-holding power. They require careful pilot hole sizing to prevent splitting, especially with larger screws.
- Hardwoods (e.g., Oak, Maple, Cherry): Denser and harder, hardwoods offer superior screw-holding power but are much more challenging to drive into. They almost always necessitate pilot holes to prevent splitting and to reduce the likelihood of stripping screw heads or breaking screws during insertion.
- Engineered Wood Products (e.g., Plywood, MDF, Particleboard): These materials have specific characteristics. Plywood, with its layered construction, can offer good screw retention but can delaminate if screws are driven too close to edges without proper pilot holes. MDF and particleboard are susceptible to crumbling around the screw if not pre-drilled correctly, leading to reduced holding power.
Moisture Content
The moisture content of wood also plays a crucial role. As wood dries, it shrinks; as it absorbs moisture, it swells. Driving a screw into green (high moisture content) wood can lead to loosening as the wood dries and shrinks around the screw. Conversely, driving into very dry wood can increase the risk of splitting due to its reduced flexibility. Using wood that has been properly seasoned and acclimated to its environment is always recommended for stable, long-lasting connections.
Understanding these wood dynamics allows for informed decisions regarding pilot hole sizing, screw selection, and driving technique, ensuring that each screw is driven straight and securely for optimal performance.
Essential Tools and Their Role in Achieving Straightness
The right tools, properly used, are non-negotiable for consistently driving screws straight into wood. This isn't just about having a power drill; it's about selecting the correct accessories and understanding their nuanced applications.
Power Drills and Impact Drivers
- Cordless Drills: Offer portability and variable speed control, crucial for starting screws slowly and finishing precisely. Look for models with a clutch mechanism, allowing you to set the torque and prevent overtightening, stripping, or cam-out.
- Corded Drills: Provide consistent power for continuous, heavy-duty work without battery concerns.
- Impact Drivers: Deliver rotational force along with rapid, short-burst impacts. This combination is highly effective for driving long or large-diameter screws, particularly into hardwoods, as the impacts reduce resistance and minimize the chance of cam-out. However, their high torque can also lead to over-driving or stripping if not used carefully.
Drill Bits for Pilot Holes and Countersinking
- Pilot Hole Bits: These are essential for creating a path for the screw. The diameter of the pilot hole is critical and must be carefully selected based on the screw's core (shank) diameter and the wood type. Twist bits are common, but brad-point bits offer cleaner holes and prevent "walking" on the wood surface.
- Countersink Bits: Used to create a conical recess for the screw head, allowing it to sit flush with or slightly below the wood surface. Some countersink bits include an integrated pilot drill, which speeds up the process and ensures the pilot hole and countersink are perfectly concentric.
Drive Bits (Driver Bits)
Matching the drive bit to the screw head type (Phillips, flat, Torx, square, PoziDriv) is paramount. A perfectly fitting bit prevents cam-out (when the bit slips out of the screw head), which can damage the screw head, the bit, and the surrounding wood. Torx and square drive bits generally offer superior grip and reduced cam-out compared to Phillips or flat-head designs.
Clamping and Support Tools
- Clamps: Essential for holding workpieces securely together, preventing movement during drilling and driving. This is critical for achieving perfectly aligned joints and straight screw insertion.
- Squares and Marking Gauges: Used for accurate layout and marking of screw locations, ensuring consistent spacing and alignment.
- Drill Guides and Jigs: For absolute precision, especially in production environments, drill guides or jigs can be invaluable. These tools physically guide the drill bit and subsequently the screw, ensuring perpendicularity and straightness.
By investing in quality tools and understanding their precise application, professionals can significantly enhance their ability to drive screws straight, contributing to the overall quality and efficiency of their projects.
Prepping for Success: Beyond Just Drilling
Precision in screw driving begins long before the drill bit touches the wood. Meticulous preparation ensures that every screw has the best possible start, reducing the risk of error and enhancing the final quality of the joint.
Marking and Measuring: The Foundation of Accuracy
Accurate layout is the first step towards a straight screw. Incorrect marking can lead to misaligned fasteners, uneven stress distribution, and compromised aesthetics.
- Precise Placement: Use a pencil, ruler, and a combination square to mark the exact entry point for each screw. Ensure marks are clear but light enough not to permanently stain the wood.
- Awl or Punch: After marking, use an awl or a center punch to create a small indentation at the screw location. This dimple provides a starting point for the drill bit, preventing it from "walking" across the surface and ensuring the pilot hole begins precisely where intended.
- Edge Distance: Always ensure screws are placed an appropriate distance from the edges of the wood. As a general rule, maintain a distance of at least one-half the wood's thickness from the edge to prevent splitting. For hardwoods or when driving into end grain, this distance may need to be increased.
Pilot Holes: The Non-Negotiable Step for Optimal Results
A pilot hole is a pre-drilled hole that guides the screw and reduces the resistance the screw encounters as it enters the wood. Skipping this step is a common mistake that leads to split wood, crooked screws, and stripped fasteners.
-
Why Pilot Holes are Crucial:
- Prevents Splitting: By removing a small amount of material, the pilot hole relieves the stress that would otherwise cause the wood to split, especially in hardwoods, dense softwoods, or near edges and end grain.
- Guides the Screw: A pilot hole acts as a precise guide, ensuring the screw follows a straight path. Without it, the screw's tip can easily wander off course.
- Reduces Friction: A pilot hole significantly reduces the friction on the screw shank, making it easier to drive the screw without excessive force. This minimizes the risk of stripping the screw head (cam-out) or breaking the screw itself.
- Optimizes Holding Power: By ensuring a clean path, the screw threads can properly engage with the wood fibers without crushing them, leading to stronger, more reliable connections.
-
Sizing Pilot Holes Correctly: The diameter of the pilot hole is paramount and depends on two main factors:
- Screw's Core (Shank) Diameter: For the unthreaded portion of the screw (the shank), the pilot hole should be slightly larger than this diameter. This allows the shank to pass through freely, ensuring that the threads do all the work of gripping the wood in the receiving piece, preventing the pieces from being pulled apart by friction on the shank.
- Screw's Root (Thread) Diameter: For the threaded portion, the pilot hole should be slightly smaller than the root diameter (the diameter of the screw if you exclude the threads). This allows the threads to bite firmly into the wood without forcing them to displace too much material, which causes splitting.
- Wood Type: Softer woods generally require a pilot hole closer to the screw's root diameter to maximize holding power, while harder woods demand a pilot hole closer to the screw's minor diameter to prevent splitting and reduce driving resistance. A common rule of thumb is to use a drill bit roughly the same size as the screw's core (unthreaded shank) for softwoods and slightly larger for hardwoods. However, always test on a scrap piece of the same wood to verify the ideal size.
- Pilot Hole Depth: The pilot hole should be drilled to a depth slightly exceeding the threaded length of the screw. This ensures the full threaded portion of the screw can engage with the wood. Use a depth stop on your drill bit or mark the bit with tape to achieve consistent depth.
Countersinking and Counterboring: For a Flawless Finish
Once pilot holes are drilled, consider whether the screw heads need to sit flush or below the surface.
- Countersinking: This creates a conical recess for flat-head or oval-head screws, allowing the head to sit flush with the wood surface. This is critical for smooth, snag-free surfaces and an aesthetically pleasing finish.
- Counterboring: This creates a flat-bottomed cylindrical recess that allows the entire screw head (and sometimes a washer) to sit below the surface, leaving a deeper cavity that can be plugged with a wood dowel or filler for a completely concealed fastener. This is common in high-end woodworking or where screws need extra protection.
By diligently executing these preparation steps, you lay the groundwork for successful, straight, and strong screw connections, optimizing both the functional and aesthetic outcomes of your projects.
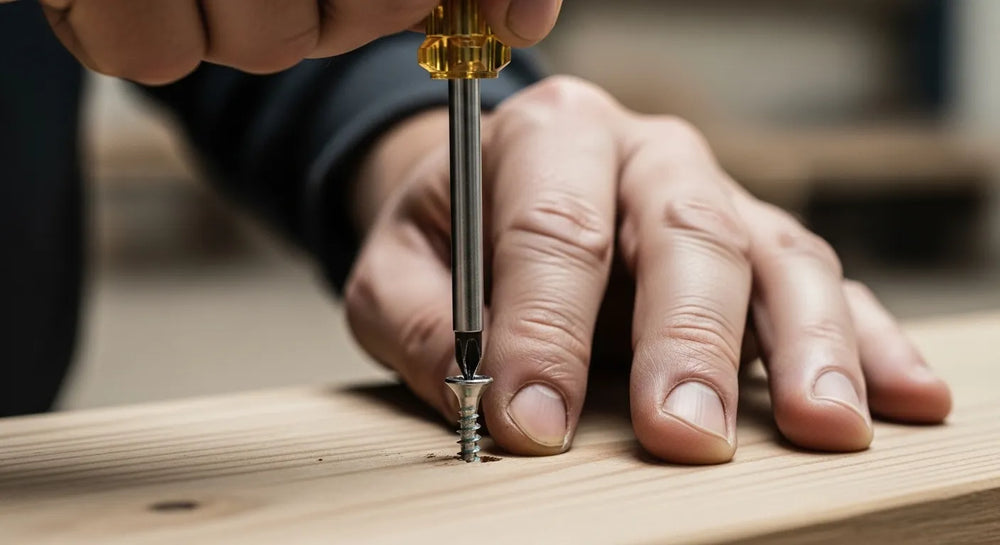
The Art of Driving a Screw Straight: Technique and Control
Even with perfect preparation, the act of driving the screw requires skill and precision. The proper technique ensures the screw follows the pilot hole, engages correctly, and reaches its intended depth without incident.
Starting the Screw: The Crucial First Turn
The initial engagement of the screw is arguably the most critical step for straightness.
- Align and Stabilize: Position the screw tip precisely into the pilot hole and align the driver bit with the screw head. Hold the screw firmly with one hand while applying slight forward pressure to the drill/driver with the other, ensuring the tool is perfectly perpendicular to the wood surface.
- Slow and Steady Start: Begin driving the screw at a very low speed. The goal is to get the first few threads to bite into the wood and pull the screw into the pilot hole straight. If you start too fast, the screw can easily wobble or strip before it even begins to seat.
- Visual Confirmation: As the screw begins to turn, visually confirm that it is entering the wood squarely. Make minor adjustments to the angle of your drill if necessary. Once the screw is stable and biting, you can remove your guiding hand.
Maintaining Alignment Throughout the Drive
Keeping the screw straight once it has started is a continuous effort.
- Consistent Pressure: Apply steady, firm, and consistent downward pressure directly in line with the screw. This prevents the bit from camming out of the screw head and helps maintain the screw's alignment. Avoid lateral pressure, which can bend or steer the screw off course.
- Perpendicularity is Key: Continuously monitor the angle of your drill or driver. It should remain perpendicular to the wood surface (or at the desired angle for angled screws) throughout the entire driving process. Use visual cues, such as comparing the drill's body to the edges of the workpiece, to maintain alignment.
- Body Mechanics: Stand in a balanced stance, with your body aligned with the screw's path. Use your body weight to apply downward pressure rather than relying solely on arm strength. This provides more stability and control.
Controlling Speed and Torque: Precision over Power
The variable speed trigger and clutch settings on your drill are your best friends for preventing damage.
- Variable Speed: Start slow, increase speed once the screw is firmly engaged and driving straight, and then slow down again as the screw head approaches the surface. This allows for fine control and prevents over-driving.
-
Torque Control (Clutch Setting): Most drills have a numbered clutch setting. This mechanism allows the drill to slip when a preset torque level is reached, preventing the screw from being driven too deep, stripping its head, or stripping the wood's threads.
- Start with a lower clutch setting, especially in softer woods or with smaller screws.
- Increase the setting gradually if the screw isn't driving fully, or if you're working with hardwoods.
- The goal is to set the clutch so that the screw head finishes flush (or counter-sunk) without causing damage.
Advanced Techniques for Enhanced Straightness
For high-precision applications or challenging scenarios, consider these aids:
- Screw Guides/Jigs: Commercial screw guides or simple DIY wooden jigs can physically hold the drill bit (and sometimes the screw) perfectly perpendicular to the surface, eliminating wobble and ensuring a straight start.
- Sacrificial Blocks: When fastening two pieces of wood, using a clamp to hold them together tightly, and then placing a "sacrificial" block of wood on the exit side of the screw path can prevent tear-out if the screw slightly protrudes.
- Wax or Lubricant: For particularly dense hardwoods or very long screws, applying a small amount of wax or soap to the screw threads can reduce friction and make driving significantly easier, reducing the risk of snapping the screw or stripping its head.
Mastering these techniques transforms the simple act of driving a screw into a controlled, precise operation, ensuring strong, reliable, and aesthetically pleasing connections every time.
Choosing the Right Screw for the Job: A Strategic Decision
Selecting the appropriate screw for a specific wood application is a critical decision that impacts joint strength, durability, and aesthetics. With a vast array of options available, understanding the nuances of screw types, materials, and dimensions is essential for procurement managers, MRO buyers, and design engineers.
Screw Types and Their Applications
- Wood Screws: Traditionally designed with a tapered shank and coarser threads, these are optimized for gripping wood fibers. Modern versions often feature self-tapping tips that don't require a pilot hole in softer woods, though a pilot is always recommended for precision and preventing splits.
- Deck Screws: Treated for outdoor use, these screws often have corrosion-resistant coatings, sharper points, and coarse threads for quick driving into softer decking materials.
- Cabinet Screws: Typically have a smaller head and finer threads for less visible applications, designed to pull joints tightly without splitting.
- Lag Screws (Lag Bolts): Heavy-duty fasteners with coarse threads and a hex head, used for connecting large wood members or attaching heavy objects to wood. They require substantial pilot holes.
Head Types for Functionality and Finish
The screw head type dictates how the screw sits on or in the surface and which driver bit is used:
- Flat Head: Designed to be countersunk, sitting flush with the surface for a smooth finish.
- Pan Head: Has a slightly domed, flat-bottomed profile, sitting on top of the surface. Provides a larger bearing surface.
- Round Head: Features a fully rounded, decorative dome. Sits proud of the surface and is often used for aesthetic purposes or when a flush finish isn't required. For projects demanding both aesthetic appeal and corrosion resistance, such as fine cabinetry or marine applications, a Round Slot Drive Brass Wood Screw can be an excellent choice.
- Oval Head: A decorative head that is partially rounded and partially tapered, allowing it to sit slightly proud while offering a more refined look than a round head. For extreme outdoor or marine environments where superior corrosion resistance and strength are critical, an Oval Slot Drive Silicon Bronze Wood Screw offers robust performance and durability.
- Hex Head: Common on lag screws, provides maximum torque for heavy-duty applications.
Drive Types for Secure Engagement
The drive type refers to the recess in the screw head that accepts the driver bit. Choosing the correct one is crucial for preventing cam-out and stripping:
- Flat (Slotted) Drive: Traditional but prone to cam-out and requires careful driving. When a flush finish is paramount in woodworking, consider options like a Flat Slot Drive Brass Wood Screw, ensuring seamless integration into your design.
- Phillips Drive: Common, but still susceptible to cam-out, especially with higher torque.
- Square (Robertson) Drive: Excellent resistance to cam-out, very popular in woodworking.
- Torx (Star) Drive: Offers the best cam-out resistance and superior torque transfer, ideal for demanding applications.
Material Considerations: Durability, Environment, and Compliance
The screw material must be selected based on the application's environmental conditions, required strength, and desired longevity. Sourcing U.S.-made fasteners ensures adherence to stringent material quality standards and robust performance.
- Steel: The most common and economical material. Available in various finishes (zinc plated, galvanized, phosphated) for different levels of corrosion resistance. However, untreated steel will rust in damp environments.
- Stainless Steel (e.g., 304, 316): Offers superior corrosion resistance, making it ideal for outdoor, marine, or damp environments. 316 stainless steel provides even better resistance to salt water. It is generally softer than hardened steel, requiring careful driving.
- Brass and Bronze: Often chosen for decorative applications or when non-magnetic properties are required. They offer good corrosion resistance, particularly silicon bronze, which is excellent for marine use, but are softer than steel.
- Coatings and Finishes: Specialized coatings (e.g., ceramic, polymer, epoxy) can provide enhanced corrosion resistance, lubrication for easier driving, or color matching.
Length and Gauge: Matching Screw to Material Thickness
- Length: A general rule of thumb for wood screws is that the screw should penetrate at least two-thirds of the thickness of the receiving (bottom) piece of wood. For example, if you're attaching a 3/4-inch board to a 1.5-inch board, the screw should penetrate at least 1 inch into the 1.5-inch board, meaning a screw length of 1.75 inches or more would be appropriate.
- Gauge (Diameter): Screw gauge numbers (e.g., #6, #8, #10) indicate the screw's diameter. Larger numbers mean thicker screws, which provide greater holding power but also require larger pilot holes and increase the risk of splitting, especially in thinner or softer wood. Match the gauge to the load requirements and the wood's dimensions.
By carefully considering these factors and leveraging the vast selection of high-quality, U.S.-made fasteners available on Maden.co, you can ensure that every screw driven is not just straight, but also perfectly suited to its task, contributing to the overall durability and success of your project.
Common Pitfalls and How to Avoid Them
Even with the best intentions and tools, screw driving can present common challenges. Recognizing these pitfalls and knowing how to prevent them is crucial for maintaining project quality and efficiency.
Stripped Heads and Cam-Out
- The Problem: A stripped screw head occurs when the driver bit rounds out the recess, making it impossible to turn the screw further or remove it. Cam-out is when the driver bit slips out of the screw head under torque, often damaging the screw head and potentially the surrounding material.
-
Prevention:
- Correct Driver Bit: Always use a driver bit that perfectly matches the screw head type and size.
- Firm, Consistent Pressure: Apply strong, steady downward pressure, keeping the bit fully engaged in the screw head.
- Appropriate Speed and Torque: Use a slower speed for starting and finishing, and utilize the drill's clutch setting to prevent over-driving. For impact drivers, use a lower power setting when approaching the final depth.
- Pilot Holes: Reduce driving resistance, thereby reducing the force needed and the likelihood of cam-out.
- Higher Quality Screws and Bits: Invest in hardened driver bits and screws with well-formed recesses (Torx or square drives are generally superior).
Split Wood
- The Problem: The most common frustration, especially when working near edges, in end grain, or with dense hardwoods. The screw acts as a wedge, forcing wood fibers apart beyond their elastic limit.
-
Prevention:
- Pilot Holes: This is the primary defense. Ensure the pilot hole is correctly sized for the screw and wood type.
- Edge Distance: Maintain adequate distance from the edges (at least half the material thickness).
- Avoid End Grain Where Possible: If unavoidable, use a larger pilot hole and consider using specialized screws or reinforcement.
- Clamping: Securely clamp the workpieces to prevent movement and distribute stress evenly.
- Slower Driving Speed: Allow the wood fibers to part gradually.
- Wax or Lubricant: For hardwoods, applying wax to the screw threads can reduce friction.
Crooked Screws
- The Problem: The screw enters the wood at an unintended angle, resulting in a weak, unsightly, or misaligned connection.
-
Prevention:
- Accurate Marking and Awl Indentation: Start with a precise mark and a clear dimple to guide the bit.
- Pilot Holes: A well-drilled pilot hole provides a reliable path.
- Perpendicular Start: Ensure the drill is perfectly perpendicular to the surface when beginning. Use a drill guide or jig for assistance if needed.
- Steady Downward Pressure: Apply pressure in line with the screw's intended path, not at an angle.
- Slow Start: Allow the screw to properly engage and self-guide into the pilot hole before increasing speed.
- Visual Monitoring: Continuously watch the screw's alignment throughout the driving process.
Over-tightening
- The Problem: Driving a screw too far can strip the threads in the wood, causing the screw to lose its grip. It can also cause wood to crush or crack, or lead to screw heads shearing off.
-
Prevention:
- Clutch Setting: Utilize the torque clutch on your drill. Set it to a level where it engages just as the screw head makes contact or is slightly recessed.
- Variable Speed Control: Slow down as the screw head approaches the surface.
- Feel the Resistance: Develop a feel for when the screw is snug. Stop turning as soon as you feel significant resistance, especially in softer woods. The goal is tight, not over-tight.
By understanding these common issues and implementing the preventative measures outlined, you can significantly enhance your success rate in driving straight, secure screws, saving time, materials, and ultimately, improving the quality of your projects.
The Strategic Advantage of Sourcing U.S.-Made Fasteners with Maden.co
In the complex ecosystem of industrial supply chains, the quality and origin of fasteners can profoundly impact project success, product longevity, and operational efficiency. While mastering the technique of screwing straight into wood is fundamental, it's equally important to pair that skill with the reliability of superior components. This is where Maden.co offers a distinct, strategic advantage for procurement managers, MRO buyers, and design engineers.
Driving American Manufacturing Revival
At Maden.co, our core mission is to democratize access to American manufacturing. We believe that securing high-quality, U.S.-made industrial components should be as accessible and convenient as any global alternative. This vision isn't just a philosophy; it's the driving force behind our platform, connecting industrial buyers with over 2.5 million meticulously cataloged products from our network of 800+ verified U.S. manufacturers. By choosing Maden.co, you're not just buying a product; you're investing in the future of American innovation and industry. Our entire business model is built on this principle; you can learn more about our mission to champion American manufacturing here.
Unparalleled Quality and Compliance
When it comes to fasteners, "U.S.-made" signifies a commitment to stringent quality control, material integrity, and consistent performance. Our values of American Manufacturing Pride and Industrial Excellence mean that every screw, bolt, or component listed on Maden.co meets demanding specifications, often exceeding international standards. For a design engineer, this means peace of mind knowing that the fasteners specified for a critical assembly will perform as expected. For an MRO buyer, it translates to reduced equipment downtime due to component failure. And for procurement managers, it simplifies compliance with critical industry standards (e.g., DIN, NPT), ensuring that products meet all regulatory and performance benchmarks.
Enhanced Supply Chain Resilience and Transparency
The past few years have highlighted the vulnerabilities of extended global supply chains. Sourcing through Maden.co inherently enhances your supply chain resilience by reducing reliance on overseas logistics, tariffs, and geopolitical uncertainties. Our commitment to Supply Chain Transparency means you have clear visibility into the origin and quality of your components, minimizing risks associated with counterfeit parts or inconsistent manufacturing processes. This local sourcing strategy dramatically reduces lead times, improves inventory management, and provides greater control over your procurement process, contributing directly to a lower Total Cost of Ownership (TCO).
Customer Empowerment and Digital Innovation
We understand that procurement can be a friction-filled process. Our platform is built with Digital Innovation at its core, designed to simplify and streamline your purchasing journey. Imagine a scenario where a procurement manager needs to source a specific, hard-to-find U.S.-made brass wood screw, or an MRO buyer requires an urgent replacement component to prevent costly operational halts. Maden.co offers an intuitive interface that allows you to quickly locate, compare, and purchase precisely what you need, from Round Slot Drive Brass Wood Screws for decorative applications to Flat Slot Drive Brass Wood Screws for flush finishes, and even Oval Slot Drive Silicon Bronze Wood Screws for demanding outdoor environments.
Strategic Financing for Capital-Intensive Projects
A key differentiator and a significant benefit for our customers is our "Instant Financing" option. We recognize that large-volume purchases or capital-intensive projects require flexible financial solutions. This feature, available directly during the checkout process, allows procurement managers and business owners to manage cash flow effectively without compromising on the quality or quantity of components needed. It's a strategic tool that enables you to secure the necessary U.S.-made parts immediately, allowing projects to proceed without delay while optimizing your financial planning. You can apply for Instant Financing at checkout to streamline your capital-intensive projects.
By partnering with Maden.co, you're not just acquiring fasteners; you're investing in a more reliable, efficient, and transparent procurement process that champions American ingenuity and drives industrial excellence. For highly specialized needs or if you have specific sourcing questions that require expert guidance, our dedicated team is readily available to assist you. Are you a U.S. manufacturer producing quality fasteners or other industrial components? We invite you to register as a vendor and join our growing network, contributing to America's manufacturing revival.
Conclusion
Mastering the art of screwing straight into wood is a foundational skill with far-reaching implications across all industrial applications. From ensuring structural integrity and preventing material damage to elevating aesthetic quality and reducing overall project costs, precision in fastener installation is paramount. We've explored the critical steps: understanding wood dynamics, selecting the right tools, meticulous preparation through marking and pilot holes, and executing the driving process with control and finesse. Avoiding common pitfalls like stripping, splitting, or crooked fasteners directly contributes to the success and longevity of any endeavor.
However, even the most refined technique can only be as effective as the components it employs. The reliability of U.S.-made fasteners, sourced from verified manufacturers, provides the bedrock for superior performance. At Maden.co, we are proud to offer unparalleled access to such components, championing American Manufacturing Pride and empowering industrial buyers with quality, transparency, and efficiency. By choosing our platform, you secure not just a product, but a strategic partnership that enhances your supply chain resilience, reduces procurement friction, and contributes to industrial excellence.
Don't let subpar components or inconsistent sourcing undermine your hard work. Explore the vast catalog of U.S.-made fasteners and industrial components on Maden.co today, and leverage our Instant Financing option at checkout to manage your cash flow effectively and ensure your projects proceed without delay. America's manufacturing revival is here, and we're here to power your success.
Frequently Asked Questions (FAQ)
Q1: Why is a pilot hole so important, even for screws with self-tapping tips?
A pilot hole is crucial because it creates a precise path for the screw, guiding it straight and preventing it from "walking" or veering off course. More importantly, it significantly reduces the risk of splitting the wood, especially in hardwoods, near edges, or in end grain, by relieving the pressure that the screw would otherwise exert. While self-tapping screws are designed to penetrate wood without a pre-drilled hole, using a pilot hole (especially when precision, aesthetics, or material integrity are critical) always enhances the quality of the joint, reduces the chance of stripping the screw head, and optimizes holding power by allowing threads to engage cleanly.
Q2: How do I choose the correct screw size (length and gauge) for my project?
For screw length, a general rule is that the screw should penetrate at least two-thirds of the thickness of the receiving (bottom) piece of wood. For example, if you're joining a 1-inch board to a 2-inch board, the screw should enter the 2-inch board by at least 1.33 inches, meaning a screw length of at least 2.33 inches (1 inch for the top board + 1.33 inches for the bottom). For screw gauge (diameter), consider the load the joint will bear and the wood's density. Larger gauge screws offer greater holding power but require larger pilot holes and increase splitting risk. Always test on a scrap piece of wood to find the optimal combination that provides strong hold without causing damage.
Q3: What should I do if the wood starts to split while driving a screw?
If you notice the wood splitting, stop immediately. Back the screw out, and assess the damage. Often, splitting occurs due to an insufficient or incorrectly sized pilot hole, or driving too close to an edge or end grain. To prevent further splitting, you can try:
- Enlarging the pilot hole slightly (if it was too small).
- Changing the screw's location if it's too close to an edge.
- Clamping the wood tightly around the splitting area before re-drilling and re-driving.
- Applying wood glue into the split, clamping it, letting it dry, then re-drilling and driving with extreme caution and a well-sized pilot hole.
- For hardwoods, consider applying wax or soap to the screw threads to reduce friction.
Q4: Can I screw straight into hardwood without pre-drilling a pilot hole?
While possible with some very small, fine-threaded, or specialized self-tapping screws and an impact driver, it is generally not recommended to screw straight into hardwood without a pilot hole. Hardwoods are dense and inflexible, making them highly susceptible to splitting if a screw is driven directly into them. Attempting to do so also significantly increases the risk of stripping the screw head, breaking the screw, or damaging your drill. For reliable, strong, and damage-free connections in hardwood, a correctly sized and drilled pilot hole is almost always a necessary and best practice.


