Extracting a Snapped Screw from Wood Effectively
Table of Contents
- Introduction
- Understanding Why Screws Snap
- Essential Tools for Screw Extraction
- Step-by-Step Extraction Techniques
- Advanced Techniques and Considerations
- Post-Extraction and Repair
- Strategic Sourcing for Industrial Excellence with Maden.co
- Conclusion
- FAQ
A snapped screw can bring a project to an abrupt, frustrating halt, transforming a simple assembly task into a complex challenge. For procurement managers, MRO buyers, and design engineers, such seemingly minor issues can translate into significant project delays, increased labor costs, and even compromise structural integrity. Imagine a critical piece of machinery offline because a stripped or broken fastener prevents a routine repair, or a new product prototype delayed due to an inaccessible component. These aren't just inconveniences; they are direct threats to operational efficiency and profitability.
At Maden.co, we understand the ripple effect of such challenges throughout the industrial supply chain. Our mission is to democratize access to American manufacturing, providing access to over 2.5 million American-made products from our network of 800+ verified U.S. manufacturers. We believe that preventing issues like snapped screws begins with sourcing high-quality fasteners and understanding best practices. However, when the inevitable happens, knowing the correct techniques and having access to the right tools and replacement parts quickly is paramount. This comprehensive guide delves into the most effective methods for removing a snapped screw from wood, offering practical advice and detailing the essential tools needed to get your projects back on track. We'll explore various scenarios, from screws broken flush with the surface to those with a protruding shank, ensuring you're equipped to tackle any situation with confidence and precision.
Introduction
The sudden snap of a screw head can feel like a small catastrophe, especially when it halts progress on a time-sensitive project. This common occurrence, often caused by over-tightening, poor-quality fasteners, or incorrect pilot hole sizing, doesn't just damage the workpiece; it creates a bottleneck that can cascade through a project timeline, affecting budget and resources. For professionals managing complex builds or intricate maintenance, a single snapped screw can represent an unexpected expenditure of time and labor, diverting valuable resources from other critical tasks.
This article serves as your definitive resource for navigating the challenges of snapped screw removal. We will provide a thorough examination of the underlying reasons screws snap, detail the critical preparation steps, and then systematically walk through a range of extraction techniques, from the simplest manual methods to more advanced tool-based solutions. Our aim is to equip you with the knowledge and confidence to approach any snapped screw scenario effectively, minimizing damage to your materials and ensuring a swift return to productivity. By understanding these techniques and having access to the reliable, American-made components that Maden.co provides, you can transform a frustrating setback into a manageable task, upholding the integrity and efficiency of your operations.
Understanding Why Screws Snap
Before diving into removal techniques, it’s crucial to understand why screws snap in the first place. This knowledge not only aids in preventing future occurrences but also helps in assessing the specific challenge posed by the broken fastener.
Common Causes of Screw Breakage
Several factors contribute to screw breakage, each offering clues about the best removal approach:
- Excessive Torque: Applying too much rotational force, especially with power tools, is the leading cause of screw heads shearing off. The screw material reaches its yield strength, leading to failure.
-
Incorrect Pilot Hole Size:
- Too Small: A pilot hole that is too small creates excessive friction and resistance as the screw is driven in, demanding more torque than the screw can withstand, often resulting in snapping.
- Too Large: While less likely to cause snapping, a pilot hole that is too large can prevent the screw from properly engaging the wood fibers, leading to stripping of the threads and eventual loosening, which can then result in snapping under stress.
- Low-Quality Fasteners: Inconsistent material composition, improper heat treatment, or flaws in the manufacturing process can result in brittle screws prone to snapping under normal driving conditions. This is where sourcing from verified American manufacturers, like those found on Maden.co, becomes critical. Our platform emphasizes Industrial Excellence, connecting buyers with components built to stringent U.S. quality standards, reducing such risks.
- Corrosion or Rust: Over time, exposure to moisture or chemicals can weaken metal screws, making them brittle and highly susceptible to snapping when force is applied, such as during removal.
- Fatigue: For fasteners under continuous stress or cyclical loading, material fatigue can develop, eventually leading to sudden failure and snapping.
- Angle of Entry: Driving a screw at an incorrect or skewed angle can put undue stress on the shaft, increasing the likelihood of it snapping.
- Wood Density and Type: Driving a screw into particularly dense hardwoods without an adequately sized pilot hole or lubrication can increase resistance and stress on the fastener.
Preventing Future Snapped Screws
Prevention is always better than cure. To minimize the incidence of snapped screws:
- Use Proper Pilot Holes: Always drill a pilot hole that matches the screw's core diameter, not including the threads. For hardwoods, a slightly larger pilot hole or a countersink may be necessary.
- Select Quality Fasteners: Invest in high-quality, U.S.-made screws appropriate for the application. The material (brass, steel, silicon bronze) and coating matter significantly. For instance, for applications requiring specific material properties, choosing a robust option like a Flat Slot Drive Brass Wood Screw or an Oval Slot Drive Silicon Bronze Wood Screw from our platform ensures you're starting with superior components. Our commitment to American Manufacturing Pride means we connect you with manufacturers adhering to the highest standards.
- Control Torque: When using power tools, set the clutch to an appropriate torque setting. Hand tools offer better tactile feedback for sensitive applications.
- Lubricate Screws: For very dense woods or long screws, a small amount of wax or soap on the screw threads can significantly reduce friction and prevent snapping.
- Drive Straight: Always ensure the screw is driven straight and perpendicular to the material surface.
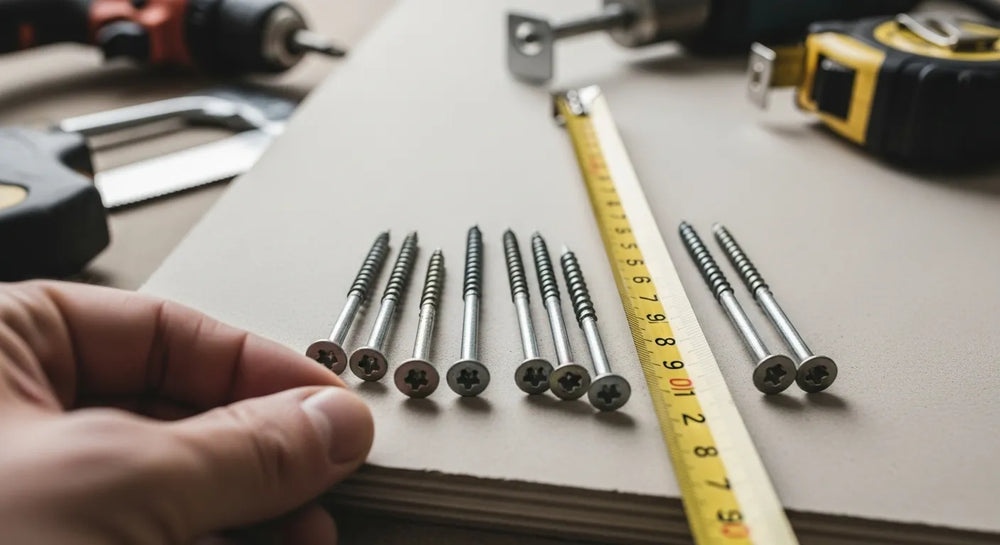
Essential Tools for Screw Extraction
Successfully removing a snapped screw requires the right tools. Having these readily available can save significant time and prevent further damage. At Maden.co, we understand that access to the correct U.S.-made tools and components is critical for efficient operations and we are dedicated to streamlining the procurement process.
Basic Hand Tools
- Pliers (Vice Grips, Locking Pliers, Needle-Nose Pliers): Invaluable if any part of the screw shank is protruding from the wood. Vice grips, in particular, offer a strong, adjustable grip.
- Hacksaw or Rotary Tool (Dremel): Used to cut a new slot into the exposed screw shank, if feasible, allowing a flathead screwdriver to be used.
- Center Punch: Essential for creating a starting dimple for drilling, preventing the drill bit from wandering.
- Hammer: For use with a center punch or tapping tools.
- Safety Glasses and Gloves: Always prioritize personal safety.
Specialized Extraction Tools
-
Screw Extractors (Left-Hand Drill Bits & Extractor Set): This is often the most effective and least damaging method.
- Left-Hand Drill Bits: These bits drill counter-clockwise. Sometimes, the drilling action itself will loosen and remove the snapped screw.
- Fluted or Spiral Screw Extractors: After drilling a pilot hole into the snapped screw, these tapered, reverse-threaded tools bite into the screw material, allowing it to be unscrewed.
- Impact Driver with Extractor Bits: Provides controlled, high-torque pulses that can often break free stubborn, snapped screws, especially when paired with appropriate extractor bits.
- Drill Bits: A set of high-quality, sharp drill bits (preferably cobalt or titanium for tougher screws) will be necessary for creating pilot holes in the snapped screw itself or for drilling around it.
- Drill (Corded or Cordless): For operating drill bits and screw extractors. Variable speed is crucial for control.
Materials and Supplies
- Penetrating Oil: For rusted or stubborn screws, penetrating oil can help lubricate the threads and break corrosion.
- Wood Glue/Epoxy: For filling any holes or damage after extraction.
- Wood Filler: For cosmetic repairs.
- New Screws: Crucial for completing the project. When sourcing replacements, consider the robust selection available on our platform. For example, if you need a durable brass fastener, check out our Round Slot Drive Brass Wood Screw, ensuring you replace with a high-quality, U.S.-made alternative.
Step-by-Step Extraction Techniques
The approach to removing a snapped screw largely depends on its condition and how much of it is exposed. We will categorize techniques based on common scenarios.
Scenario 1: Screw Shank is Protruding
If a portion of the screw shank is still visible and accessible, this is often the easiest scenario to tackle.
Method 1: Using Pliers or Vice Grips
- Preparation: Clear the area around the screw. Ensure good lighting.
- Grip: Select a pair of locking pliers (vice grips) for maximum hold. Clamp the jaws firmly onto the exposed shank of the screw. The tighter the grip, the less likely it is to slip.
- Twist and Turn: Slowly and carefully twist the pliers counter-clockwise. Apply steady, even pressure. Avoid sudden jerks, which could cause the screw to snap further or damage the wood.
- Angle: If the screw is very tight, try wiggling it slightly from side to side as you turn to break the bond with the wood fibers.
- Remove: Once the screw begins to turn, continue unscrewing it until it's fully extracted.
Method 2: Creating a New Slot (If Shank is Sufficiently Wide)
- Access: If the exposed shank is wide enough (typically a larger gauge screw), you might be able to cut a new slot.
- Tool Selection: Use a hacksaw blade (held carefully without the frame for tight spaces) or a rotary tool (Dremel) with a thin cutting disc.
- Cut Slot: Carefully cut a shallow, straight slot across the diameter of the exposed screw shank. Ensure the slot is deep enough for a flathead screwdriver blade to engage securely.
- Extraction: Insert a well-fitting flathead screwdriver into the newly created slot. Apply downward pressure and slowly turn counter-clockwise to unscrew the fastener.
Scenario 2: Screw is Snapped Flush with the Surface
This is a more challenging scenario as there's no visible part of the screw to grip. This requires drilling.
Method 1: Using a Screw Extractor Kit (The Gold Standard)
This method is generally the most effective and preserves the surrounding wood best.
- Center Punch: Using a center punch and a hammer, create a small indentation exactly in the center of the snapped screw. This prevents the drill bit from walking.
-
Drill Pilot Hole (Left-Hand Drill Bit):
- Select a left-hand drill bit that is smaller than the diameter of the broken screw, but large enough to create a substantial hole for the extractor. Consult your extractor kit's instructions for recommended drill bit sizes.
- Attach the left-hand drill bit to your drill. Set the drill to a slow speed and reverse (counter-clockwise) rotation.
- Carefully drill into the center of the snapped screw. Apply steady, moderate pressure. As you drill, the left-hand rotation may actually catch the screw and back it out. If it does, congratulations!
- Insert Extractor: If the screw doesn't come out with the left-hand drill bit, remove the drill bit and select the appropriate size screw extractor from your kit. The extractor should be slightly larger than the pilot hole you just drilled.
- Tap and Turn: Gently tap the extractor into the drilled hole using a hammer. This ensures it bites securely into the screw material.
- Extract: Attach a tap wrench or a drill (set to slow speed, reverse/counter-clockwise) to the extractor. Slowly turn the extractor counter-clockwise. As the extractor turns, its reverse threads will bite deeper into the broken screw, eventually gripping it and unscrewing it from the wood. Be patient and apply steady, consistent force.
Method 2: Drilling Out the Screw (Last Resort, Can Damage Wood)
This method is more destructive and should be considered if other options fail, as it risks damaging the surrounding wood.
- Center Punch: As before, create a center mark on the snapped screw.
- Drill Around the Screw: Select a drill bit that is slightly smaller than the outer diameter of the screw's threads (not the head). Carefully drill a series of small holes in a circle around the snapped screw. The goal is to weaken the wood's grip on the screw.
- Widen Hole (Optional): If necessary, gradually increase the drill bit size to carefully drill out the wood directly surrounding the screw.
- Extract: Once enough wood is removed, you may be able to grasp the remaining screw with needle-nose pliers or simply pull it out.
- Repair: This method will leave a larger hole that will need to be filled with wood plugs or wood filler and glue before a new screw can be inserted.
Scenario 3: Screw is Snapped Below the Surface (Recessed)
This scenario is similar to a flush screw but requires creating access to the fastener.
Method: Using a Drill Bit to Create a Recess and Extractor
- Create a Pilot Hole: Similar to the flush scenario, use a center punch to mark the center of the snapped screw.
- Drill a Small Recess: Using a standard drill bit that is slightly larger than the screw's diameter but smaller than the screw head, carefully drill down a few millimeters, creating a small, shallow cavity around the snapped screw. This exposes the top of the broken screw.
- Follow Flush Method: Once the top of the snapped screw is exposed within this recess, proceed with the "Screw Extractor Kit" method described for flush screws. Drill a pilot hole into the snapped screw, then insert and turn the screw extractor counter-clockwise.
- Repair: After extraction, the created recess will need to be filled with wood filler or a dowel/plug before a new screw can be inserted.
Advanced Techniques and Considerations
Sometimes, a snapped screw proves incredibly stubborn. Here are some additional considerations and techniques.
Applying Heat
Heat can sometimes help expand the surrounding metal of the screw, breaking the bond with the wood fibers.
- Heat Source: Use a soldering iron, a heat gun (on a low setting), or even a powerful hairdryer.
- Application: Apply heat directly to the snapped screw for a short period (15-30 seconds). Be extremely cautious not to scorch or damage the surrounding wood.
- Extraction: Immediately after heating, attempt to extract the screw using pliers (if protruding) or a screw extractor. The heat can loosen rust and expand the metal, making it easier to turn.
Using Penetrating Oil
For screws that are rusted or heavily stuck, penetrating oil can be a lifesaver.
- Application: Apply a generous amount of penetrating oil directly onto the snapped screw and around its base.
- Soak Time: Allow the oil to soak in for at least 30 minutes, or even a few hours, depending on the severity of the rust. Reapply periodically.
- Extraction: After soaking, attempt extraction using one of the methods described above. The oil helps to lubricate the threads and break down corrosion.
Sacrificial Drilling (When All Else Fails)
In extreme cases, if the screw is unyielding and the workpiece is not overly precious, a more aggressive approach may be necessary. This involves drilling out the entire screw and then repairing the hole.
- Larger Drill Bit: Select a drill bit that is slightly larger than the full diameter of the snapped screw.
- Drill Out: Carefully and slowly drill directly into the center of the snapped screw, ensuring the drill bit is straight. The goal is to completely destroy the screw's threads and shaft. This will effectively create a larger hole containing the remnants of the screw.
- Clean Out: Use a pick or pliers to remove any remaining metal fragments.
-
Repair: The resulting hole will be significantly larger and will require extensive repair.
- Dowel Method: The most robust repair involves drilling a perfectly round hole with a standard drill bit (matching the diameter of a dowel) and then gluing a wooden dowel into the hole. Once dry, cut the dowel flush and sand smooth. A new pilot hole can then be drilled into the dowel for a new screw.
- Wood Plug: Similar to a dowel, a wood plug can be used to fill the hole, providing a solid base for a new screw.
- Epoxy/Wood Filler: For less critical applications, a strong epoxy or wood filler can be used, though it may not provide the same holding power as solid wood for a new fastener.
Post-Extraction and Repair
Once the snapped screw is successfully removed, the next step is to repair any damage to the wood and prepare for a new fastener.
Repairing the Hole
- Minor Damage: For small holes or slight enlargement, wood filler or epoxy putty can be used to patch the area. Allow it to dry completely, then sand smooth.
-
Larger Holes/Stripped Threads: If the original screw hole is stripped or significantly enlarged from the extraction process, a more robust repair is needed:
- Clean the Hole: Ensure the hole is free of debris.
- Drill for Dowel/Plug: Use a drill bit to create a clean, round hole slightly larger than the damaged area.
- Insert Dowel/Plug: Apply wood glue to a wooden dowel or a wood plug (matching the species if possible) and insert it firmly into the hole.
- Cure and Trim: Allow the glue to cure completely. Trim the dowel/plug flush with the surface using a chisel or saw, then sand smooth.
- New Pilot Hole: Once the repair is solid, drill a new pilot hole (of the correct size!) into the repaired area for the new screw.
Choosing Replacement Fasteners
Selecting the right replacement fastener is crucial to prevent a repeat scenario. At Maden.co, we emphasize Supply Chain Transparency and Industrial Excellence, ensuring you find components that meet stringent quality and performance criteria.
- Material: Consider the environment and application. For example, for outdoor use or corrosive environments, corrosion-resistant materials like stainless steel or silicon bronze are ideal. We offer a wide range of options, including Oval Slot Drive Silicon Bronze Wood Screw that provide excellent durability. For interior applications where aesthetics and strength are key, a Round Slot Drive Brass Wood Screw might be suitable.
- Type and Thread: Ensure the replacement screw is appropriate for the wood type and desired holding power. Wood screws have specific thread profiles designed to grip wood fibers effectively.
- Size: Ideally, use a new screw of the same diameter and length. If the hole was repaired with a dowel, you have a fresh start. If the hole was only partially repaired, you might need a slightly larger diameter screw to ensure a secure fit, but proceed with caution to avoid splitting the wood.
- Quality: Always opt for high-quality, U.S.-made fasteners. The cost savings of cheaper, inferior screws are quickly negated by project delays and material damage caused by failures. Our platform connects you directly with verified U.S. manufacturers, ensuring you receive components built to last. Our commitment to American Manufacturing Pride guarantees that the components you source are produced with rigorous attention to detail and material integrity.
Strategic Sourcing for Industrial Excellence with Maden.co
For procurement managers, MRO buyers, and design engineers, the ability to quickly source high-quality, American-made components is not just a convenience—it's a strategic advantage. When a snapped screw halts production or delays a critical repair, the immediate need for a reliable replacement part, or even the specialized tools for extraction, becomes paramount. This is where Maden.co truly excels.
Our platform is engineered to address these very challenges, embodying our core values of Digital Innovation and Customer Empowerment. We provide unparalleled access to a vast network of verified U.S. manufacturers, offering over 2.5 million American-made products. Whether you need specific fasteners, precision tools, or specialized components, our extensive catalog simplifies the procurement process. We understand the pressure to maintain operational continuity and meet design specifications without compromise. By connecting you directly with American manufacturers, we significantly reduce procurement friction, enhance supply chain resilience, and contribute to a stronger domestic industrial base.
Consider a scenario: an MRO buyer needs to quickly replace a specific type of wood screw for a repair that’s stopping production. Instead of sifting through unreliable global suppliers or facing lengthy lead times, they can visit Maden.co, easily find the exact U.S.-made Flat Slot Drive Brass Wood Screw they need, and have it on its way. Or perhaps a design engineer requires a high-strength, corrosion-resistant Oval Slot Drive Silicon Bronze Wood Screw for a critical prototype. Our platform's detailed product specifications and direct manufacturer connections ensure that compliance with critical industry standards is met, enhancing confidence in every purchase.
Furthermore, we recognize that large-volume purchases or unexpected equipment breakdowns often require agile financial solutions. That's why we offer "Instant Financing" as a strategic tool. This option, available conveniently during the checkout process, allows businesses to manage cash flow effectively and make necessary, capital-intensive purchases without delay. It's about empowering our customers to maintain uninterrupted operations and seize opportunities without financial bottlenecks. Our entire business model is built on this principle; you can learn more about our mission to champion American manufacturing here: About Us.
Our dedication goes beyond just offering products. It’s about cultivating a robust, transparent, and efficient supply chain for American businesses. We believe that America's manufacturing revival is here, and we are proud to be the definitive platform proving that American-made components are as accessible and convenient as any global alternative. We invite qualified U.S. manufacturers to join our thriving ecosystem and help us further strengthen domestic production. Are you a U.S. manufacturer? Register as a vendor and join the American manufacturing revival: Vendor Registration.
Conclusion
A snapped screw, while a common nuisance, need not be a catastrophic project setback. By understanding the underlying causes, equipping yourself with the right tools, and applying a methodical approach, you can effectively remove even the most stubborn broken fasteners. From carefully gripping a protruding shank with vice grips to meticulously drilling out a flush screw with an extractor kit, each technique offers a path to resolution. Ultimately, success lies in patience, precision, and the use of quality tools and components.
Beyond the immediate fix, this challenge underscores the critical importance of reliable sourcing. At Maden.co, we are committed to providing American industrial buyers with unparalleled access to high-quality, U.S.-made products. We believe in empowering procurement managers, MRO buyers, and design engineers to overcome challenges by offering a seamless procurement experience. From fasteners that resist snapping to tools that make extraction easier, our platform is designed to build a more resilient and efficient supply chain. We invite you to explore our comprehensive catalog of over 2.5 million American-made products today. Experience the confidence of sourcing from verified U.S. manufacturers and take advantage of our Instant Financing option at checkout to streamline your capital-intensive projects. Your next critical component, from a sturdy Round Slot Drive Brass Wood Screw to an entire inventory of specialized parts, is just a click away on Maden.co.
FAQ
Q1: What is the most common reason for a screw to snap when being driven into wood?
A1: The most common reason is applying excessive torque, especially with power tools, which exceeds the screw's tensile strength. Other frequent causes include using a pilot hole that is too small for the screw's core diameter, or using low-quality fasteners with material defects. Proper pilot hole sizing and using quality, U.S.-made fasteners from platforms like Maden.co are crucial preventive measures.
Q2: Can I use a regular drill bit to remove a snapped screw?
A2: A regular drill bit, especially a left-hand drill bit, can sometimes work to remove a snapped screw if the drilling action itself catches and backs out the fastener. However, for a more reliable and controlled extraction, a specialized screw extractor kit is recommended. These kits typically include left-hand drill bits to create a pilot hole, followed by a reverse-threaded extractor that bites into the screw and unscrews it. Using a regular, right-hand drill bit can sometimes tighten the screw further or damage the surrounding wood if not used carefully.
Q3: What should I do if the snapped screw is rusted and extremely difficult to remove?
A3: For rusted or extremely stubborn snapped screws, start by applying a penetrating oil directly to the screw and its immediate surroundings. Allow the oil to soak in for at least 30 minutes, or even several hours, reapplying periodically. The penetrating oil helps to break down corrosion and lubricate the threads. If possible, gently tap the screw with a hammer (through a center punch) to help the oil penetrate. After soaking, attempt extraction using a screw extractor kit, or pliers if enough of the shank is protruding. Applying a small amount of heat with a soldering iron or heat gun (being careful not to burn the wood) can also help.
Q4: After removing a snapped screw, how do I prepare the hole for a new fastener?
A4: After extraction, inspect the hole for damage. If the hole is only slightly enlarged, wood filler or epoxy putty can be used and then sanded smooth, followed by drilling a new pilot hole. If the hole is significantly damaged or stripped, the most robust repair involves drilling out the damaged area to create a clean, larger hole, and then gluing a wooden dowel or wood plug into it. Once the glue cures, trim the dowel/plug flush and sand. Finally, drill a new pilot hole of the correct size into the repaired area for the new fastener. This ensures the new screw will have a strong, secure grip in solid wood.


