How to Choose a Drill Bit for a Drywall Anchor
Table of Contents
- Introduction
- Why Drill Bit Sizing is Non-Negotiable for Anchor Integrity
- Decoding Drywall Anchor Types and Their Drill Bit Needs
- The Definitive Guide to Finding the Right Drill Bit Size
- Beyond the Anchor: Drill Bit Material and Type
- Step-by-Step Best Practices for a Professional Installation
- Procurement Strategy: Sourcing Anchors for Industrial Reliability
- Conclusion
- Frequently Asked Questions
Introduction
It’s a scenario that plays out in workshops, on construction sites, and during facility maintenance checks across the country: a newly installed shelf begins to sag, a heavy picture frame lies shattered on the floor, or a critical piece of wall-mounted equipment feels worryingly loose. The cause is almost always a single, overlooked detail—a failed drywall anchor. While it’s easy to blame the anchor itself, the true culprit is often the tool used to prepare its home: the drill bit. Choosing a bit that is even a fraction of an inch too large or too small can mean the difference between a secure, load-bearing fixture and a costly, potentially hazardous failure.
For procurement managers, MRO buyers, and design engineers, this isn't just a minor inconvenience. It represents rework, wasted materials, and a compromise in safety and professional standards. The integrity of an entire installation, from commercial signage to industrial control panels, hinges on this fundamental step. This is why understanding the precise relationship between a drywall anchor and its corresponding drill bit is a non-negotiable skill.
This article provides a definitive, in-depth guide to selecting the correct drill bit for any drywall anchor. We will move beyond simple guesswork, exploring the mechanics of different anchor types, deciphering manufacturer specifications, and outlining professional best practices for a perfect installation every time. Our goal is to empower you with the technical knowledge to ensure that every anchor you install performs exactly as intended, supported by the reliability and quality of American-made components. A secure installation begins with the right knowledge and the right hardware.
Why Drill Bit Sizing is Non-Negotiable for Anchor Integrity
At first glance, the hole for a drywall anchor seems like a simple prerequisite. However, the physics at play are precise. Drywall, or gypsum board, is a relatively soft material composed of a gypsum plaster core pressed between two thick sheets of paper. It has excellent fire-resistant properties and is easy to finish, but it lacks the dense, solid structure of wood or masonry. It crumbles easily and has very low pull-out strength on its own. A drywall anchor is an engineered solution designed to overcome this weakness by distributing the load over a wider surface area.
The effectiveness of this solution is entirely dependent on a perfect fit, which is determined by the drill bit.
The Critical Tolerances: Too Big vs. Too Small
-
Drill Bit Too Small: This is a common mistake driven by the fear of making the hole too large. If the pilot hole is too small, the anchor will not insert properly. Attempting to force it can lead to several negative outcomes. You might tear the paper facing of the drywall, compromising the structural integrity of the surface. More likely, you will damage the anchor itself, crushing its fins or stripping its threads before it's even in the wall. The anchor may go in crooked, preventing the screw from seating correctly and drastically reducing its holding power.
-
Drill Bit Too Large: An oversized hole is a recipe for immediate failure. An expansion-style anchor needs to bite into the surrounding gypsum to create friction and grip. If the hole is too large, the anchor's fins or ribs have nothing to expand against. The anchor will spin uselessly in the hole as you try to drive the screw, a frustrating experience known as "spinning out." It will never tighten, and it will have virtually zero load-bearing capacity. For toggle bolts or molly bolts, an oversized hole can cause the entire assembly to be loose and unstable, even if the toggle mechanism deploys.
This precision is central to the principle of Industrial Excellence. In a professional context—be it an office build-out, a retail store setup, or a factory floor modification—there is no room for "good enough." A failed anchor can mean damaged inventory, broken equipment, or a safety liability. This is why our mission at Maden.co is not just about selling parts; it's about providing access to verified, reliable components that uphold the highest standards of performance.
Decoding Drywall Anchor Types and Their Drill Bit Needs
The world of drywall anchors is diverse, with specific designs engineered for different load capacities and applications. Understanding the design of your chosen anchor is the first step in determining the correct drill bit. Let’s break down the most common categories found in industrial and commercial settings.
Expansion Anchors (Plastic & Nylon)
These are the most common type of light-to-medium-duty anchors. They work on a simple principle: as a screw is driven into the anchor's hollow core, it forces the sides of the anchor to expand outwards. This expansion creates pressure against the inside of the drywall, generating friction and holding the anchor securely in place.
- How They Work: Many designs, like the classic Ribbed Plastic Anchor, feature external ribs that bite into the gypsum to prevent the anchor from spinning during screw insertion. Others have a split design that flares out dramatically behind the drywall panel.
- Drill Bit Rule: The drill bit diameter must match the diameter of the anchor's body or shank. It is crucial not to measure the outer edge of the ribs or the top flange, as these are designed to be wider than the hole. The hole should be just large enough for the main cylinder of the anchor to be tapped in with firm pressure. A snug fit is essential for the expansion mechanism to function correctly. These are ideal for tasks like securing thermostats, smoke detectors, or lightweight signage.
Threaded / Self-Drilling Anchors
Designed for speed and efficiency, self-drilling anchors are a favorite among MRO professionals and contractors performing multiple installations. These anchors feature a coarse, wide thread and a sharp, drill-like tip that carves directly into the drywall panel, eliminating the need for a separate pilot hole.
- How They Work: You simply drive the anchor into the wall using a screwdriver or a drill set to low speed and torque. The anchor's threads displace the gypsum and create their own secure fitting. Once the anchor is flush with the wall, you drive your screw into the anchor's core.
- Drill Bit Rule: In most cases, no drill bit is required. This is their primary advantage. However, in situations with very hard, old drywall or multiple layers of paint, drilling a very small pilot hole (about half the diameter of the anchor's tip) can make it easier to start the anchor without damaging it or the wall surface. For high-volume projects, a product like the Medium-Duty Nylon Self-Drilling Anchor can dramatically reduce installation time while still providing reliable holding power for items like shelving brackets and display fixtures.
Sleeve-Type and Hollow Wall Anchors (Molly Bolts & Toggle Bolts)
When you need to support significant loads—such as heavy shelving, grab bars, or wall-mounted monitors—you must move beyond basic plastic anchors to more robust hollow wall anchors.
- Molly Bolts (Sleeve-Type Anchors): These consist of a metal sleeve with a screw inside. When you drill a hole and insert the molly, tightening the screw causes the metal sleeve to collapse and expand, creating strong, spider-like legs that brace against the back of the drywall.
- Toggle Bolts: These feature a spring-loaded "wing" or toggle mechanism on the end of a long screw. You drill a hole large enough for the collapsed toggle to pass through. Once inside the wall cavity, the wings spring open. As you tighten the screw, the wings are pulled tight against the back of the drywall, distributing the load over a very wide area.
- Drill Bit Rule: For both molly and toggle bolts, the drill bit size is determined by the diameter of the collapsed mechanism. This means the required hole will be significantly larger than the screw itself. A 3/16" toggle bolt might require a 1/2" or 5/8" hole to allow the wings to pass through. This large hole size is a key consideration, as it is more difficult to patch if the fixture is ever removed.
For applications that require more strength than a standard plastic anchor but don't warrant a large toggle bolt, a heavy-duty nylon anchor is an excellent choice. A robust fastener like the Medium-Duty Nylon Wall Anchor for #8 screws provides a significant upgrade in shear and tensile strength, making it suitable for securing heavier fixtures, small cabinets, and commercial-grade brackets. The drill bit selection for this type of anchor follows the same rule as standard expansion anchors: match the bit to the shank diameter for a snug, secure fit.
The Definitive Guide to Finding the Right Drill Bit Size
While understanding the anchor type is crucial, you still need to determine the exact drill bit diameter. Relying on guesswork is not a professional strategy. Here are the three primary methods for finding the correct size, ranked from most to least reliable.
Method 1: The Manufacturer's Specification (The Gold Standard)
The single most reliable source of information for drill bit size is the manufacturer. Reputable manufacturers list the required bit size directly on the product packaging, in the included instructions, or on the technical data sheet available online.
Pro Tip: For professional buyers, maintaining a file—digital or physical—of the technical data sheets for commonly used fasteners is a best practice. This ensures that any team member can quickly access the correct installation parameters.
This method embodies our value of Supply Chain Transparency. When you source components through a marketplace dedicated to verified U.S. manufacturers, you gain more than just a product; you gain access to reliable data, material certifications, and performance specifications. This is essential for design engineers specifying parts for a new product and for procurement managers ensuring compliance with project requirements. Our commitment to this transparency is fundamental to our mission. You can learn more about our mission to champion American manufacturing here.
Method 2: Measuring the Anchor Manually
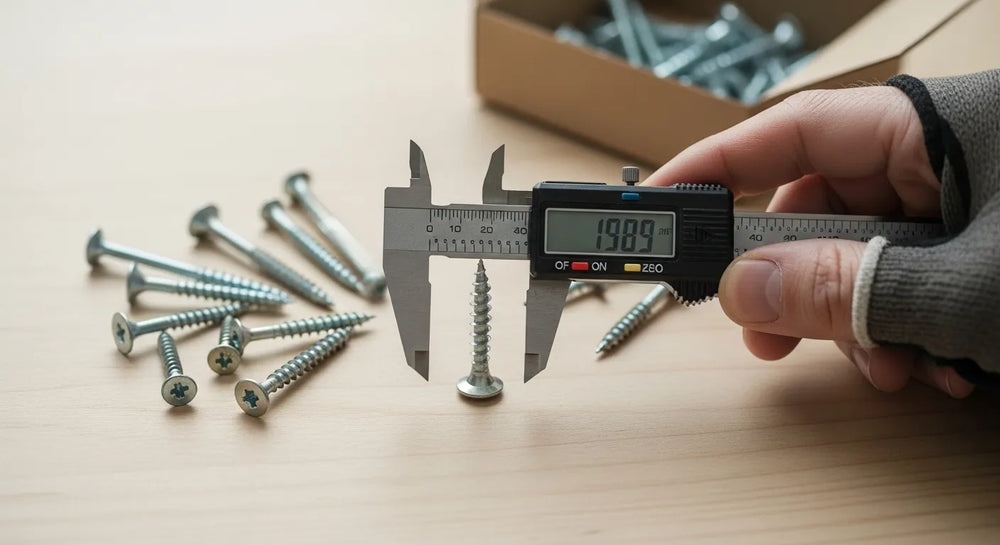
If the original packaging is gone and a data sheet is unavailable, the next best method is to measure the anchor yourself using a precision instrument.
- Using Calipers: A digital or dial caliper is the ideal tool for this job. Measure the diameter of the anchor's shank, being careful to avoid the threads, ribs, or flange. Measure at several points along the body to ensure consistency. This measurement is the exact drill bit size you need.
- The Visual Comparison Trick: If you don't have calipers, you can use a simple visual check. Hold the drill bit directly in front of the anchor. Looking straight on, the drill bit should completely obscure the body of the anchor, but you should still be able to see the outer edges of the ribs or threads on either side. If you can see the anchor's body behind the bit, the bit is too small. If the bit hides the ribs or threads entirely, it's likely too large. This method requires a good eye and should be considered a field-expedient solution, not a primary strategy.
Method 3: Using a Drill Bit Sizing Chart
Generic sizing charts that cross-reference screw sizes (e.g., #6, #8, #10) to anchor sizes and recommended drill bit diameters are widely available online. While these can be a helpful starting point, they should be used with caution.
Anchor dimensions are not perfectly standardized across all manufacturers. A #8 anchor from one brand might have a slightly different shank diameter than a #8 from another. Using a generic chart could lead you to select a bit that is off by 1/64" or 1/32", which can be enough to compromise the installation. Always default to Method 1 or 2 if possible.
Beyond the Anchor: Drill Bit Material and Type
The drill bit itself is as important as its size. Using the wrong type of bit can result in a messy, oversized hole, even if the diameter is technically correct.
Drill Bit Materials
- High-Speed Steel (HSS): This is the standard, all-purpose drill bit material suitable for wood, plastic, and soft metals. For drilling into drywall, a standard HSS bit is perfectly adequate.
- Cobalt and Titanium-Coated: These bits are harder and more heat-resistant, designed for drilling into hardened steel and other tough materials. While they will certainly work on drywall, they are overkill and not cost-effective for this application.
Drill Bit Types
- Twist Bit: This is the most common type of drill bit. While functional, its sharp, angled tip can sometimes "walk" or wander across the painted drywall surface before it begins to bite, potentially misplacing your hole.
- Brad-Point Bit: This is the ideal choice for drilling into drywall. A brad-point bit has a very sharp spur at its center that digs into the material first, preventing any wandering. The outer edges of the bit then shear the paper facing of the drywall cleanly, resulting in a perfectly round, precise hole with no tearing. This level of precision is crucial for a professional finish.
- Spade Bit: These are designed for boring large-diameter holes in wood. They are far too aggressive for drywall and will create a rough, torn hole that is unsuitable for any type of anchor. Avoid spade bits for this application entirely.
Step-by-Step Best Practices for a Professional Installation
With the correct anchor and drill bit in hand, following a systematic installation process ensures a perfect result every time.
- Mark the Location: Use a pencil to precisely mark the center of your desired hole.
- Check for Obstructions: Use a stud finder to ensure you are not attempting to drill into a wooden stud, metal framing, or wiring. If a stud is present, you don't need an anchor—you can drive a screw directly into the stud for a much stronger hold.
- Select the Right Tools: Confirm your drill bit matches the anchor's requirement using the methods described above. Insert the bit into your drill and tighten the chuck securely.
- Drill the Pilot Hole: Place the tip of the drill bit directly on your pencil mark. If using a twist bit, you can use a nail set or awl to create a small indentation to guide the bit. Drill straight into the wall, keeping the drill perfectly perpendicular (90 degrees) to the surface. Apply steady, light pressure. Let the bit do the work.
- Insert the Anchor: Clear away any gypsum dust from the hole. Gently push the anchor into the hole. It should be a snug fit. Use a rubber mallet or the handle of a screwdriver to lightly tap the anchor until its flange is flush with the wall surface. If it requires excessive force, your hole is too small. If it pushes in with no resistance, your hole is too big.
- Set the Screw: Place your fixture over the anchor, insert the appropriate screw, and drive it in until it is snug. Be careful not to overtighten, as this can strip the anchor's internal threads or damage the drywall.
Procurement Strategy: Sourcing Anchors for Industrial Reliability
For businesses, sourcing fasteners goes far beyond a trip to the hardware store. It's a strategic decision that impacts project timelines, budgets, and operational reliability. Procurement managers and MRO buyers often face significant challenges: inconsistent quality from overseas suppliers, long and unpredictable lead times, and a lack of verifiable material certifications. A single bad batch of anchors can bring a project to a halt or lead to widespread failures down the line.
This is the problem we are dedicated to solving. At Maden.co, our mission is to democratize access to American manufacturing, connecting industrial buyers with over 2.5 million products from our network of 800+ verified U.S. manufacturers. This approach, rooted in our core values of American Manufacturing Pride and Customer Empowerment, directly addresses common procurement pain points by:
- Ensuring Quality: Access to components made to exacting standards, with transparent material sourcing and clear technical specifications.
- Improving Supply Chain Resilience: Reducing dependence on fragile global supply chains and shortening lead times by sourcing domestically.
- Reducing Total Cost of Ownership (TCO): While the per-unit cost may sometimes be higher, the TCO is often lower due to reduced failures, less rework, and enhanced safety and reliability.
For a contractor outfitting a new commercial space or an MRO manager stocking up on essential fasteners, navigating capital expenditures is a key part of the process. To facilitate this, we offer an Instant Financing option during the checkout process. This strategic tool allows businesses to manage cash flow effectively, enabling larger volume purchases to secure better pricing or acquire all necessary components for a major project without delaying work. If you have specific sourcing needs or can't find a particular component in our catalog, please contact our team for assistance.
Furthermore, we are constantly expanding our network of domestic suppliers. If you are a U.S. manufacturer of high-quality fasteners and industrial components, we invite you to join our platform. Register as a vendor and become a part of the movement to rebuild our nation's industrial base. America's manufacturing revival is here.
Conclusion
Choosing the right drill bit for a drywall anchor is not a trivial detail; it is the foundation of a safe, reliable, and professional installation. By understanding the specific mechanics of your chosen anchor, prioritizing the manufacturer's specifications, and using the correct type of drill bit, you can eliminate the guesswork and prevent costly failures. This commitment to precision and quality is what separates amateur work from industrial excellence.
Ultimately, the integrity of your work depends on the quality of your components. Stop the guesswork and ensure your next project is built on a foundation of American-made strength and reliability. Explore our extensive catalog of drywall anchors, fasteners, and MRO supplies today. You can apply for Instant Financing at checkout to streamline your capital-intensive projects and secure the components you need without delay.
Frequently Asked Questions
1. Can I use the same drill bit for a #8 anchor in drywall and a concrete wall? No, you absolutely should not. Drywall anchors are designed specifically for hollow walls and require a bit sized for a snug fit. Concrete anchors, such as a plastic or metal sleeve anchor, require a specialized masonry drill bit and are sized according to that anchor's specific requirements, which will be different from a drywall anchor even for the same screw size.
2. What happens if I drill the hole too big for my drywall anchor? An oversized hole is one of the most common installation failures. The anchor will not be able to expand and grip the surrounding material. It will either spin uselessly in the hole when you try to insert the screw or pull out easily under even the slightest load. The only solution is to patch the hole and drill a new one, or use a larger toggle-style anchor that requires a bigger hole by design.
3. Are self-drilling anchors always better than anchors that require a pilot hole? Not necessarily. Self-drilling anchors offer a significant advantage in speed and convenience, making them ideal for high-volume installations where light to medium holding power is sufficient. However, for heavier applications, traditional expansion anchors or molly bolts that are installed into a precisely drilled pilot hole often provide superior load-bearing capacity and a more secure fit. The "better" anchor depends entirely on the specific application and weight requirements.
4. Why should my business prioritize sourcing U.S.-made anchors and fasteners? Prioritizing U.S.-made fasteners provides several strategic business advantages. It ensures a higher, more consistent level of quality control and adherence to industry standards (e.g., DIN, NPT). It strengthens your supply chain, reducing the risks of delays and quality issues associated with overseas sourcing. Finally, it provides access to clear technical documentation and domestic customer support, which is critical for engineering and MRO applications where precision and reliability are paramount.


