How to Install Drywall Anchors: A Practical Guide
Table of Contents
- Introduction
- Why Drywall Cannot Hold a Screw Alone
- Choosing the Right Anchor for the Job
- The Professional's Step-by-Step Installation Guide
- Common Mistakes and How to Avoid Them
- The Maden.co Advantage: Building Resilient American Supply Chains
- Conclusion
- Frequently Asked Questions
Introduction
A sudden crash echoes from the other room. You walk in to find a newly hung shelf, its contents scattered across the floor, and two ugly, gaping holes in the wall where the screws used to be. It’s a scenario familiar to facility managers, maintenance professionals, and business owners alike. This common failure isn't just an annoyance; in a commercial or industrial setting, it represents rework costs, potential safety hazards, and project delays. The culprit is almost always the same: failing to use the correct anchor for the job. Drywall, a ubiquitous building material composed of a soft gypsum core pressed between two sheets of paper, simply lacks the density to hold a standard screw under load.
This guide is designed to move beyond basic DIY advice and provide a professional framework for understanding, selecting, and installing drywall anchors correctly, the first time. We will explore the fundamental principles of why anchors are necessary, break down the various types of anchors and their specific applications, and provide a detailed, step-by-step installation process that ensures a secure and lasting hold. For procurement managers, MRO (Maintenance, Repair, and Operations) buyers, and engineers, choosing the right fastener is a critical decision that impacts project integrity and long-term reliability. The core message is simple: a secure installation is not an accident; it is the direct result of using a high-quality, properly-rated, and correctly installed anchoring component.
Why Drywall Cannot Hold a Screw Alone
To appreciate the function of a drywall anchor, it's essential to understand the material it's designed to work with. Drywall is fundamentally a brittle, low-density material. When you drive a standard wood or metal screw into it, the threads have very little solid material to bite into. They essentially just pulverize the soft gypsum core, creating a loose, dusty pocket.
This is where the principles of mechanical force come into play. A fastener in a wall is subjected to two primary types of force:
- Shear Force: This is a downward-pulling force that runs parallel to the wall's surface. A picture hanging from a hook is a perfect example of shear force. While drywall can resist very light shear loads on its own, anything more than a few pounds will cause the screw to tear a downward path through the gypsum.
- Tensile Force (or Pull-Out Force): This is a force that pulls straight out from the wall, perpendicular to the surface. A towel rack, a grab bar, or a wall-mounted cabinet door being opened and closed repeatedly all exert tensile force. Drywall has virtually no resistance to this type of force, and a screw will pull out with minimal effort.
A drywall anchor is a purpose-built intermediary. It is designed to be inserted into the drywall and then expand or deploy a locking mechanism on the other side—in the hollow space behind the wallboard. This action dramatically increases the surface area bearing the load, distributing the force across a much wider section of the drywall panel instead of concentrating it on the crumbling gypsum immediately around the screw shank. By creating this braced, high-surface-area connection, an anchor effectively bypasses the weakness of the gypsum core and leverages the relative strength of the entire panel. For professionals, this isn't just about hanging decor; it's about ensuring that safety signage, equipment mounts, and essential fixtures remain securely in place, upholding both operational integrity and workplace safety standards.
Choosing the Right Anchor for the Job
The anchor aisle can be an intimidating place, filled with a dizzying array of shapes, sizes, and materials. However, selecting the correct one becomes straightforward when you match the anchor's design to the weight of the object and the type of force it will endure. At Maden.co, we connect industrial buyers with a vast catalog of American-made components, ensuring that you can source the precise, high-quality fastener for any application. Our mission is to democratize access to American manufacturing, making it simple to find reliable parts for any project.
Light-Duty Applications (Up to 15 lbs)
These are for objects that exert minimal shear force and almost no tensile force, such as small picture frames, smoke detectors, thermostats, and lightweight clocks.
Ribbed Plastic Anchors
These are the most common type of expansion anchor. They require a pre-drilled pilot hole that matches the diameter of the anchor's body. Once the hole is drilled, the plastic sleeve is gently tapped into place until it is flush with the wall. As you drive a screw into the sleeve, the ribbed, split shaft expands, pressing firmly against the inside of the drywall.
- Best For: Very light, static loads.
- Pro Tip: These are an excellent, cost-effective choice for bulk procurement by MRO teams for routine facility upkeep. Sourcing a high-quality, U.S.-made product like this Ribbed Plastic Anchor ensures consistency in material and performance, preventing the brittleness and breakage common with lower-quality imports.
Medium-Duty Applications (15 to 50 lbs)
This category covers the majority of common wall-mounted items, including heavier art, mirrors, curtain rods, shelving units, and bulletin boards.
Self-Drilling Anchors (Threaded Anchors)
These anchors are a significant step up in both holding power and convenience. They feature a sharp, drill-like tip and aggressive, wide threads that carve their own way into the drywall, eliminating the need for a pilot hole. This not only saves time but also ensures a perfectly sized opening for a snug fit. They are typically made from nylon or a zinc alloy.
- Best For: Rapid installations of shelving, medium-weight mirrors, and wall organizers.
- Pro Tip: For a procurement manager under pressure to complete an office fit-out, the time saved by not drilling pilot holes for a hundred different fixtures adds up to significant labor cost savings. A reliable, American-made option like the Medium-Duty Nylon Wall Anchor #6 Self-Drilling Drywall Zip-It® provides the strength and efficiency needed for commercial-scale projects. The nylon construction offers a slight flex that prevents cracking under load compared to more brittle materials.
Sleeve-Type Expansion Anchors
Similar to ribbed plastic anchors, these require a pre-drilled hole. However, their design is often more robust, providing greater expansion and holding power. When the screw is driven in, it pulls up a cone-shaped wedge into the sleeve, forcing the sides to expand powerfully behind the drywall.
- Best For: A versatile, all-around choice for MRO toolkits, suitable for everything from towel bars to heavier signage.
- Pro Tip: Having a stock of dependable, medium-duty anchors is essential for any facilities maintenance team. The Medium-Duty Nylon Wall Anchor #8 for Drywall is a prime example of a U.S.-made component that offers superior holding power for its class, making it a trustworthy choice for items that will see regular use and interaction. Our platform's commitment to Industrial Excellence means you can trust the specifications and quality of the components you source.
Heavy-Duty Applications (50+ lbs)
For critical applications where failure is not an option, you must use an anchor designed for significant loads. This includes TV mounts, heavy shelving, small wall-mounted cabinets, and safety grab bars.
Hollow-Wall Anchors (Molly Bolts)
These all-metal anchors provide excellent holding power. After drilling a pilot hole, the entire anchor body is inserted into the wall. As you turn the screw, the sleeve behind the wall compresses and expands, forming a set of "legs" that brace against the back of the drywall. Some versions require a special setting tool for a perfect installation, while others can be set just by turning the screw.
- Best For: Applications requiring high tensile and shear strength, like towel racks that will be pulled on or shelving holding valuable equipment.
- Pro Tip: A key benefit of molly bolts is that the screw can be removed and reinserted without the anchor losing its place, which is useful for items that may need to be taken down for maintenance.
Toggle Bolts
When it comes to pure holding power in hollow walls, the toggle bolt is the champion. It consists of a screw and a spring-loaded, wing-like toggle. To install, you drill a relatively large hole, pinch the wings together, and push them through the hole. Once clear, the wings spring open behind the drywall. Tightening the screw then pulls the wings tight against the back of the wall, creating an incredibly strong brace.
- Best For: The heaviest consumer and light commercial loads, such as large TV mounts, heavy mirrors, and overhead light fixtures.
- Pro Tip: The main drawback is the large hole required, and if you ever remove the screw completely, the toggle wing will fall down inside the wall cavity. Plan your installation carefully.
A Note on Weight Ratings and Safety: The weight rating listed on an anchor's packaging is for a static load under ideal conditions (i.e., new, 5/8" drywall). For dynamic loads (items that are moved or pulled on) or for installations in older or thinner drywall, always incorporate a significant safety factor. A good professional rule of thumb is to choose an anchor rated for at least four times the actual weight of the object you intend to hang.
The Professional's Step-by-Step Installation Guide
Following a precise and methodical process is what separates a professional installation from a failed one. This commitment to process reflects our core value of Industrial Excellence.
Step 1: Gather Your Tools and Materials
Before you begin, ensure you have everything you need. A well-prepared workspace is an efficient one.
- Safety Glasses: A non-negotiable for any drilling task.
- Electronic Stud Finder: The most important tool. You must check for studs, pipes, and wiring before drilling.
- Drill and Assorted Drill Bits: Ensure you have the exact bit size required for your anchor.
- Screwdriver or Screw Gun: A drill with a clutch setting is ideal to prevent over-tightening.
- Tape Measure and Pencil: For accurate placement.
- Level: To ensure your fixture is perfectly horizontal or vertical.
- Hammer: For gently tapping in expansion-style anchors.
- Your Selected Anchors and Screws: Ensure the screw length is sufficient to pass through your fixture, the drywall, and fully engage the anchor mechanism.
Step 2: Locate the Ideal Position
Use the electronic stud finder to scan the area where you plan to install your fixture. Your goal is to avoid studs, plumbing, and electrical wiring. If you do find a stud exactly where you want to hang a heavy item, that's great! You can drive a long screw directly into the stud and forgo the anchor entirely. If a stud isn't available, mark a safe spot in a hollow cavity.
Step 3: Mark Your Spot
Once you've identified a safe, stud-free location, use your tape measure, level, and pencil to mark the precise spot(s) for your anchor(s). For items with multiple mounting points, like a shelf, precision is key. Measure twice, drill once.
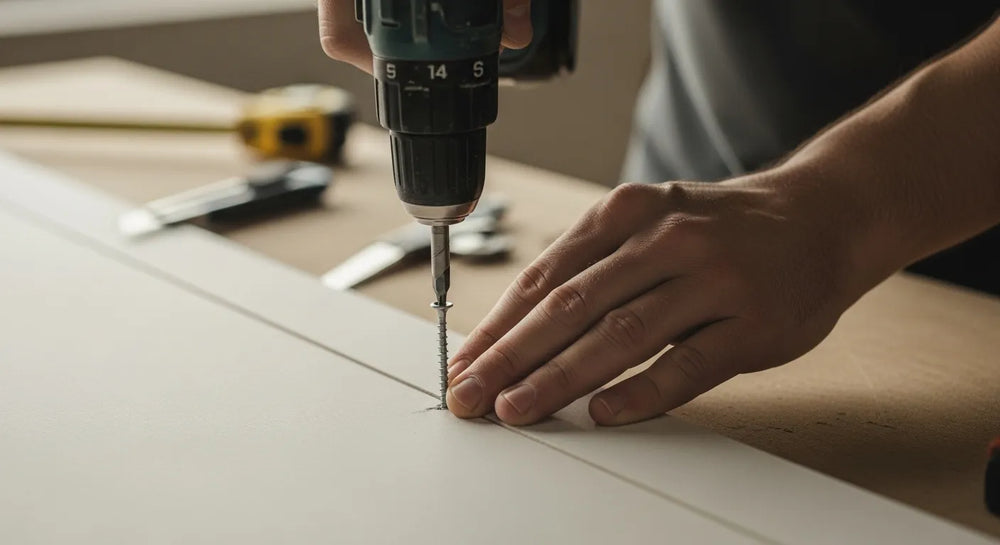
Step 4: Drill the Pilot Hole (If Necessary)
This step is critical for any anchor that is not self-drilling.
- Check the Anchor's Packaging: The required drill bit size will be printed on the box or instructions. Do not guess.
- Drill a Perpendicular Hole: Hold your drill straight and level, perpendicular to the wall. Drill cleanly through the drywall. You will feel a change in resistance once the bit passes through into the hollow cavity.
- Clear the Debris: Gently clear any dust or paper burrs from the edge of the hole.
Step 5: Insert the Anchor
The method here depends on the anchor type:
- Ribbed/Sleeve-Type Anchors: Align the anchor with the hole and press it in with your thumb. If it's snug, use a hammer to gently tap it until the anchor's head is flush with the wall surface. If you have to hit it hard, your pilot hole is too small.
- Self-Drilling Anchors: Place the sharp tip of the anchor on your mark. Using a screwdriver or a drill on a low-speed, high-torque setting, apply firm, steady pressure and drive the anchor into the wall until the head is flush.
- Toggle Bolts: Pinch the spring-loaded wings together and push them through the pre-drilled hole.
Step 6: Set the Anchor
This is the step that secures the anchor.
- For Expansion and Self-Drilling Anchors: Place your fixture over the anchor, insert the screw, and begin to tighten it. You will feel resistance as the anchor expands and sets. Stop tightening once the screw is snug. Over-tightening can strip the anchor or damage the drywall.
- For Molly Bolts: As you tighten the screw, the sleeve will begin to expand behind the wall. Continue tightening until it feels very firm.
- For Toggle Bolts: Pull the screw back towards you to ensure the wings are braced against the back of the wall. Hold this tension as you begin to tighten the screw, securing your fixture in the process.
Common Mistakes and How to Avoid Them
-
Mistake: Using a light-duty anchor for a heavy-duty job.
- Solution: Always overestimate the load and choose an anchor with a generous safety margin. When in doubt, level up to a toggle bolt or molly bolt.
-
Mistake: Drilling the pilot hole too large.
- Solution: The anchor will spin in the hole when you try to drive the screw. You will have to remove it, patch the hole, and start over in a new location. Always use the specified drill bit size.
-
Mistake: Over-tightening the screw.
- Solution: This can strip the anchor's internal threads or crack the surrounding drywall, compromising the entire installation. Use a drill with a torque clutch or tighten the final turns by hand with a screwdriver for better feel.
-
Mistake: Hitting a stud while drilling a pilot hole.
- Solution: Stop immediately. If the stud is in a usable location, you can use a wood screw instead. If not, you'll need to patch the small hole and move your anchor location over a few inches.
The Maden.co Advantage: Building Resilient American Supply Chains
For an MRO buyer facing an unexpected equipment breakdown or a design engineer needing specific components for a new prototype, the ability to quickly find and finance a verified, U.S.-made part is a game-changer. Sourcing fasteners like drywall anchors is about more than just finding the lowest piece price; it's about Total Cost of Ownership (TCO). A cheap, imported anchor that fails can cause thousands of dollars in damage and downtime.
This is where our mission comes to life. At Maden.co, we are committed to proving that American-made components are as accessible and convenient as any global alternative. Our platform connects you with over 800 verified U.S. manufacturers and more than 2.5 million products, embodying our value of Supply Chain Transparency. By sourcing domestically, you reduce lead times, gain clarity on material certifications, and insulate your operations from the volatility of international shipping. You can learn more about our mission to champion American manufacturing here.
This commitment to quality is why we partner with the best. Are you a U.S. manufacturer? Register as a vendor and join the American manufacturing revival. For businesses undertaking large-scale projects or significant MRO inventory replenishment, managing capital is key. That’s why we offer a strategic tool to empower our customers. You can apply for Instant Financing at checkout to streamline your capital-intensive projects and manage cash flow effectively. If you have specific sourcing questions for a large-scale project, our team is ready to help.
Conclusion
Mastering how to put anchors in drywall is a foundational skill for maintaining and outfitting any commercial or industrial space. It begins with a clear understanding of the material's limitations and is executed by carefully matching the right type of anchor to the specific load it will bear. By following a methodical, professional installation process—from locating a safe spot to setting the anchor correctly—you can ensure that every fixture you mount is secure, reliable, and safe.
The integrity of your work ultimately depends on the quality of the components you use. By choosing to source high-quality, American-made anchors, you are not just making a smart technical decision; you are investing in a more resilient and transparent supply chain. We invite you to explore the extensive catalog on Maden.co, where you can find the exact fasteners you need from verified U.S. manufacturers. Power your projects with the confidence that comes from superior components and help us drive the American manufacturing revival.
Frequently Asked Questions
1. Can I use a drywall anchor in a plaster wall? While some drywall anchors can work in plaster, it's often not ideal. Plaster is much harder and more brittle than drywall and can crack or shatter during drilling. For plaster walls, it is highly recommended to use anchors specifically designed for plaster or, for heavy items, to locate a wooden lath behind the plaster to screw into directly.
2. What should I do if my drywall anchor is spinning in the hole? A spinning anchor almost always means the pilot hole was drilled too large or the drywall has become too damaged around the hole to provide a snug fit. Unfortunately, there is no reliable fix for this. The best course of action is to remove the anchor, patch the hole with spackling compound, and start over in a new location at least a few inches away.
3. How much weight can a drywall anchor really hold? The weight rating on the package is a maximum static load in ideal conditions. It does not account for vibrations, dynamic forces (like pulling on a towel rack), or the condition of your drywall. For safety and liability, especially in a professional setting, always use an anchor rated for at least four times the weight of the object. For anything extremely heavy or critical (like safety equipment), consult a professional contractor.
4. Can I remove a drywall anchor and reuse the hole? It depends on the anchor. Ribbed plastic anchors and self-drilling anchors generally cannot be removed without damaging the wall further and are not reusable. Hollow-wall anchors (molly bolts) are designed so that the screw can be removed and reinserted, but the anchor body itself remains in the wall. A toggle bolt's wing will fall inside the wall cavity if the screw is completely removed. In most cases, it is best to leave the anchor in the wall, patch over it, and drill a new hole if needed.


