How to Mount Drywall Anchors: A Professional Guide
Table of Contents
- Introduction
- Understanding the 'Why': The Physics Behind Drywall Anchors
- A Taxonomy of Drywall Anchors: Choosing the Right Tool for the Job
- The Installation Process: A Step-by-Step Professional Protocol
- Beyond the Basics: Advanced Considerations for Industrial and Commercial Applications
- The Maden.co Advantage: Empowering Your Procurement Process
- Conclusion
- Frequently Asked Questions (FAQ)
Introduction
An urgent work order lands on a facility manager's desk: install new safety and directional signage throughout a newly renovated office wing. The challenge? Every wall is gypsum board, or drywall. Driving a screw directly into drywall is a recipe for failure; within hours, the sign will sag, and eventually, it will fall, leaving a damaged wall and a potential safety hazard. This scenario, common in commercial, industrial, and residential settings, highlights a fundamental truth: the integrity of any mounted fixture is only as strong as its connection to the wall. For professionals, from MRO buyers to design engineers and contractors, understanding how to properly mount a drywall anchor isn't just a basic skill—it's a critical component of project success, safety, and long-term cost management.
This article moves beyond simple DIY tips to provide a comprehensive, professional-grade guide to the science, selection, and installation of drywall anchors. We will explore the physics that make these small components so effective, conduct a detailed analysis of the various anchor types available for different load requirements, and provide a meticulous step-by-step installation protocol. Furthermore, we will examine the crucial business implications of fastener selection, including how sourcing high-quality, U.S.-made components impacts Total Cost of Ownership (TCO) and strengthens supply chain resilience. The goal is to empower you with the technical knowledge and strategic insight needed to ensure every fixture you mount is secure, reliable, and professionally executed.
Understanding the 'Why': The Physics Behind Drywall Anchors
Before touching a drill, it's essential for any professional to understand the material they are working with. Drywall, composed of a soft gypsum plaster core sandwiched between two layers of paper, has excellent compressive strength but very poor tensile and shear strength. This means that while it can support weight pressing against it, it crumbles easily when you try to pull something out of it or hang weight from it. A simple screw driven into drywall only has the friction of the gypsum powder holding it in place, which is next to nothing.
This is where the drywall anchor performs its critical function. It is an intermediary device designed to overcome the inherent weakness of the material.
The primary purpose of a drywall anchor is to transfer the load from a small, concentrated point (the screw) to a much larger surface area, either by expanding within the wall or by bracing against the back of the wall.
Understanding the forces at play is crucial for selecting the right anchor:
- Shear Load: This is a downward force that runs parallel to the wall surface. Think of a picture frame hanging on a screw. The weight of the frame pulls the screw straight down. Most anchors handle shear load reasonably well.
- Tensile Load (or Pull-Out Force): This is a force that pulls directly away from the wall, perpendicular to its surface. A towel bar being pulled on or a grab bar are prime examples. This is the most challenging force for drywall and where anchor selection becomes paramount.
An anchor's ability to resist these forces dictates its load rating. This rating is not a suggestion; it's a critical safety and performance specification. For procurement managers and engineers, sourcing anchors with clear, verifiable load ratings from trusted manufacturers is a non-negotiable aspect of responsible design and maintenance. This commitment to industrial excellence is a core reason we built Maden.co—to connect professionals with American-made products that meet rigorous performance standards.
A Taxonomy of Drywall Anchors: Choosing the Right Tool for the Job
The market is filled with a vast array of drywall anchors, each engineered for specific applications and load capacities. Selecting the incorrect type can lead to fixture failure, property damage, or even injury. Here, we dissect the most common categories, moving from light-duty to heavy-duty applications, to help you make an informed decision for your project.
Expansion Anchors (Ribbed Plastic Anchors)
These are among the most common and basic types of anchors. Typically made of plastic or nylon, they are inserted into a pre-drilled pilot hole. As a screw is driven into the anchor, its sides are forced to expand, creating a tight friction fit against the inside of the gypsum.
- How They Work: Pure friction and expansion within the drilled hole.
- Best For: Very light-duty, static shear loads. Think smoke detectors, small thermostats, lightweight picture frames, or wall clocks.
- Load Capacity: Typically 5-20 lbs, depending on size and drywall thickness.
- Limitations: They offer minimal resistance to tensile (pull-out) force and should never be used for critical applications, shelving, or on ceilings. Their reliability depends heavily on drilling the correct size pilot hole.
For applications requiring a simple, reliable solution for light loads, a high-quality, American-made Ribbed Plastic Anchor provides a consistent and cost-effective option. Sourcing domestically ensures uniformity in material quality, which is crucial for predictable performance across large-scale installations.
Sleeve-Type Anchors (Nylon Wall Anchors)
Sleeve-type anchors represent a significant step up in holding power from basic expansion anchors. After being inserted into a pilot hole, driving a screw into the anchor causes the sleeve behind the drywall to split and fold outwards, creating "wings" that brace against the back of the wall.
- How They Work: A combination of expansion and mechanical bracing against the interior wall surface.
- Best For: Light to medium-duty applications that may experience some tensile force. This includes curtain rods, towel racks, heavier picture frames, and lightweight shelving.
- Load Capacity: Generally 20-50 lbs.
- Installation Note: These require a correctly sized pilot hole and careful insertion to ensure the sleeve doesn't deform before it's properly seated.
The design of these anchors makes them far more resistant to pull-out than simple expansion types. When sourcing for commercial projects, choosing a product like the Medium Duty Nylon Wall Anchor #8 for Drywall from a verified U.S. manufacturer provides assurance of material integrity. Inferior nylon can become brittle over time, compromising the anchor's long-term reliability.
Self-Drilling Anchors (Threaded Anchors)
Designed for speed and convenience, self-drilling anchors, often called threaded or "zip-it" anchors, feature a sharp, aggressive point that allows them to be driven directly into drywall without a pilot hole.
- How They Work: They have wide, deep threads that cut into the drywall, providing a secure hold. Once installed flush with the wall, a screw is driven into the center of the anchor.
- Best For: Medium-duty applications where installation speed is a key factor, such as large-scale installations of signage, mirrors, or shelving in a commercial setting.
- Load Capacity: Can often hold up to 50-75 lbs.
- Key Advantage: Eliminates the need for a pilot hole, significantly reducing installation time. This is a major benefit for MRO teams and contractors looking to improve operational efficiency.
A crucial technique with these anchors is to use a slow speed on your drill or a screwdriver to avoid stripping the drywall. For maintenance teams facing a backlog of work orders, using an efficient and reliable product like the Medium Duty Nylon Wall Anchor #6 Self-Drilling Drywall (Zip-It®) can be a game-changer. Sourcing these components through a streamlined platform ensures you have the right parts on hand, minimizing downtime and labor costs.
Heavy-Duty Anchors: Toggle Bolts & Molly Bolts
When the load is heavy or safety is paramount, you must turn to heavy-duty anchoring systems that provide a robust mechanical lock behind the drywall.
-
Toggle Bolts: This classic design consists of a bolt and a pair of spring-loaded "wings." A large hole is drilled to accommodate the folded wings, which are then pushed through the wall. Once behind the drywall, the wings spring open. Tightening the bolt pulls the wings flush against the interior of the wall, creating an extremely strong anchor point. Their main drawback is that the bolt must be attached to the fixture before inserting it into the wall, and if you remove the bolt, the wings fall down inside the wall cavity.
-
Molly Bolts (Sleeve-Type Hollow Wall Anchors): These are arguably more versatile. A Molly bolt consists of a metal sleeve with a screw inside. It's inserted into a pilot hole and the screw is tightened. This causes the metal sleeve to collapse and expand behind the wall, much like a rivet. The advantage is that once the anchor is set, the screw can be removed and reinserted as needed without losing the anchor itself.
-
How They Work: Pure mechanical bracing with a large footprint behind the wall.
-
Best For: Heavy-duty and safety-critical applications like grab bars, large televisions, heavy shelving, small cabinetry, and anything mounted on a ceiling.
-
Load Capacity: Can range from 50 lbs to well over 100 lbs, depending on the specific design and size.
For any application involving public safety or high-value equipment, using a heavy-duty anchor is non-negotiable. The material quality and manufacturing precision of these components are critical, making domestic sourcing from verified partners a vital risk-mitigation strategy.
The Installation Process: A Step-by-Step Professional Protocol
Proper installation is just as important as proper selection. A high-quality anchor installed incorrectly will fail. The following process provides a universal framework for professional-grade results.
Step 1: Pre-Installation Assessment & Tool Preparation
- Assess the Load: Accurately determine the total weight of the fixture you are mounting. Always be conservative and choose an anchor with a load rating significantly higher than your estimated weight, especially for items that may experience dynamic forces (like a grab bar).
- Locate Studs: Before committing to an anchor, always use a quality electronic stud finder. Mounting directly to a wood or metal stud is always the strongest and preferred method. An anchor is a solution for when a stud is not available in the desired location.
-
Gather Your Tools: Having everything ready prevents mistakes. You will need:
- The correct anchors and screws
- Safety glasses
- An electronic stud finder
- A power drill with a full set of drill bits
- A screwdriver (manual and/or powered)
- A level
- A tape measure
- A pencil
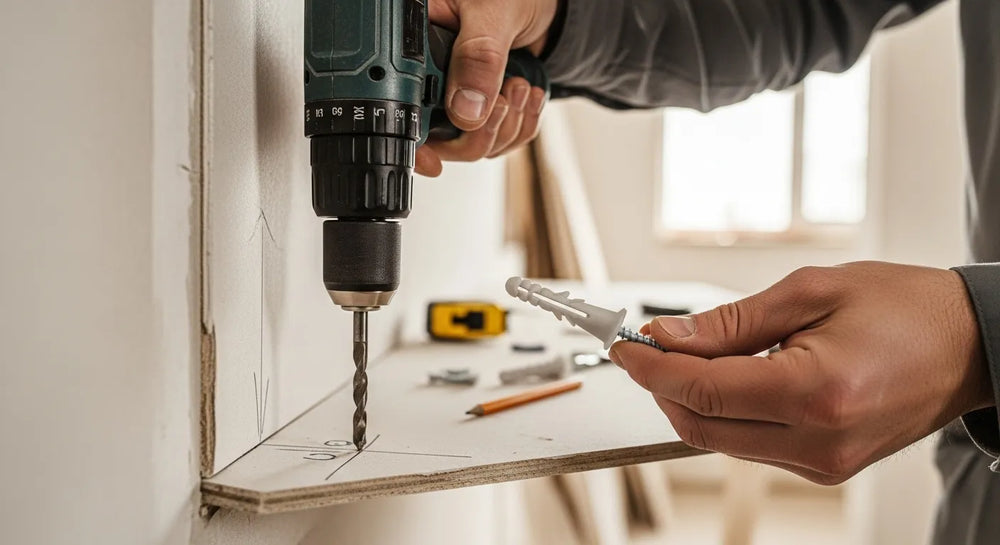
Step 2: Marking and Drilling the Pilot Hole
- Measure and Mark Precisely: Use your tape measure and level to mark the exact location for your anchor. For fixtures with multiple mounting points, measure meticulously to ensure they align perfectly. A small error at this stage can be difficult to correct later.
- Select the Correct Drill Bit: This is one of the most common points of failure. If the pilot hole is too large, the anchor will not expand properly and will spin in the hole. If it's too small, you risk damaging the drywall or the anchor upon insertion. The anchor's packaging will specify the required drill bit size. When in doubt, it is better to start with a slightly smaller bit and widen the hole if necessary.
- Drill with Control: Hold the drill perfectly perpendicular (90 degrees) to the wall. Apply steady, moderate pressure. Let the drill bit do the work. Drilling at an angle will compromise the anchor's fit and holding power.
Step 3: Inserting and Setting the Anchor
The technique here varies by anchor type:
- For Expansion/Sleeve-Type Anchors: Gently tap the anchor with a rubber mallet or the handle of a screwdriver until its head is flush with the wall surface. Do not force it. If it requires excessive force, your pilot hole is too small.
- For Self-Drilling Anchors: Place the anchor on the tip of a Phillips screwdriver or a drill set to a low speed and low torque. Apply firm pressure and drive it in until the head is flush with the wall. Stop immediately once it is flush to avoid stripping the surrounding drywall.
- For Toggle Bolts: Thread the bolt through your fixture, then screw on the spring-loaded wings. Pinch the wings together and push them through the drilled hole. You will hear a "snap" as they open behind the wall. Pull the bolt back towards you to ensure the wings are seated against the drywall interior before tightening.
- For Molly Bolts: Insert the entire anchor assembly into the hole until it's flush. Turn the screw clockwise. You will feel resistance as the sleeve begins to expand. Continue turning until the screw is very snug. For some types, a special setting tool is used to pull the screw head and expand the sleeve more effectively.
Step 4: Fastening the Fixture
With the anchor properly set, the final step is to attach your item.
- Position the fixture over the anchor.
- Insert the screw and tighten it by hand first to ensure it's not cross-threaded.
- Finish tightening with a screwdriver or a drill on a low-torque setting.
- Crucially, do not over-tighten. Over-tightening the screw can strip the anchor's internal threads or even damage the drywall from behind, compromising the entire installation. The screw should be snug, with no "play" in the fixture.
Beyond the Basics: Advanced Considerations for Industrial and Commercial Applications
For a procurement manager, MRO buyer, or design engineer, the conversation about fasteners extends far beyond simple installation. It involves strategic sourcing, risk management, and financial efficiency.
Sourcing for Compliance and Reliability
In a commercial or industrial environment, a failed fastener is not just an inconvenience; it's a liability. The consequences can range from costly rework and equipment damage to potential OSHA violations and serious safety incidents. This is why the provenance of your components matters. Sourcing fasteners from unverified overseas suppliers introduces significant risks:
- Material Inconsistency: Lack of certification for material composition (e.g., nylon grade, steel hardness).
- Manufacturing Defects: Poor molding, inconsistent threading, and other flaws that lead to premature failure.
- Inaccurate Load Ratings: Published specifications that may not stand up to real-world testing.
Our mission at Maden.co is to mitigate these risks by championing Supply Chain Transparency. We provide direct access to over 800+ verified U.S. manufacturers, giving you confidence in the quality and traceability of every component you procure. You can learn more about our mission to champion American manufacturing here. This direct connection is fundamental to building a more resilient and reliable American supply chain.
Total Cost of Ownership (TCO) in Fasteners
The sticker price of an anchor is a misleading metric of its true cost. A professional TCO analysis includes:
TCO = Purchase Price + (Labor for Installation) + (Cost of Rework from Failures) + (Cost of Project Delays) + (Potential Liability Cost)
When viewed through this lens, a slightly more expensive, high-quality, American-made anchor almost always provides a lower TCO. The reliability reduces the likelihood of costly rework and the associated labor expenses. For large projects, predictable performance means schedules are met, avoiding the cascading costs of delays.
Streamlining Procurement for MRO and Project Needs
For an MRO buyer facing an unexpected equipment breakdown or a project manager sourcing for a new build, procurement friction is a major obstacle. The time spent searching for specific components, vetting suppliers, and managing purchase orders is a significant hidden cost. We built our platform to solve this. With over 2.5 million American-made products, we empower you to find exactly what you need, from a specific type of drywall anchor to highly specialized industrial components, all in one place.
Furthermore, we understand that large-scale MRO or capital projects require smart cash flow management. That’s why we offer a powerful strategic tool directly within our platform. When you're ready to purchase materials for your next facility upgrade or construction project, you can apply for Instant Financing at checkout to streamline your capital-intensive projects. This empowers businesses to acquire the necessary high-quality materials without delaying projects due to budget constraints.
The Maden.co Advantage: Empowering Your Procurement Process
From the simplest ribbed anchor to the most robust toggle bolt, every component plays a role in the integrity of your work. By choosing to source through Maden.co, you are not just buying a part; you are investing in a more efficient, reliable, and transparent procurement ecosystem. Our platform is built on core values designed to serve the American industrial professional: American Manufacturing Pride, Digital Innovation, and Customer Empowerment.
We are dedicated to proving that American-made is the most accessible and convenient choice. For buyers, this means unprecedented access and streamlined purchasing. For manufacturers, it means a direct channel to the businesses that need their products. Are you a U.S. manufacturer committed to quality? Register as a vendor and join the American manufacturing revival. If you have specific sourcing questions or need help finding a particular component for your next project, our team is ready to help.
Conclusion
Mastering how to mount drywall anchors is a foundational skill, but for the industrial professional, it's the starting point of a much larger conversation about quality, efficiency, and strategic sourcing. The process begins with understanding the physics of the load, moves to a careful selection of the appropriate anchor type for the specific application, and culminates in a precise, methodical installation. Each step is critical to ensuring a secure and lasting result.
Ultimately, the reliability of your work is directly tied to the quality of the components you use. By prioritizing high-quality, American-made fasteners, you reduce long-term costs, mitigate risks, and enhance the safety and integrity of your projects. At Maden.co, we are proud to be your strategic partner in this endeavor, providing the tools, access, and financial flexibility you need to build, maintain, and repair with confidence. Explore our extensive catalog of U.S.-made products today and experience a procurement process designed for the modern American industrial leader.
Frequently Asked Questions (FAQ)
1. What is the most common mistake people make when installing drywall anchors? The two most frequent errors are choosing the wrong type of anchor for the weight of the object and over-tightening the screw. Using a light-duty expansion anchor for a heavy shelf will lead to failure. Similarly, using too much force when driving the screw can strip the anchor or damage the drywall, rendering the entire installation useless. Always match the anchor to the load and tighten until snug, not beyond.
2. Can I reuse a drywall anchor if I move a fixture? It is strongly advised not to reuse most drywall anchors. Expansion-style and sleeve-type anchors are designed for a single use; removing the screw and reinserting it compromises their holding power. Molly bolts are an exception, as the anchor body remains set in the wall, allowing the screw to be removed and re-inserted. If you remove an anchor, it's best to patch the hole and use a new anchor for the new location.
3. How do I know what size screw to use with a specific anchor? The anchor's packaging or the manufacturer's specification sheet will almost always indicate the appropriate screw size (diameter and sometimes length). The screw must be large enough in diameter to properly expand the anchor and long enough to pass through the fixture you're mounting and fully engage the anchor's mechanism. Using the wrong size screw is a common cause of anchor failure.
4. Why should my business prioritize sourcing U.S.-made fasteners like drywall anchors? Prioritizing U.S.-made fasteners offers several strategic business advantages. It ensures superior quality control and material traceability, reducing the risk of product failure and liability. It strengthens your supply chain, making it more resilient to global disruptions. Finally, it supports the domestic manufacturing base, contributing to a stronger national economy. For professional applications, the reliability and peace of mind provided by a verifiably high-quality component far outweigh any minor upfront cost differences.


