Mastering the Stubborn: How to Remove a Wood Screw with a Broken Head
Table of Contents
- The Anatomy of a Frustration: Why Wood Screws Break
- Prevention: The First Line of Defense Against Broken Screws
- Assessing the Damage: Your First Steps
- Targeted Removal Techniques: From Simple to Advanced
- Repairing the Damage: Restoring Integrity
- Beyond the Breakage: The Maden.co Advantage in Proactive Procurement
- Conclusion
- Frequently Asked Questions (FAQ)
Project delays often stem from unexpected challenges, and few are as frustrating as a broken screwhead. Imagine a critical assembly halted, or a precise cabinetry project brought to a standstill, all because a seemingly innocuous fastener has failed. This common workshop vexation isn't just a minor inconvenience; it can cascade into wasted time, increased labor costs, and even compromise the structural integrity of a finished piece if not addressed correctly. The immediate impulse might be frustration, but the strategic response involves understanding the underlying causes, deploying the right tools, and knowing the systematic approaches to resolve the issue without further damage.
This comprehensive guide is designed to equip procurement managers, MRO buyers, design engineers, and business owners with the practical knowledge to tackle broken wood screws effectively. We will delve into why screws break, preventive measures to minimize future occurrences, and a step-by-step breakdown of various removal techniques, from the simplest to the most complex. Ultimately, we aim to transform a common procurement headache into an opportunity for precision and efficiency, reinforcing the critical role of quality components and expert execution in every project. Our thesis is that understanding and mastering the removal of broken screws not only saves projects but also underscores the invaluable long-term benefits of sourcing high-quality, reliable American-made components from the outset.
The Anatomy of a Frustration: Why Wood Screws Break
Before we dive into solutions, it's crucial to understand the root causes behind a broken wood screw. Recognizing these factors is the first step toward prevention, a cornerstone of efficient and reliable project execution. When a screw's head shears off or its drive cam-out, it’s often a symptom of one or more underlying issues, highlighting the delicate balance between material quality, installation technique, and environmental conditions.
Material Quality and Composition
The integrity of a screw begins with its material. Inferior materials or inconsistent manufacturing processes can lead to inherent weaknesses. Screws made from softer alloys or those with poor tempering are far more susceptible to failure under stress. When a screw head breaks, it often signifies a brittle metal that couldn't withstand the torsional forces applied during installation. For instance, a quality round slot drive brass wood screw, manufactured to stringent standards, is designed to offer a balance of strength and ductility, reducing the likelihood of catastrophic failure compared to a low-grade alternative. Similarly, for applications requiring higher corrosion resistance, like outdoor or marine environments, a meticulously crafted oval slot drive silicon bronze wood screw provides superior resilience, preventing issues that might arise from rust-induced weakening and subsequent breakage.
At Maden.co, our mission to democratize access to American manufacturing means we prioritize connecting buyers with products engineered for performance and durability. We understand that compromised material quality isn't just a manufacturing defect; it’s a direct hit to project timelines and budgets. This commitment to industrial excellence is why we partner with verified U.S. manufacturers who adhere to the highest standards, ensuring that the components you source contribute to the longevity and reliability of your assemblies.
Installation Errors
Even the highest quality screw can fail if installed improperly. Common installation errors include:
- No Pilot Hole or Incorrect Size: Driving a screw into wood without an appropriately sized pilot hole creates excessive friction and stress on the screw shaft, especially near the head. The wood fibers grip the screw too tightly, causing it to twist and snap. The pilot hole should be slightly smaller than the screw's shank diameter but larger than the root diameter.
- Overtightening: Applying too much torque, particularly with power drivers, can easily shear off the screw head. Once the screw is snug, additional force simply stresses the material beyond its elastic limit.
- Angled Driving: If a screw is driven in at an angle, it introduces uneven stress, making it prone to bending or breaking. The head is particularly vulnerable to lateral forces.
- Wrong Driver Bit: Using a driver bit that doesn't fit the screw head precisely (e.g., a worn Phillips head in a new screw, or a flathead too narrow for the slot) leads to cam-out, stripping the drive recess and making it impossible to apply torque. In extreme cases, the stress of the ill-fitting bit can weaken the head, causing it to snap.
- Lack of Lubrication: In dense hardwoods or when driving long screws, a little lubrication (like wax or soap) can significantly reduce friction, easing the screw's path and reducing the stress on its head.
Wood Type and Condition
The nature of the wood itself plays a significant role. Hardwoods (e.g., oak, maple) exert much more resistance than softwoods (e.g., pine, cedar), demanding more careful pilot hole drilling and torque management. Wood with knots or inconsistencies can also create unexpected stress points, leading to screw breakage. Furthermore, old, dry, or treated wood can be brittle, increasing the risk of splintering and screw failure.
Understanding these factors allows procurement professionals to make informed decisions when selecting fasteners. Investing in the right type of screw for the application and ensuring proper installation techniques are followed are not merely operational details; they are strategic decisions that impact the Total Cost of Ownership (TCO) and overall project success.
Prevention: The First Line of Defense Against Broken Screws
The most effective "removal" technique is often prevention. By adopting best practices in procurement and installation, you can significantly reduce the incidence of broken screw heads, saving time, money, and frustration. Our commitment to industrial excellence extends to empowering our customers with the knowledge to make smart, proactive choices.
Prioritize Quality Fasteners
The adage "you get what you pay for" holds particularly true for fasteners. Sourcing high-quality, U.S.-made screws ensures consistency in material, thread integrity, and head strength. At Maden.co, we offer over 2.5 million American-made products from our network of 800+ verified U.S. manufacturers, each meeting rigorous standards. This commitment means fewer defective parts and greater reliability in your assemblies.
Consider the application: for general woodworking where a clean, traditional aesthetic is desired, a robust flat slot drive brass wood screw from a verified American manufacturer offers both reliability and visual appeal. For projects where superior strength and corrosion resistance are paramount, such as marine applications or outdoor structures, opting for an oval slot drive silicon bronze wood screw is a strategic choice that prevents premature failure and ensures longevity. Our platform is designed to make these critical sourcing decisions straightforward, connecting you directly with the high-quality components that prevent future headaches.
Master Pilot Hole Techniques
This cannot be overstated: always drill a pilot hole.
- Correct Diameter: The pilot hole should be slightly smaller than the screw's shank diameter for softwoods, but closer to the root (inner) diameter for hardwoods to prevent splitting and reduce friction.
- Correct Depth: The pilot hole should extend at least the full length of the screw's threaded portion, or slightly deeper.
- Countersinking/Counterboring: For screws that need to sit flush or below the surface, use a countersink bit to create a tapered recess for the screw head or a counterbore bit for a flat-bottomed hole if the head needs to be hidden with a plug.
Use the Right Tools and Techniques
- Matching Driver Bits: Always use a driver bit that perfectly matches the screw head type and size. For slot drives, ensure the bit is neither too narrow nor too wide for the slot.
- Controlled Torque: When using power drills, set the clutch to an appropriate torque setting. Start low and increase as needed. For delicate work, manual screwdrivers offer better control.
- Straight Driving: Ensure the screw is driven straight into the material. Use a drill guide or a steady hand to maintain perpendicularity.
- Lubrication: For dense woods, a small amount of wax or soap on the screw threads can dramatically reduce the force required for driving, lessening the chance of snapping.
By integrating these preventive measures into your standard operating procedures, you not only avoid the immediate problem of a broken screw but also enhance the overall quality and durability of your finished products. This proactive approach aligns perfectly with Maden.co’s core values of Industrial Excellence and Supply Chain Transparency, ensuring you have reliable access to the best U.S.-made components. You can learn more about our commitment to these values and our mission to champion American manufacturing by visiting our About Us page.
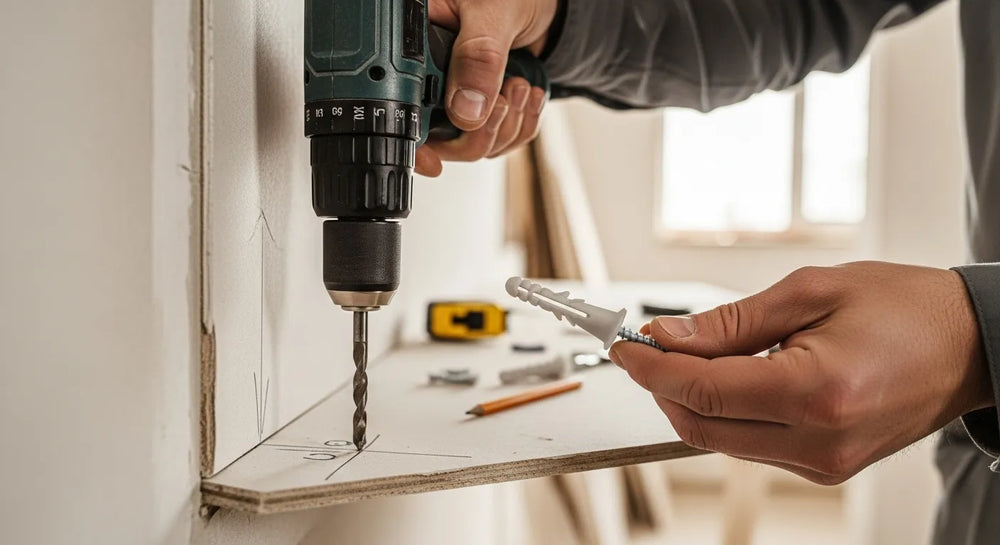
Assessing the Damage: Your First Steps
When confronted with a broken screw head, panic is counterproductive. A calm, systematic assessment will guide you to the most effective removal method, minimizing further damage to your workpiece.
Safety First
Always begin with safety. Wear appropriate personal protective equipment (PPE), including safety glasses, to protect your eyes from flying debris, especially if drilling or grinding. Gloves can protect your hands.
Clear the Work Area
Remove any sawdust, wood chips, or other debris around the broken screw. A clean work area allows for better visibility and access to the remaining screw shaft. Use a brush, compressed air, or a shop vacuum.
Analyze the Situation
Carefully examine the broken screw:
- How much of the screw shaft is exposed? Is it flush with the surface, slightly protruding, or deeply embedded?
- What type of wood is it in? Hardwoods will require more aggressive methods than softwoods.
- Is the wood around the screw damaged? Splintering or cracking might require a more delicate approach to avoid exacerbating the damage.
- What is the screw's material? Brass or softer metals will behave differently than steel. For instance, a quality round slot drive brass wood screw might be easier to grip and extract with pliers if a small portion of the shaft is exposed, due to the material's relative malleability.
This initial assessment will help you choose the least invasive and most efficient removal strategy.
Targeted Removal Techniques: From Simple to Advanced
Removing a broken wood screw requires patience, precision, and the right tools. We'll explore methods categorized by how much of the screw shaft is visible and accessible.
Method 1: When the Shaft is Still Protruding
If a small portion of the screw shaft (even just a millimeter or two) is still exposed above the wood surface, you have several options that don't involve drilling.
-
Grip with Pliers or Vice Grips:
- Needle-nose pliers: For very small, thin shafts. Grip as close to the wood surface as possible.
- Locking pliers (Vice Grips): The superior choice for most protruding shafts. Clamp them down very tightly onto the exposed shaft. The locking mechanism ensures a constant, firm grip.
- Technique: Once clamped, twist the pliers slowly counter-clockwise. Apply firm, steady pressure. If it resists, try wiggling it slightly back and forth while twisting to break any adhesion.
- Benefit: This is often the quickest and least destructive method if applicable.
- Consideration: This works best with screws that aren't severely seized or in dense hardwoods. The quality of the original flat slot drive brass wood screw you might have used can influence this, as a sturdy brass alloy provides a better surface for gripping.
-
Small Pipe Wrench: For slightly thicker, more robust screw shafts, a small pipe wrench can provide an even more secure grip than pliers. Its adjustable jaws can really bite into the shaft.
Method 2: When the Shaft is Flush or Slightly Below the Surface
When there's no visible shaft to grip, more direct action is needed.
-
Creating a New Slot:
- Rotary Tool (Dremel): With a thin cut-off wheel, carefully carve a new slot into the center of the broken screw shaft. Make sure the slot is deep and wide enough for a flathead screwdriver bit.
- Hacksaw Blade: If you have steady hands and good access, you can carefully use a hacksaw blade (removed from its frame for precision) to cut a new slot.
- Technique: Once the new slot is cut, select a flathead screwdriver bit that fits snugly. Turn slowly and firmly counter-clockwise. You may want to use a manual impact driver for an initial shock if it's very stuck, as the impact can help break the friction.
- Benefit: This method preserves the surrounding wood and often requires minimal specialized tools.
- Caveat: Requires precision to avoid damaging the wood or slipping.
-
Using a Left-Hand Drill Bit:
- Concept: These drill bits are designed to cut in a counter-clockwise direction. As they drill into the screw, they can sometimes grab the screw and unscrew it simultaneously.
-
Process:
- Center Punch: Use a center punch to create a small indentation exactly in the center of the broken screw. This prevents the drill bit from wandering.
- Drill: Select a left-hand drill bit slightly smaller than the diameter of the screw shaft. Attach it to your drill and set the drill to reverse (counter-clockwise) rotation.
- Slow Speed, Firm Pressure: Begin drilling slowly with firm, steady pressure. If the screw is not too tight, the bit may catch the screw and spin it out.
- Benefit: Can remove the screw without needing an extractor, sometimes in one step.
- Consideration: Success is not guaranteed, and if the screw doesn't come out, you've at least created a pilot hole for an extractor.
Method 3: When the Screw is Embedded or Severely Stuck – The Screw Extractor
This is often the go-to method for deeply embedded or stubborn broken screws. Screw extractors (sometimes called "easy-outs") come in various sizes and styles, but most operate on the principle of reverse-threading.
-
Prepare with a Pilot Hole:
- Center Punch: Crucial for starting your drill bit precisely in the center of the broken screw. If you don't punch accurately, the drill bit will wander, potentially damaging the wood or the screw threads further.
- Drill a Guide Hole: Using a standard drill bit (not left-hand), drill a pilot hole into the broken screw shaft. The size of this pilot hole is critical and will be specified by your screw extractor set (usually slightly smaller than the extractor itself). Drill deep enough for the extractor to get a good bite.
- Clear Debris: Ensure no metal shavings obstruct the hole.
-
Insert the Screw Extractor:
- Select Size: Choose an extractor that fits snugly into the pilot hole you've drilled.
- Tap In: Gently tap the extractor into the pilot hole with a hammer. This helps it seat firmly.
- Attach Wrench/Driver: Most extractors have a square shank, allowing you to use a tap wrench, crescent wrench, or a socket wrench.
- Twist Counter-Clockwise: Slowly and steadily turn the extractor counter-clockwise. As you turn, the reverse threads on the extractor will bite into the screw's shaft, eventually gripping it firmly and twisting the entire screw out.
- Patience is Key: Do not rush or apply excessive force, as this can break the extractor itself (a much worse problem than a broken screw!). If it's very tight, apply penetrating oil and let it soak.
Method 4: Drilling Around the Screw (for stubborn cases or when aesthetics allow)
If all else fails, or if the screw is severely corroded or rusted in place (a problem less likely with high-quality materials like the oval slot drive silicon bronze wood screw found on our marketplace), you may need to remove the wood around the screw.
-
Plug Cutter/Forstner Bit:
- Select Size: Choose a plug cutter or Forstner bit with a diameter slightly larger than the screw head/shaft.
- Drill Around: Carefully position the cutter over the broken screw and drill down, essentially creating a wood plug that contains the entire broken screw.
- Extract: Once the plug is cut, you can often remove it and the screw using pliers.
- Repair: The resulting hole can then be filled with a matching wood dowel and glue, sanded flush, and finished. This is a robust repair method, particularly useful in non-structural or aesthetic applications where a clean patch is acceptable.
Method 5: Heat Application (for metal-on-metal friction, less common for wood screws but useful for embedded parts)
While less common for wood screws, if the screw is somehow bonded or seized extremely tightly, local heat can sometimes expand the surrounding wood or metal slightly. A soldering iron held against the screw shaft for a few minutes can transfer enough heat to break the bond. This is a delicate method and should be used with caution to avoid scorching the wood.
Repairing the Damage: Restoring Integrity
Once the broken screw is successfully removed, you’ll typically be left with a hole that needs repair, especially if you used an aggressive removal method like drilling around the screw. Proper repair ensures the structural and aesthetic integrity of your project.
Filling Minor Holes
For smaller holes left by the pilot hole or minor extraction, simple solutions suffice:
- Wood Filler: High-quality wood filler, matched to your wood color, can be pressed into the hole, allowed to dry, and then sanded smooth. This is ideal for cosmetic fixes.
- Toothpicks/Dowel Bits: For holes where a new screw needs to be driven nearby, pack the hole tightly with wood glue-coated toothpicks or small slivers of wood. Once dry, cut flush and drill a new pilot hole. This provides new wood for the threads to bite into.
Repairing Larger Holes
If you had to drill out a plug of wood around the screw, a more substantial repair is needed:
- Dowel Rods: Use a dowel rod of the appropriate diameter, cut to size, and glued into the hole. Once the glue is dry, sand the dowel flush with the surrounding surface. This creates a very strong repair.
- Matching Wood Plugs: For a more seamless repair, especially in visible areas, use a plug cutter to create a plug from the same type of wood. This plug can then be glued into the hole, matching the grain as closely as possible, and sanded flush.
By carefully repairing the damage, you ensure that the frustration of a broken screw becomes a temporary setback, rather than a permanent flaw in your work.
Beyond the Breakage: The Maden.co Advantage in Proactive Procurement
The challenges posed by a broken wood screw are a microcosm of larger issues in industrial procurement: the critical need for reliability, the tangible cost of component failure, and the strategic value of quality sourcing. For procurement managers, MRO buyers, design engineers, and business owners, selecting the right components isn't just about price; it's about minimizing downtime, ensuring product longevity, and building resilient supply chains.
At Maden.co, we are driving America's manufacturing revival by democratizing access to a vast catalog of American-made components. We understand that finding a specific DIN-compliant part, an obscure fitting for an MRO repair, or a specialized fastener for a design prototype shouldn't be a scavenger hunt. Our platform connects you with over 2.5 million American-made products from our network of 800+ verified U.S. manufacturers. This means you can easily source not just standard wood screws like the reliable round slot drive brass wood screw or the flat slot drive brass wood screw, but also highly specialized components like the corrosion-resistant oval slot drive silicon bronze wood screw, all from trusted domestic sources.
Our core values—American Manufacturing Pride, Digital Innovation, Supply Chain Transparency, Industrial Excellence, and Customer Empowerment—are built into every aspect of our platform. We aim to become the definitive platform that proves American-made components are as accessible and convenient as any global alternative, directly contributing to your improved Total Cost of Ownership (TCO) and enhanced supply chain resilience.
Strategic Sourcing and Financial Flexibility
We recognize that large-volume purchases or capital-intensive projects require flexible financial solutions. That's why Maden.co offers Instant Financing, a powerful tool designed to help businesses manage cash flow effectively and make strategic procurement decisions without immediate budget constraints. This feature is seamlessly integrated into our checkout process, allowing you to apply for financing for your critical component needs, from a single specialized part to a bulk order of fasteners. You can apply for Instant Financing at checkout to streamline your capital-intensive projects, ensuring your operations remain agile and responsive to demand.
By partnering with Maden.co, you're not just buying parts; you're investing in a more reliable, efficient, and transparent procurement process. We reduce procurement friction and empower you to build with confidence, knowing your components are backed by the quality and innovation of American manufacturing. Are you a qualified U.S. manufacturer? We invite you to expand your reach and become part of our growing network. Register as a vendor and join the American manufacturing revival to connect with buyers who prioritize quality and domestic sourcing.
Conclusion
A broken wood screw head, while a minor component failure, can represent a significant hurdle in any project. Understanding the causes, implementing preventive measures, and mastering effective removal techniques are invaluable skills for anyone involved in manufacturing, construction, or maintenance. From patiently extracting a stubborn screw with specialized tools to carefully repairing the resulting hole, each step is a testament to precision and problem-solving.
Ultimately, preventing these frustrations starts with strategic sourcing. By choosing high-quality, reliable, American-made components, you invest in the integrity and longevity of your projects from the ground up. Maden.co is your strategic partner in this endeavor, providing unparalleled access to an extensive catalog of industrial components from verified U.S. manufacturers. We empower you to build more resilient supply chains, reduce procurement friction, and ensure the industrial excellence that defines American manufacturing.
Don't let a broken screw derail your progress. Explore the vast catalog of American-made products on Maden.co today, and discover how our commitment to quality, transparency, and digital innovation can transform your procurement process. From specialized fasteners to essential industrial components, we have the solutions you need. Remember, you can apply for Instant Financing at checkout to manage your cash flow for those critical, larger-volume purchases. For any specific sourcing questions or assistance, our dedicated team is ready to help; simply contact us.
Frequently Asked Questions (FAQ)
Q1: What is the most common reason a wood screw head breaks off?
A1: The most common reasons include overtightening, not drilling an appropriate pilot hole (especially in hardwoods), using the wrong driver bit which causes cam-out and stresses the head, or using screws made from inferior, brittle materials. Proper technique and quality fasteners are crucial for prevention.
Q2: Can I use super glue to reattach a broken screw head to extract the shaft?
A2: While tempting, using super glue to reattach a broken screw head is generally not an effective or reliable method for extraction. The bond strength of super glue is typically insufficient to withstand the torque required to unscrew a tight, broken shaft. It's more likely to break again immediately, potentially making the situation more difficult. It's best to use mechanical extraction methods.
Q3: How can I prevent stripping the head of a wood screw during installation?
A3: To prevent stripping, ensure you use a driver bit that perfectly matches the screw head type and size. Apply firm, consistent downward pressure while driving, and use a power drill with a clutch set to an appropriate torque. For manual driving, use a snug-fitting screwdriver and avoid excessive force. Using high-quality flat slot drive brass wood screws with well-defined slots can also significantly reduce the risk of stripping.
Q4: When should I consider calling a professional for a broken screw removal?
A4: You should consider calling a professional if the broken screw is in a critical, load-bearing, or highly visible part of a valuable piece of furniture, machinery, or structure, and your attempts with standard extraction methods are unsuccessful. Professionals often have specialized tools, greater experience with delicate materials, and techniques that can minimize damage, especially if the risk of further harm to the workpiece is high.


