How to Get Wood Plugs Out of Screw Holes: A Pro's Guide
Table of Contents
- Introduction
- Understanding Wood Plugs and Their Strategic Purpose
- Essential Tools and Materials for Safe Plug Removal
- Method 1: The Precision Drilling Method
- Method 2: The Prying and Scraping Method
- Method 3: The "Screw into the Plug" Method
- Method 4: Heat Application (as a Last Resort)
- Post-Removal Care and Hole Repair
- Preventative Measures and Best Practices
- The Maden.co Advantage: Sourcing American-Made Excellence
- Conclusion
- FAQ
Introduction
In the intricate world of industrial maintenance, repair, and operations (MRO), even seemingly minor tasks can present significant challenges. Imagine a crucial piece of equipment needing a component replacement, a historical fixture requiring restoration, or a prototype modification demanding access to a hidden fastener. Often, these fasteners are concealed beneath wood plugs, placed for aesthetic integration, protection, or structural stability. The seemingly simple act of removing these plugs without damaging the surrounding material can quickly become a time-consuming and frustrating ordeal, impacting project timelines and potentially leading to costly repairs. This guide addresses that precise challenge, offering procurement managers, MRO buyers, and design engineers a comprehensive understanding of how to efficiently and safely get wood plugs out of screw holes. We will delve into various techniques, tool selection, and best practices, demonstrating how access to quality, American-made tools and fasteners, readily available through our platform, is critical to maintaining industrial excellence and ensuring the longevity of your assets.
Understanding Wood Plugs and Their Strategic Purpose
Wood plugs are much more than mere aesthetic covers; they serve several critical functions in woodworking, manufacturing, and assembly. From concealing unsightly screw heads to protecting fasteners from corrosion or tampering, their presence is often deliberate and beneficial.
Why Plugs Are Used
- Aesthetic Integration: Plugs create a seamless, uninterrupted wood surface, particularly in high-visibility applications like cabinetry, furniture, or architectural elements, enhancing the overall finish.
- Protection: They shield screw heads from moisture, dust, and debris, preventing corrosion and extending the life of the fastener and the surrounding material. In certain industrial applications, plugs can also prevent the accumulation of contaminants in screw recesses.
- Structural Integrity: By filling the void above a screw head, plugs can sometimes contribute to the structural integrity of a joint, especially when the screw is subject to lateral forces. They can also prevent screws from backing out in high-vibration environments by physically trapping the screw head.
- Safety: In applications where exposed screw heads could snag clothing, skin, or other components, plugs provide a smooth, safe surface.
- Tamper Resistance: While not foolproof, a well-set and glued plug can make casual tampering with a fastener more difficult, adding a minor layer of security.
The Inherent Challenges of Plug Removal
Despite their benefits, removing wood plugs, especially when deeply set, tightly glued, or made of a harder wood than the surrounding material, presents a unique set of challenges:
- Concealment: The primary purpose of a plug is to blend in, making its exact location and orientation hard to discern.
- Adhesion: Many plugs are glued in place, with the adhesive bonding tightly to both the plug and the surrounding wood fibers, making extraction difficult without tearing.
- Material Brittleness: Dry, old, or thin plugs can splinter or break apart when force is applied, leaving remnants that are even harder to remove.
- Damage Risk: The greatest concern is damaging the surrounding material, which can compromise the structural or aesthetic integrity of the workpiece. This risk is amplified when working with valuable equipment or delicate finishes.
- Unknown Depth/Type of Screw: Without being able to see the fastener, it's impossible to know its type, depth, or condition, which can influence the best removal method for the plug.
Effectively navigating these challenges requires a methodical approach, the right tools, and a deep understanding of the materials involved.
Essential Tools and Materials for Safe Plug Removal
Successfully removing wood plugs with minimal damage is largely dependent on having the correct tools. Sourcing high-quality, durable tools and components is paramount for any industrial application, reducing the total cost of ownership (TCO) by minimizing re-work and equipment downtime. At Maden.co, we emphasize sourcing from verified U.S. manufacturers who meet stringent quality standards, ensuring you have reliable solutions for every task.
Basic Hand Tools: Your First Line of Defense
These are often sufficient for plugs that are not deeply set or heavily glued.
- Utility Knife/Razor Blade: For scoring around the plug's perimeter. A fresh, sharp blade is crucial.
- Thin-bladed Chisel (e.g., 1/8" or 1/4"): Essential for careful prying and carving. Precision-ground, American-made chisels offer superior edge retention and control.
- Small Flat-head Screwdriver or Awl: Can be used to gently pry or pick at the plug, especially if it's slightly raised or damaged.
- Fine-Point Tweezers or Dental Picks: Useful for extracting small fragments of wood after initial removal or for very delicate plugs.
Specialized Tools: For Stubborn Plugs and Precision Work
When basic tools aren't enough, these specialized items become indispensable.
-
Drill and Drill Bits:
- Small Pilot Bits: For creating a starting point for other tools or for controlled drilling around the plug.
- Brad-Point or Forstner Bits: These bits create clean, flat-bottomed holes, making them ideal for carefully drilling out plugs without wandering. They are vital for avoiding damage to the surrounding material. Selecting bits manufactured to high industrial standards, compliant with specifications like DIN, ensures accuracy and longevity.
- Reverse-Flute (Left-Handed) Drill Bits: These can sometimes catch the plug and spin it out as they drill, especially if the plug is slightly loose.
- Screw Extractors (Easy Outs): Once a pilot hole is drilled into the center of the plug, a screw extractor can bite into the wood and, when turned counter-clockwise, remove the plug. This is particularly effective for plugs covering metal screws, as the extractor will eventually grip the screw itself.
- Plug Cutters: While primarily used for making plugs, a plug cutter slightly larger than the existing plug can sometimes be used carefully to re-cut and define the plug's edges, making it easier to extract. This requires extreme precision to avoid damaging the surrounding material.
- Fine-Tooth Saw (e.g., Japanese Pull Saw): For plugs that are flush with the surface but need to be precisely cut out around the perimeter.
Safety Gear and Auxiliary Materials
- Safety Glasses: Always protect your eyes from flying debris.
- Work Gloves: To improve grip and protect hands.
- Masking Tape: Can be applied around the plug to protect the surrounding finish from accidental slips.
- Lubricant (e.g., WD-40, mineral oil): For plugs bonded with certain adhesives, a penetrant might help soften the bond over time. Always test on an inconspicuous area first.
- Wood Glue and Dowels/Wood Filler: For repairing any accidental damage or preparing the hole for a new plug or fastener.
By strategically sourcing these tools and materials, procurement managers can ensure their teams are equipped for success, embodying our core value of Industrial Excellence. Our mission at Maden.co is to democratize access to American manufacturing, providing a vast catalog of over 2.5 million U.S.-made products to support every phase of your operation.
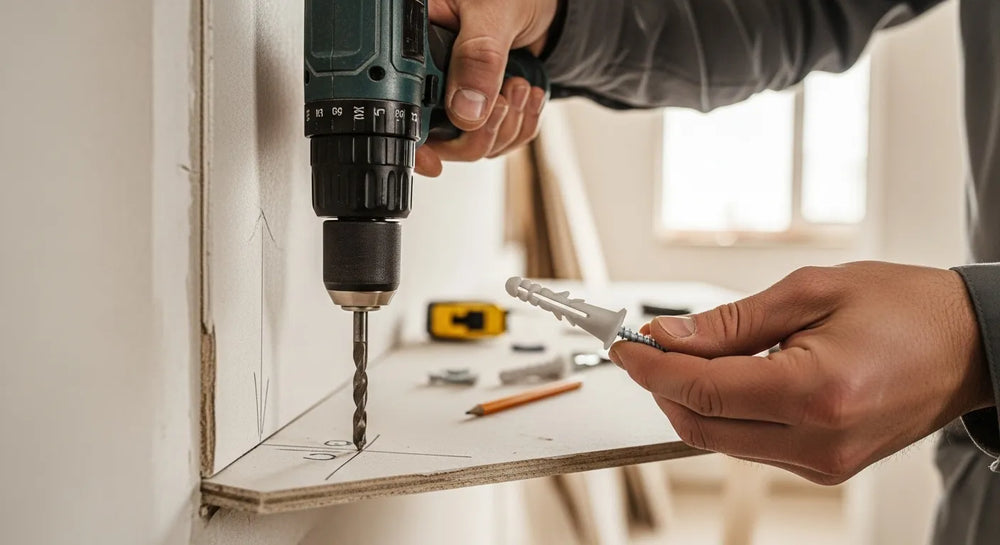
Method 1: The Precision Drilling Method
This method is particularly effective for deeply set or very stubborn plugs, especially when a screw extractor will eventually be used to engage the underlying fastener. It demands patience and precision to prevent damage.
Step-by-Step Precision Drilling
-
Preparation and Protection:
- Clean the area thoroughly to remove any dust or debris.
- Apply masking tape around the perimeter of the plug. This acts as a visual guide and helps protect the surrounding wood from errant drill bit skids or minor chipping.
- Don your safety glasses.
-
Mark the Center:
- Carefully locate the exact center of the wood plug. An awl or a sharp pencil can be used to make a small indent, providing a starting point for the drill bit and preventing it from wandering.
-
Select the Right Drill Bit:
- Choose a drill bit that is slightly smaller in diameter than the screw head you anticipate is beneath the plug, but significantly smaller than the plug itself. A brad-point bit is ideal as it creates a clean hole without walking. For specific applications requiring robust fastening after removal, considering options like a Round Slot Drive Brass Wood Screw can inform your drill bit selection for replacement.
-
Controlled Drilling Depth:
- Set a depth stop on your drill or wrap a piece of masking tape around the drill bit to mark the desired depth. This depth should be just enough to pass through the plug without touching the screw head. If the plug is thick, you might need to drill in stages.
- Begin drilling slowly and steadily, applying consistent, gentle pressure. Allow the bit to do the work. The goal is to create a clean, central hole through the plug.
-
Introducing the Screw Extractor or Reverse Drill Bit:
- Screw Extractor: Once the pilot hole is drilled, insert a suitable screw extractor (often tapered and left-handed threaded). Gently tap it into the pilot hole. Using a tap wrench or a drill on its lowest speed in reverse, slowly turn the extractor counter-clockwise. The extractor will bite into the wood of the plug and, with continuous turning, should begin to pull the plug out. If the plug is glued, the extractor may eventually grip the actual screw head, helping to loosen both the plug and the screw simultaneously.
- Reverse Drill Bit: For some plugs, a reverse-flute (left-handed) drill bit can be effective. If the plug is not overly bonded, the reverse rotation can catch the wood fibers and spin the plug out as it drills. Start with a bit slightly smaller than the plug and increase size gradually if needed.
Tips for Success with Precision Drilling:
- Slow and Steady: Rushing will almost certainly lead to damage.
- Sharp Bits are Key: Dull bits generate heat, burn the wood, and are more likely to wander. Invest in high-quality drill bits from trusted U.S. manufacturers.
- Clear Debris: Periodically pull the drill bit out to clear sawdust from the hole, especially when drilling through hardwoods.
Method 2: The Prying and Scraping Method
This method is best suited for plugs that are flush or slightly proud of the surface, or those that have a visible seam. It requires a delicate touch and sharp tools to avoid marring the surrounding material.
Step-by-Step Prying and Scraping
-
Initial Scoring:
- Using a very sharp utility knife or razor blade, carefully score around the perimeter of the wood plug. This helps to break any paint or finish adhesion and defines the plug's edge, minimizing tear-out of the surrounding wood. Angle the blade slightly inwards towards the center of the plug.
- For tougher plugs or those with clear grain, a fine-tooth saw (like a Japanese pull saw) can be used to carefully cut a thin line around the plug, but this is a very advanced technique requiring immense control.
-
Gentle Leverage:
- Take a thin-bladed chisel (e.g., 1/8" or 1/4") or a very small, sturdy flat-head screwdriver.
- Carefully insert the tip into the scored line, preferably where the wood grain of the plug runs perpendicular to the grain of the surrounding material, as this often creates a weaker seam.
- Apply very gentle, incremental leverage. The goal is to create a tiny gap, not to pry forcefully. Work your way around the plug, trying to lift it evenly.
-
Picking and Scraping:
- As a gap forms, use the chisel to gently scrape away small fragments of the plug, working from the edge towards the center.
- If the plug begins to lift, you might be able to use fine-point tweezers or a dental pick to grasp an edge and pull it out.
- For very thin plugs, a small, strong rare-earth magnet can sometimes lift a metal screw head and, in turn, pull a loosely set plug with it.
Tips for Success with Prying and Scraping:
- Sharp Tools: A dull chisel or knife will crush fibers rather than cut them cleanly, increasing the risk of damage. Regularly sharpen your tools.
- Patience is a Virtue: This method relies on slow, deliberate actions. Aggressive prying will inevitably cause damage.
- Leverage Point: If possible, use a thin piece of scrap wood or cardboard under your prying tool to protect the surface, especially on finished items.
Method 3: The "Screw into the Plug" Method
This ingenious method is highly effective for plugs that are well-seated but not excessively glued, offering a simple way to create a handle for extraction. It often works best with slightly softer wood plugs.
Step-by-Step "Screw into the Plug"
-
Mark the Center:
- Similar to the drilling method, use an awl or punch to create a small indentation at the exact center of the wood plug. This will guide your screw and prevent it from wandering.
-
Select an Appropriate Screw:
- Choose a high-quality wood screw with a sharp point and coarse threads. The screw should be long enough to bite firmly into the plug without reaching the underlying fastener. For instance, a Flat Slot Drive Brass Wood Screw or an Oval Slot Drive Silicon Bronze Wood Screw would be excellent choices due to their robust construction and sharp threads, ensuring good grip without stripping. The brass or silicon bronze construction of these American-made screws also ensures durability and resistance to deformation during extraction.
-
Carefully Drive the Screw:
- Using a hand screwdriver (or a drill on a very low torque setting), carefully drive the selected screw into the center of the wood plug.
- Go slowly, ensuring the screw threads are engaging firmly with the plug material. Drive it just enough so that it feels secure and has a good "bite" – typically half to two-thirds of the plug's thickness. Avoid driving it so deep that it bottoms out or touches the hidden screw beneath.
-
Leverage for Extraction:
- Once the screw is firmly embedded, use it as a handle.
- With pliers, a claw hammer (using a protective block of wood underneath), or even just your fingers, gently pull up on the head of the newly inserted screw.
- The friction and grip of the screw's threads should pull the wood plug straight out. If the plug is large or very tight, you might need to gently rock the screw side-to-side while pulling upwards.
Tips for Success with the "Screw into the Plug" Method:
- Avoid Over-Tightening: Driving the screw too deep or too fast can cause the plug to split or push it deeper into the hole, making removal harder.
- Quality Screws: Using inferior screws can result in stripped heads or broken shafts, complicating the removal process. Trust in the quality of American-made fasteners available through Maden.co, like the Round Slot Drive Brass Wood Screw, to perform reliably in demanding situations.
- Protect the Surface: Always use a protective pad or scrap wood if you're leveraging against the surrounding material with a hammer or pry bar.
Method 4: Heat Application (as a Last Resort)
This method should be used with extreme caution and only as a last resort, particularly for plugs secured with tenacious adhesives. Heat can damage finishes, scorch wood, and release fumes from adhesives.
Step-by-Step Heat Application
-
Ventilation and Safety:
- Ensure the work area is extremely well-ventilated.
- Wear heat-resistant gloves and safety glasses. Have a fire extinguisher or a bucket of water nearby.
- Remove any flammable materials from the immediate vicinity.
-
Controlled Heat Source:
- Use a low-setting heat gun, a soldering iron with a flat tip, or even a hair dryer on a high setting. Avoid open flames.
-
Targeted Application:
- Apply heat very carefully and incrementally to the surface of the wood plug. The goal is to soften the adhesive beneath the plug, not to burn the wood.
- Move the heat source constantly to avoid scorching a single spot.
- If using a soldering iron, briefly touch the tip to the center of the plug for a few seconds, then remove and test.
-
Test and Pry:
- After 30-60 seconds of heat application, gently attempt to pry the plug out using a thin chisel or utility knife (as described in Method 2).
- If the plug doesn't budge easily, reapply heat for short intervals and retest. Do not force it.
- You might notice a slight softening of the wood or a change in the adhesive's texture.
Critical Cautions for Heat Application:
- Wood Scorching: Overheating will burn the wood, creating an irreparable dark mark.
- Adhesive Fumes: Many industrial adhesives can release toxic fumes when heated. Ensure adequate respiratory protection if necessary.
- Finish Damage: Heat will almost certainly damage varnishes, lacquers, paints, and other finishes on the surrounding material. Factor this into your decision.
- Flammability: Wood is flammable. Proceed with extreme caution.
This method requires a high degree of technical understanding and a clear assessment of the risks versus rewards. In scenarios where such delicate procedures are necessary, ensuring you have access to specialized tools and components from trusted U.S. manufacturers is crucial. Our dedication to Supply Chain Transparency at Maden.co means you can always trace the origin and quality of your industrial supplies, a vital consideration for high-stakes repairs.
Post-Removal Care and Hole Repair
Once the stubborn wood plug has been successfully removed, the job isn't quite finished. Proper post-removal care and, if necessary, hole repair are essential for restoring the integrity and aesthetics of the workpiece. This stage also highlights the importance of having readily available, high-quality replacement parts and materials.
Cleaning the Screw Hole
- Clear Debris: Use a small brush, compressed air, or a vacuum cleaner to remove all sawdust, adhesive residue, and wood fragments from the screw hole. A clean hole is crucial for any subsequent repair or re-installation.
- Inspect for Damage: Carefully examine the edges of the hole and the screw threads (if visible). Look for splintering, cracks, or damage to the surrounding wood.
Assessing and Repairing Damage
Even with the most careful techniques, minor damage can occur.
- Minor Chipping/Splintering: If the damage is minimal, it can often be repaired with a small amount of wood glue. Apply glue to the splinters, press them back into place, and clamp lightly until dry.
-
Enlarged or Stripped Hole: If the original screw hole is too large or has stripped threads, you have several options:
- Wood Filler: For non-structural applications, a high-quality wood filler (epoxy-based or cellulose-based) can fill the hole, which can then be sanded and drilled for a new screw.
- Dowel Insertion: For a stronger repair, especially when re-inserting a screw, drill out the damaged hole to a larger, clean diameter. Insert a wooden dowel (matched in wood type if possible) with wood glue. Once dry, cut flush, sand, and then drill a new pilot hole for your replacement screw.
- Matching Finish: If the surrounding area's finish was disturbed, plan for touch-up or refinishing. This requires careful color matching and application techniques.
Selecting New Fasteners and Plugs
This is where Maden.co truly shines as a strategic partner. After removal, you might need:
- Replacement Screws: Whether for industrial machinery, custom fixtures, or architectural elements, selecting the correct screw type, material, and size is critical. Factors like material compatibility, load bearing, and environmental resistance (e.g., corrosion resistance of brass or silicon bronze) must be considered. Our platform offers a vast selection of American-made fasteners designed to meet rigorous industrial standards. For high-quality, durable solutions, consider exploring our extensive catalog.
- New Plugs: If the original aesthetic is desired, you'll need new plugs. These can be purchased pre-made or cut from matching stock using a plug cutter. Ensure the wood type and grain direction match for optimal concealment.
Our entire business model is built on this principle; you can learn more about our mission to champion American manufacturing here: About Us. We ensure that every component you need for repair, replacement, or new construction is just a click away, backed by our commitment to American Manufacturing Pride and Customer Empowerment.
Preventative Measures and Best Practices
While knowing how to remove wood plugs is valuable, preventing unnecessary difficulties in the first place is even better. Implementing best practices during initial installation can significantly reduce future procurement friction and maintenance headaches.
Proper Plug Installation Techniques
- Minimal Adhesive: When gluing plugs, use adhesive sparingly. A small bead around the perimeter or a single drop in the center is usually sufficient to hold the plug without creating an unbreakable bond. Excess glue can seep into the surrounding wood and make removal incredibly challenging.
- Grain Alignment: Whenever possible, align the grain of the wood plug with the grain of the surrounding material. While primarily for aesthetics, this can also influence how cleanly a plug can be removed if needed.
- Controlled Depth: Ensure plugs are set at the correct depth – either flush with the surface or slightly below, depending on the desired finish. Over-driving a plug can compact the wood, making it harder to extract.
- Document Plug Locations: For critical machinery or custom-built components, maintain accurate documentation or schematics that clearly indicate the location of concealed fasteners. This invaluable practice saves significant time and prevents exploratory damage during future maintenance.
The Importance of Quality Tools and Fasteners
The foundation of any successful project, from initial assembly to eventual repair, lies in the quality of the components used. This is particularly true for items like wood screws and the tools employed for their installation and removal.
- Reliability and Durability: High-quality, American-made tools are engineered for precision and longevity. They withstand the rigors of industrial use, offering consistent performance and reducing the frequency of replacement. This directly contributes to a lower Total Cost of Ownership (TCO).
- Precision and Consistency: Tools and fasteners manufactured to strict standards ensure consistent dimensions and superior material properties. This precision is critical for tasks like drilling, where even a slight deviation can lead to damaged components. When you need to trust that a screw, like a Flat Slot Drive Brass Wood Screw, will perform exactly as specified, sourcing from verified U.S. manufacturers is essential.
- Supply Chain Resilience: Partnering with U.S. manufacturers through platforms like Maden.co enhances your supply chain resilience. It reduces reliance on volatile international shipping, minimizes lead times, and supports local economies. This strategic advantage is a cornerstone of our vision: to become the definitive platform that proves American-made components are as accessible and convenient as any global alternative, driving the manufacturing revival with our tagline: "America's manufacturing revival is here."
- Customer Empowerment: By providing access to a vast network of verified U.S. manufacturers, we empower procurement managers and business owners to make informed choices, ensuring they have the right tools and parts for every job. This commitment to Digital Innovation makes sourcing efficient and transparent.
For any MRO buyer, design engineer, or business owner, the ability to quickly find and finance a verified, U.S.-made part is a game-changer. From specific Oval Slot Drive Silicon Bronze Wood Screw for corrosion-resistant applications to specialized drilling bits, our platform offers the solutions you need to maintain operational continuity and uphold the highest standards of quality. If you are a U.S. manufacturer producing these critical components or tools, we invite you to register as a vendor and join the American manufacturing revival: Register as a vendor.
The Maden.co Advantage: Sourcing American-Made Excellence
For procurement professionals, the challenge of getting wood plugs out of screw holes is just one facet of a broader mission: ensuring reliable, efficient, and cost-effective access to critical industrial components and tools. This is precisely where Maden.co delivers unparalleled value.
Streamlining Your Procurement Process
We understand the pressures faced by MRO buyers and design engineers – the need for speed, the demand for quality, and the non-negotiable requirement for compliance with industry standards. Our platform simplifies this complexity by connecting you directly with over 800+ verified U.S. manufacturers, offering a curated selection of over 2.5 million American-made products.
- Reduced Procurement Friction: Gone are the days of navigating fragmented supply chains or sifting through unreliable international suppliers. Maden.co provides a centralized, transparent marketplace, dramatically reducing the time and effort required to source specific items, whether it's a specialty drill bit or a custom fastener.
- Enhanced Supply Chain Resilience: By prioritizing U.S.-made products, we help businesses build more robust and predictable supply chains, minimizing disruptions caused by geopolitical events, shipping delays, or fluctuating international regulations. This aligns perfectly with our core value of Supply Chain Transparency.
- Improved Total Cost of Ownership (TCO): While the initial price of a component is a factor, the long-term costs associated with quality, durability, and availability are far more significant. Sourcing high-quality, American-made products through Maden.co reduces failures, extends asset life, and minimizes re-work, ultimately lowering your TCO.
Instant Financing: A Strategic Tool for Smart Procurement
A key differentiator for our platform is our "Instant Financing" option. We recognize that industrial procurement often involves significant capital outlay, and cash flow management is a constant priority for businesses.
- Empowering Larger Purchases: Instant Financing is not just a payment method; it's a strategic tool designed to empower procurement managers and business owners. It allows you to make larger volume purchases, take advantage of bulk pricing, or acquire necessary tools and components for capital-intensive projects without tying up immediate working capital.
- Streamlined Capital Management: This feature provides the flexibility needed to respond quickly to unexpected MRO needs or to invest in new equipment and materials for design and production. It ensures that critical projects aren't delayed due to budgetary constraints, enhancing operational agility.
- Seamless Integration: You can apply for Instant Financing directly at checkout, making the process smooth and efficient, allowing you to focus on your projects rather than administrative hurdles. This feature is a testament to our commitment to Digital Innovation and Customer Empowerment.
At Maden.co, we are more than just a marketplace; we are a strategic partner in America's manufacturing revival. Our dedication to American Manufacturing Pride means we connect you with the finest quality products, ensuring that your projects, whether they involve delicate wood plug removal or large-scale industrial assembly, are built on a foundation of excellence. If you have specific sourcing questions or need assistance finding a particular tool or component, our expert team is ready to help: Contact Us.
Conclusion
The seemingly small task of getting wood plugs out of screw holes can evolve into a significant challenge, impacting project timelines and potentially causing costly damage. However, with the right techniques, appropriate tools, and a commitment to quality, this task can be approached with confidence and precision. Whether you employ the precision drilling method, the careful prying and scraping technique, or the ingenious "screw into the plug" approach, understanding the nuances of each method is key to success. Post-removal care and preventive measures further solidify a robust approach to industrial maintenance and repair.
At Maden.co, we believe that success in manufacturing and MRO is built on a foundation of quality, reliability, and accessibility. By providing direct access to over 2.5 million American-made products from verified U.S. manufacturers, we empower procurement managers, MRO buyers, and design engineers to overcome challenges, enhance supply chain resilience, and achieve industrial excellence. Don't let minor tasks become major headaches. Explore our extensive catalog of high-quality tools, fasteners, and industrial components today at Maden.co and experience the Maden.co advantage. For larger projects or immediate needs, remember you can apply for Instant Financing at checkout to streamline your capital-intensive projects and keep America's manufacturing revival moving forward.
FAQ
Q1: What is the most common mistake when trying to remove wood plugs? A1: The most common mistake is impatience and using excessive force. This often leads to splintering the plug, damaging the surrounding wood, or stripping the plug entirely, making subsequent removal even more difficult. A methodical, gentle approach with sharp, appropriate tools is always recommended.
Q2: How can I tell if a wood plug is glued in or just friction-fit? A2: While it's often hard to tell definitively without attempting removal, a glued plug will typically feel extremely rigid and offer no initial give when gently probed or twisted. Friction-fit plugs might have a slight amount of play or be easier to dislodge with a sharp, thin tool inserted along the seam. Heat application (with extreme caution) might also reveal the presence of certain adhesives.
Q3: What should I do if I accidentally damage the wood around the plug during removal? A3: For minor damage like small splinters, wood glue can be applied, and the splinters pressed back into place. For larger damage, wood filler can be used, or the area can be drilled out and filled with a matching wood dowel, then sanded smooth before refinishing or re-drilling for a new fastener. Always try to match the wood species and grain if possible for the best aesthetic outcome.
Q4: Is it always necessary to replace a removed plug with a new one? A4: Not always. If the plug was primarily for aesthetic purposes and the item is in a low-visibility area, or if the screw head beneath does not require protection, it might be left open. However, if the screw needs protection from corrosion, if structural integrity is a concern, or if a clean finish is desired, replacing the plug or filling the hole with wood filler is advisable.


